In an era where online privacy and security are paramount concerns, Virtual Private Network (VPN) connections serve as indispensable tools for safeguarding sensitive data and ensuring secure communication over the internet. Windows 7 offers robust support for VPN connections, enabling users to establish encrypted tunnels to remote networks and access resources securely from anywhere in the world. In this exhaustive guide, we will embark on a journey to demystify the process of setting up a VPN connection in Windows 7, exploring its intricacies and providing step-by-step instructions for establishing a secure and private connection.
Understanding VPN Connections:
Before delving into the process of setting up a VPN connection, let’s first grasp the concept and significance of VPN technology:
- Definition: A Virtual Private Network (VPN) is a secure and encrypted connection that allows users to access resources on a remote network over the internet. It creates a private tunnel between the user’s device and the VPN server, ensuring confidentiality and integrity of data transmission.
- Privacy and Security: VPN connections provide an additional layer of privacy and security by encrypting data transmitted over public networks, such as the internet. This safeguards sensitive information from eavesdroppers, hackers, and other malicious actors.
- Remote Access: VPN connections enable users to access resources on a remote network as if they were physically present in the same location. This facilitates remote work, access to geographically restricted content, and secure communication across distributed networks.
Setting Up a VPN Connection in Windows 7:
Now, let’s explore the step-by-step process of setting up a VPN connection in Windows 7:
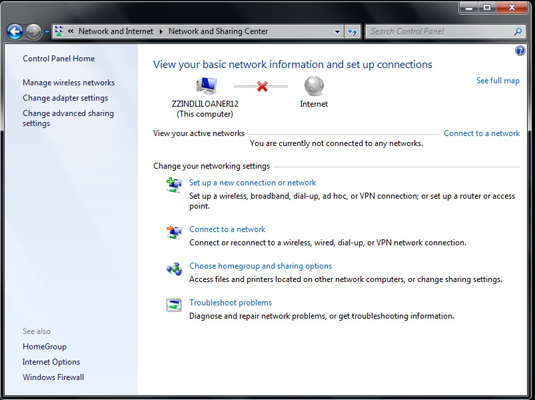
- Accessing Network and Sharing Center:
- Click on the Start button in the taskbar.
- Navigate to “Control Panel” > “Network and Sharing Center.”
- Setting Up a New Connection:
- In the Network and Sharing Center, click on “Set up a new connection or network” in the left pane.
- Select “Connect to a workplace” and click “Next” to proceed.
- Choosing Connection Type:
- Choose the option to “Use my Internet connection (VPN)” and click “Next.”
- Entering VPN Server Details:
- Enter the Internet address of the VPN server you want to connect to in the “Internet address” field.
- Optionally, enter a destination name for the connection in the “Destination name” field.
- Click “Next” to continue.
- Entering User Credentials:
- Enter your username and password for the VPN connection in the respective fields.
- Optionally, check the box to remember your credentials for future connections.
- Click “Create” to create the VPN connection.
- Connecting to the VPN:
- Once the VPN connection is created, return to the Network and Sharing Center.
- Click on “Connect to a network” and select the VPN connection you just created from the list.
- Enter your username and password if prompted, and click “Connect” to establish the VPN connection.
Advanced Features and Tips:
To further optimize your VPN connection and enhance security and performance in Windows 7, consider the following advanced features and tips:
- Configuring VPN Properties:
- Customize VPN properties, such as security protocols, encryption methods, and authentication settings, to align with your organization’s security policies and requirements.
- Access VPN properties by right-clicking on the VPN connection in the Network and Sharing Center and selecting “Properties.”
- Using Split Tunneling:
- Enable split tunneling to route only specific traffic through the VPN connection while allowing other traffic to access the internet directly.
- Configure split tunneling settings in the VPN properties to optimize bandwidth usage and improve performance.
- Enabling Automatic Reconnection:
- Configure the VPN connection to automatically reconnect if the connection is lost or interrupted.
- Enable the “Reconnect if the connection is dropped” option in the VPN properties to ensure uninterrupted access to remote resources.
- Monitoring Connection Status:
- Monitor the status of the VPN connection and view connection details, such as connection duration and data transmitted.
- Access connection status and statistics by clicking on the network icon in the system tray and selecting the VPN connection.
Conclusion:
Setting up a VPN connection in Windows 7 is a straightforward process that enables users to establish secure and private connections to remote networks with ease. By following the comprehensive guide outlined above, users can configure VPN connections to access resources securely, protect sensitive data, and ensure confidentiality of communication over the internet. Whether it’s for remote work, accessing corporate networks, or bypassing geo-restrictions, Windows 7 provides users with the tools and capabilities to harness the power of VPN technology effectively. So take control of your online privacy and security today, set up a VPN connection with confidence, and enjoy secure and unrestricted access to remote resources in Windows 7.
