In the realm of document design, visual elements play a pivotal role in enhancing readability, engagement, and aesthetic appeal. Text boxes, in particular, serve as versatile tools for highlighting key information, organizing content, and creating visually engaging layouts. By incorporating shadow effects into text boxes, you can add depth, dimension, and visual interest to your documents, creating a polished and professional look. In this extensive guide, we’ll explore the intricacies of inserting text boxes with shadow effects in Microsoft Word, empowering you to elevate your document design with style and precision.
Understanding the Significance of Shadow Effects:
Before delving into the practical aspects of inserting text boxes with shadow effects, it’s crucial to grasp the significance of these visual enhancements in document design. Shadow effects serve multiple purposes, including:
- Adding depth and dimension: Shadow effects create the illusion of depth and dimensionality, making text boxes appear elevated or floating above the page surface.
- Enhancing visual contrast: Shadows provide visual contrast between text boxes and the background, making them stand out and capturing the reader’s attention.
- Creating a sense of realism: By simulating the play of light and shadow, shadow effects contribute to a sense of realism and dynamism in document design.
By incorporating shadow effects into text boxes, you can create visually appealing and immersive document layouts that captivate your audience and convey information effectively.
Basic Text Box Insertion with Shadow Effect:
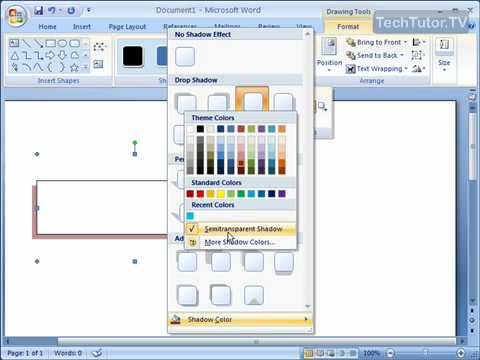
Inserting a text box with a shadow effect in Microsoft Word is a straightforward process that can be accomplished using built-in tools and features. Here’s how to do it:
- Access Text Box Options:
- Open Microsoft Word and navigate to the “Insert” tab located in the top menu bar.
- In the “Text” group, click on the “Text Box” button to access text box options.
- Draw or Insert Text Box:
- Choose the desired text box style from the dropdown menu, or select “Draw Text Box” to create a custom text box shape.
- Click and drag to draw the text box on the page or click once to insert a predefined text box shape.
- Format Text Box:
- With the text box selected, navigate to the “Format” tab, which appears when the text box is selected.
- In the “Shape Styles” group, click on the “Shape Effects” button to access shadow effect options.
- Apply Shadow Effect:
- In the dropdown menu, choose the desired shadow effect from options such as “Outer,” “Inner,” or “Perspective.”
- Customize the shadow effect by adjusting parameters such as color, transparency, distance, and blur radius.
Advanced Shadow Effect Customization:
While basic shadow effect insertion suffices for most scenarios, Microsoft Word offers advanced features and customization options to further enhance the appearance and functionality of text boxes with shadows. Here are some additional features you may explore:
- Experiment with Shadow Styles:
- Word provides a variety of shadow styles and presets to choose from, including soft shadows, hard shadows, and blurred shadows.
- Experiment with different shadow styles to achieve the desired visual effect and mood for your document layout.
- Adjust Shadow Parameters:
- Customize the properties of the shadow effect, such as angle, distance, size, transparency, and blur, to fine-tune the appearance of the shadow.
- Access the “Shadow Options” menu to adjust these parameters manually or choose from predefined presets.
- Layering and Grouping:
- For complex document layouts, Word allows users to layer and group text boxes with shadow effects to create intricate designs or arrange content within the document.
- Use the “Group” or “Arrange” options in the formatting menu to manipulate text boxes with shadows as needed.
Best Practices for Shadow Effect Usage:
While shadow effects offer versatility and visual appeal in document design, it’s essential to use them judiciously and in accordance with best practices. Here are some tips to consider:
- Maintain Consistency:
- Use consistent shadow effects throughout the document to ensure visual coherence and professionalism. Consistent formatting enhances readability and visual appeal.
- Avoid Overuse:
- Avoid applying shadow effects excessively, as this can overwhelm the reader and detract from the readability of the document.
- Use shadow effects sparingly to highlight key information or create visual interest without overwhelming the content.
- Consider Accessibility:
- When using shadow effects, consider accessibility guidelines to ensure that the content remains accessible to all users, including those with visual impairments.
- Use shadow effects judiciously and consider providing alternative text or descriptions for text boxes with shadows to aid understanding.
Conclusion:
Inserting text boxes with shadow effects in Microsoft Word is a powerful way to enhance document design and visual appeal. By mastering the basic insertion process, exploring advanced customization options, and adhering to best practices for shadow effect usage, you can create documents that are not only visually appealing and engaging but also professional and polished. Whether you’re creating reports, presentations, or marketing materials, text boxes with shadows offer a versatile and effective means of highlighting key information, organizing content, and creating visually captivating layouts. So, the next time you embark on a document creation journey in Word, remember to leverage the power of shadow effects to elevate your document design with style and precision, and make a lasting impression on your audience.
