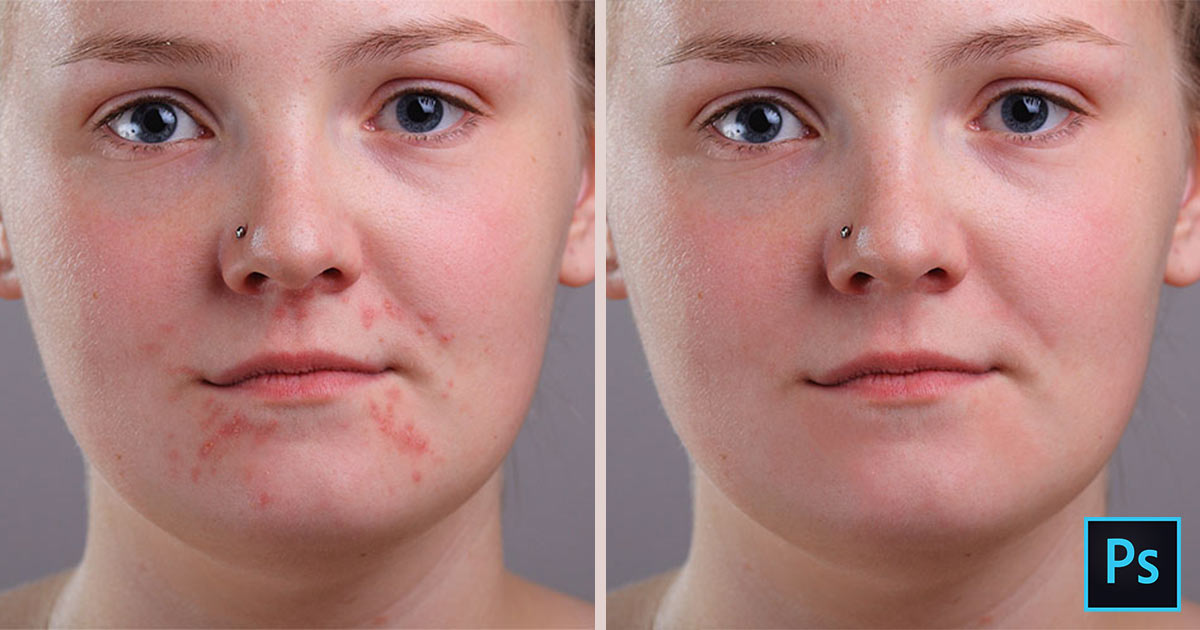
Introduction:
In the realm of digital photography and image editing, achieving flawless skin is a pursuit that often involves meticulous retouching techniques. Among the arsenal of tools available in Adobe Photoshop, the Spot Healing Brush stands out as a powerful and versatile instrument for erasing acne, blemishes, and imperfections. This comprehensive guide will meticulously walk you through the step-by-step process of using the Spot Healing Brush to remove acne and skin blemishes in Photoshop, empowering you to unveil the radiant beauty beneath the imperfections.
Section 1: Understanding the Spot Healing Brush
1.1 Introduction to the Spot Healing Brush:
- The Spot Healing Brush is a retouching tool in Photoshop designed to seamlessly blend textures and colors, making it ideal for removing small imperfections like acne, pimples, and skin blemishes.
1.2 Key Features of the Spot Healing Brush:
- The Spot Healing Brush is equipped with content-aware technology, allowing it to intelligently sample surrounding pixels and automatically generate a healing effect. This feature simplifies the retouching process and produces natural-looking results.
Section 2: Preparing Your Image for Retouching
2.1 Opening Your Image in Photoshop:
- Launch Adobe Photoshop and open the image you wish to retouch. Ensure that you are working on a duplicate layer to preserve the original image and maintain a non-destructive editing workflow.
2.2 Zooming In for Precision:
- To achieve accurate and detailed retouching, zoom in on the areas of the image containing acne or blemishes. This allows you to work at a pixel level, ensuring precise corrections.
Section 3: Selecting the Spot Healing Brush
3.1 Locating the Spot Healing Brush:
- In the Photoshop toolbar, locate the Spot Healing Brush icon. It resembles a bandaid and is typically grouped with other healing tools like the Healing Brush and Patch Tool.
3.2 Adjusting Brush Settings:
- Right-click on the image to access the brush settings. Adjust the brush size to match the size of the blemish you are addressing. For larger areas, a larger brush size is recommended, while smaller blemishes may require a smaller brush.
Section 4: Healing Acne and Blemishes
4.1 Single Click Technique:
- With the Spot Healing Brush selected, simply click on the acne or blemish you want to remove. The tool automatically analyzes the surrounding pixels and blends them seamlessly, erasing the imperfection.
4.2 Stroke Technique for Larger Areas:
- For larger areas affected by acne or blemishes, use the Spot Healing Brush in a stroke motion. Click at one end of the area and, while holding down the mouse button, drag the brush over the blemished region. Release the mouse button, and Photoshop will intelligently blend the pixels.
Section 5: Addressing Different Types of Blemishes
5.1 Dealing with Redness and Inflammation:
- When dealing with red or inflamed acne, adjust the brush’s hardness to ensure a softer blending effect. This prevents harsh transitions between healed and unaffected skin, creating a more natural appearance.
5.2 Handling Dark Spots and Scars:
- For dark spots or scars, consider creating a new layer and using the Spot Healing Brush on this layer. This approach preserves the original image and provides additional flexibility for refining the healing effect.
Section 6: Fine-Tuning the Healing Process
6.1 Refining Edges and Transitions:
- After using the Spot Healing Brush, zoom in and inspect the edges of the healed areas. Use a soft brush or the Eraser tool to refine any edges that may appear unnatural or overly smooth.
6.2 Adjusting Opacity for Subtlety:
- To achieve a more subtle and natural look, consider reducing the opacity of the healing layer. This allows some of the original skin texture to show through, avoiding a plastic or overly retouched appearance.
Section 7: Batch Processing for Efficiency
7.1 Using the Healing Brush in Batch:
- If your image has multiple acne or blemish spots, Photoshop provides a batch processing feature. Create a new layer for each spot, apply the Spot Healing Brush, and repeat the process for efficiency.
7.2 Maintaining Consistency:
- While batch processing, maintain consistency in brush settings and opacity levels to ensure uniformity in the retouched areas. This approach yields a professional and cohesive result.
Section 8: Additional Retouching Techniques
8.1 Combining Spot Healing with Other Tools:
- For complex skin retouching, consider combining the Spot Healing Brush with other tools like the Healing Brush, Clone Stamp, or Frequency Separation. Each tool has its strengths, and their strategic combination can achieve impeccable results.
8.2 Dodging and Burning for Dimension:
- To add dimension to the skin, incorporate dodging and burning techniques. Lightly dodge areas that catch light and burn areas with shadows, enhancing the three-dimensional appearance of the skin.
Section 9: Reviewing and Saving Your Work
9.1 Zooming Out for Overall Assessment:
- Zoom out and assess the overall image to ensure that the retouched areas seamlessly integrate with the rest of the skin. Check for any anomalies or inconsistencies that may require additional attention.
9.2 Saving a High-Quality Image:
- Once satisfied with the retouching, save your image in a high-quality format such as JPEG or PNG. Consider creating a new version of the file to preserve the original, untouched image.
Section 10: Practicing Ethical Retouching
10.1 Maintaining Realism: – While retouching is a powerful tool, it’s crucial to maintain a sense of realism. Avoid excessive retouching that leads to an artificial appearance, as this can detract from the authenticity of the image.
10.2 Celebrating Natural Beauty: – Embrace the natural beauty of imperfections. Not every blemish needs to be removed, and some features contribute to the uniqueness and character of an individual. Practice retouching with the goal of enhancing rather than completely altering.
Conclusion: Unveiling Confidence Through Retouching
The Spot Healing Brush in Photoshop is a gateway to unveiling the confidence and radiance that lie beneath minor imperfections. This comprehensive guide has equipped you with the skills to navigate the nuances of acne and blemish removal, fostering a balance between digital retouching and the celebration of natural beauty. As you embark on your journey of skin retouching, remember that every stroke with the Spot Healing Brush is an opportunity to reveal the authentic glow within, ensuring that the final image reflects both perfection and individuality. Welcome to the world where digital retouching becomes a tool for empowering confidence and self-expression in the realm of photography and visual storytelling.