Introduction:
In the ever-expanding digital landscape, the ability to seamlessly connect and access resources across a network is paramount. Windows 10, with its user-friendly interface, offers a robust feature known as “Mapping a Network Drive,” empowering users to establish convenient links to shared folders or network-attached storage. This extensive guide will meticulously walk you through the step-by-step process of mapping a network drive in Windows 10, facilitating efficient data sharing, collaboration, and resource accessibility.
- Understanding the Significance of Mapping a Network Drive: Mapping a network drive is a fundamental practice for streamlining access to shared resources. By assigning a drive letter to a network location, users can treat it like a local drive, simplifying file management and enhancing overall productivity.
- Ensuring Network Connectivity: Before proceeding with mapping a network drive, ensure that your Windows 10 device is connected to the network. Verify network connectivity by checking Wi-Fi or Ethernet status in the taskbar. A stable connection is essential for seamless mapping.
- Identifying the Network Location: Determine the network location or shared folder you want to map as a drive. This could be a folder on another computer, a network-attached storage (NAS) device, or a shared resource on a server. Obtain the network path, often in the format “\computer\share” or “\IP_address\share.”
- Accessing File Explorer: Open File Explorer on your Windows 10 device. This can be done by clicking on the folder icon in the taskbar or using the shortcut Win + E. File Explorer serves as the gateway for managing files, folders, and network connections on your system.
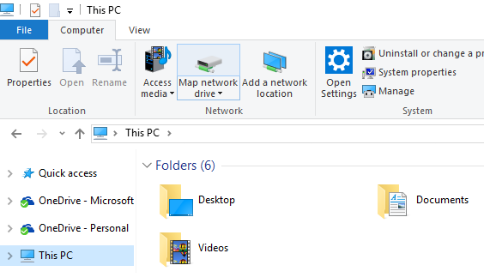
- Navigating to “This PC” in File Explorer: In File Explorer, navigate to “This PC” on the left-hand side. This section displays all drives, including mapped network drives, and provides a clear overview of your system’s storage resources.
- Initiating the Map Network Drive Wizard: On the “This PC” tab, locate the “Computer” ribbon at the top. Click on the “Computer” tab and select “Map network drive” from the toolbar. This action initiates the Map Network Drive wizard, guiding you through the steps of creating a mapped network connection.
- Choosing a Drive Letter: In the Map Network Drive wizard, choose an available drive letter from the drop-down menu. Windows 10 allows you to assign any available letter to the mapped drive. Select a letter that is easy to remember and doesn’t conflict with existing drive assignments.
- Entering the Network Location: In the wizard, you’ll encounter a field labeled “Folder.” Here, enter the network path or location you identified in step 3. You can manually type the path or use the “Browse” button to navigate to the network resource. Ensure the option “Reconnect at sign-in” is checked if you want the drive to be automatically mapped on startup.
- Credentials and Authentication (If Required): If the network resource requires authentication, Windows will prompt you to enter credentials (username and password). Provide the necessary login details to authenticate and gain access to the shared folder. Check the “Remember my credentials” option to avoid repeated logins.
- Completing the Mapping Process: Once you’ve entered the drive letter and network location, click on “Finish” to complete the mapping process. Windows 10 will establish the connection to the specified network resource, and you’ll see the newly mapped drive listed under “This PC” in File Explorer.
- Verifying the Mapped Network Drive: To ensure the successful mapping of the network drive, navigate to “This PC” in File Explorer. You should see the assigned drive letter representing the mapped network drive, along with its associated label and the network path. Double-click on the drive to access its contents.
- Customizing Drive Labels and Icons (Optional): For clarity and visual distinction, you can customize the label and icon of the mapped network drive. Right-click on the drive, select “Properties,” and navigate to the “Customize” tab. Here, you can assign a distinctive label and choose a custom icon to make the drive easily recognizable.
- Disconnecting or Removing a Mapped Drive: If you ever need to disconnect or remove a mapped network drive, right-click on the drive in File Explorer and select “Disconnect” or “Disconnect network drive.” Follow the prompts to confirm the disconnection, and the mapped drive will be removed from your system.
- Troubleshooting Mapped Drive Issues: In case of connectivity issues or difficulties accessing the mapped drive, verify the network path, credentials, and network status. Ensure that the shared resource is accessible and permissions are correctly configured on the network.
- Automating Mapping with Scripts (Advanced): For advanced users, automating the mapping process with scripts provides a efficient way to set up mapped drives consistently. Batch scripts or PowerShell scripts can be created to execute the mapping commands automatically during system startup.
Conclusion:
Mapping a network drive in Windows 10 is a pivotal skill that enhances accessibility, collaboration, and file management across networks. Whether you’re connecting to shared folders within your home network or accessing resources on a corporate server, the process outlined in this guide empowers you to navigate the digital landscape with efficiency and ease.
As you incorporate mapped network drives into your computing routine, remember the versatility they offer in terms of seamless integration with your local file system. By understanding the steps involved, customizing settings to suit your preferences, and troubleshooting as needed, you harness the full potential of mapped network drives in Windows 10, contributing to a streamlined and interconnected digital experience.