Introduction: Color accuracy is a cornerstone of graphic design, and CorelDRAW stands as a robust platform for achieving precise color representation. Within this powerful design software, the ability to assign color profiles plays a pivotal role in ensuring that the intended colors are faithfully reproduced across various devices and output mediums. This extensive guide delves into the intricacies of assigning color profiles in CorelDRAW, offering a comprehensive exploration for designers seeking mastery in the realm of color management.
I. The Significance of Color Profiles:
A. Defining Color Profiles:
- A color profile is a set of data that characterizes the color properties of a device or color space.
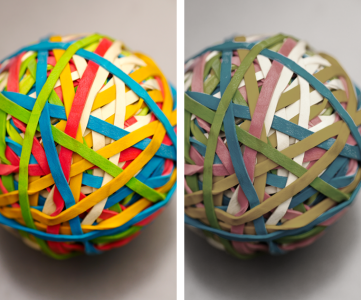
- Color profiles ensure consistent and accurate color reproduction by providing a standardized interpretation of colors across different devices, such as monitors, printers, and digital displays.
B. Importance of Assignment:
- Assigning color profiles in CorelDRAW is crucial for maintaining color accuracy throughout the design process.
- Assigning the correct color profile ensures that colors are interpreted consistently, whether viewed on-screen or reproduced in print.
II. Understanding Color Spaces and Profiles in CorelDRAW:
A. RGB Color Space:
- CorelDRAW primarily operates in the RGB (Red, Green, Blue) color space for digital design.
- Assigning the appropriate RGB color profile is essential for accurate color representation on computer monitors and electronic displays.
B. CMYK Color Space:
- For print projects, the CMYK (Cyan, Magenta, Yellow, Black) color space is used to represent colors using ink.
- Assigning the correct CMYK color profile is vital to ensure accurate color reproduction on printed materials.
C. Additional Color Spaces:
- CorelDRAW supports various color spaces, including LAB, Grayscale, and Spot colors, each serving specific design requirements.
- Assigning the right color profile for each color space is essential for achieving consistent and accurate color representation.
III. Steps to Assign Color Profiles in CorelDRAW:
A. Assigning Default Color Profiles:
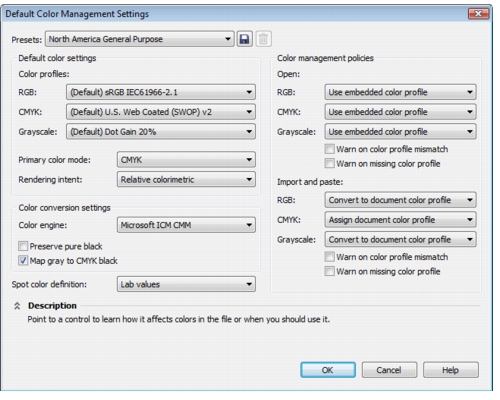
- Access the color management settings through “Tools” > “Color Management” > “Default Settings.”
- Choose the desired RGB and CMYK color profiles as defaults for new documents.
B. Assigning Profiles to Existing Documents:
- Open an existing document in CorelDRAW.
- Navigate to “Tools” > “Color Management.”
- In the Color Management dialog, assign the appropriate RGB and CMYK color profiles for the document.
C. Real-Time Profile Switching:
- CorelDRAW allows users to switch color profiles in real-time while working on a document.
- Experiment with different profiles to observe how colors are affected, facilitating accurate color adjustments based on the intended output.
D. Assigning Spot Colors:
- For projects involving Spot colors, assign the appropriate color profile to ensure precise color representation.
- Access the color management settings and assign the Spot color profile within the Color Management dialog.
IV. Color Profile Assignment Best Practices:
A. Consistency Across Projects:
- Maintain consistency in color profile assignments across different design projects.
- Create a set of standardized color profiles that align with your preferred color spaces and rendering intents for uniform color representation.
B. Soft Proofing:
- Utilize the soft proofing feature in CorelDRAW to simulate how colors will appear on different output devices.
- Soft proofing aids in making informed decisions about color adjustments before finalizing designs for print or digital output.
C. Collaborative Work:
- When collaborating on design projects, ensure that all team members use the same color profiles to maintain color consistency.
- Share color profiles with collaborators to establish a unified approach to color management.
D. Documenting Color Profiles:
- Keep a record of color profiles used in each project for future reference.
- Documenting color profiles ensures that consistent color representation can be maintained even when revisiting or updating projects.
V. Troubleshooting and Common Issues:
A. Mismatched Profiles:
- Be cautious of mismatched profiles between design software and devices.
- Consistently use the same profiles across all design tools to avoid color discrepancies.
B. Profile Conflicts:
- Resolve conflicts when multiple color profiles are applied to a document.
- Choose the most appropriate profile based on the intended output and design requirements.
C. Real-Time Adjustments:
- If colors appear differently than intended during real-time profile switching, evaluate and adjust color settings as needed.
- Ensure that the chosen profile aligns with the project’s requirements and output medium.
VI. Conclusion:
Assigning color profiles in CorelDRAW is a fundamental step toward achieving accurate and consistent color representation in design projects. This comprehensive guide has provided a detailed exploration of the significance of color profiles, their relationship with different color spaces, and the practical steps for assigning profiles in CorelDRAW. By understanding the nuances of color profile assignment and embracing best practices, designers can ensure that their creative visions are translated into vibrant and faithful colors across a diverse range of devices and output mediums. CorelDRAW’s commitment to precision in color management empowers designers to navigate the complexities of the color spectrum with confidence, creating visually stunning designs that resonate with audiences worldwide.