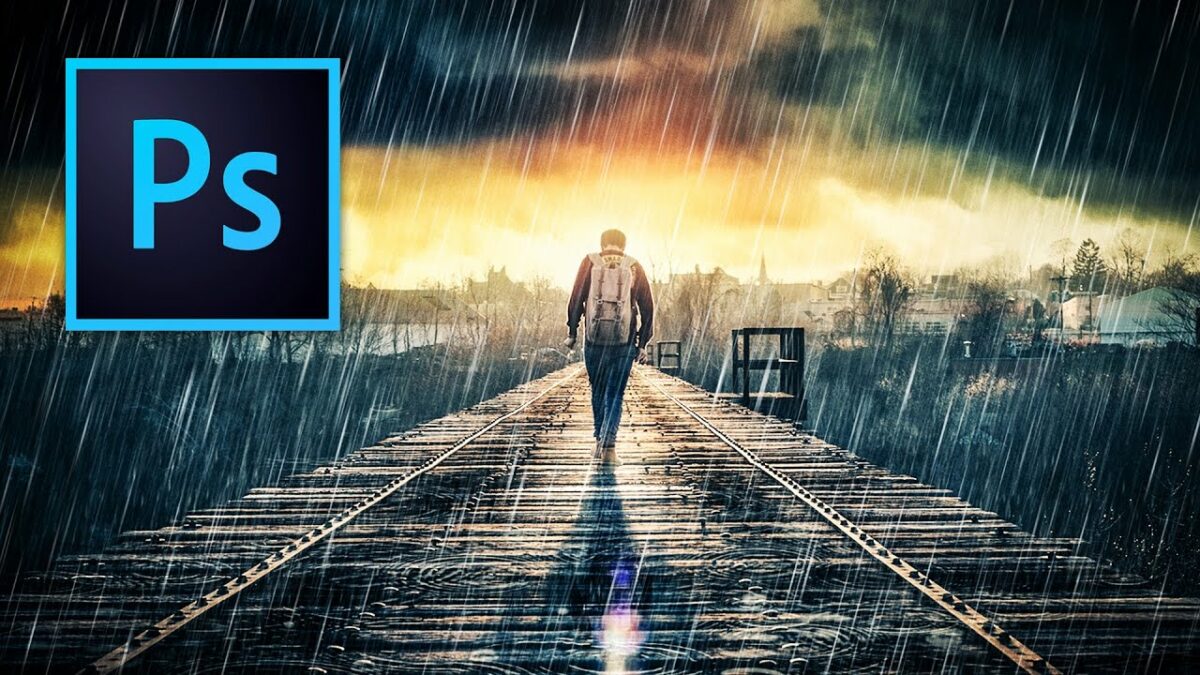
Categories
How To Guides Windows 10

Bridging the Divide: A Comprehensive Guide on How to Sync Your iPhone with Windows 10

Introduction

In the era of technological convergence, syncing your iPhone with Windows 10 opens up a world of possibilities, allowing seamless integration between your Apple device and Microsoft’s operating system. This comprehensive guide aims to walk you through the step-by-step process of syncing your iPhone with Windows 10, covering a range of synchronization options, from transferring files and photos to managing apps and data. Whether you’re a seasoned user or a newcomer to this digital ecosystem, this guide provides detailed insights to help you achieve a harmonious synchronization between your iPhone and Windows 10.

Section 1: Understanding the Integration

1.1 Overview

Syncing your iPhone with Windows 10 involves establishing a connection that enables the exchange of data and content between the two platforms. This integration enhances user convenience by facilitating tasks like file transfers, media sharing, and software management.

1.2 Benefits of Syncing iPhone with Windows 10

  • Data Backup: Keep your iPhone data backed up on your Windows 10 computer, safeguarding against potential data loss.
  • Media Transfer: Seamlessly transfer photos, videos, and music between your iPhone and Windows 10.
  • App Management: Streamline the process of managing and updating apps on your iPhone using Windows 10.

Section 2: Connecting Your iPhone to Windows 10

2.1 Overview

The initial step in syncing your iPhone with Windows 10 is establishing a physical or wireless connection.

2.2 USB Connection

  • Use a USB Cable: Connect your iPhone to your Windows 10 computer using the USB cable provided with your device.
  • Trust This Computer: On your iPhone, if prompted, tap “Trust This Computer” to establish a secure connection.

2.3 Wireless Connection (Wi-Fi Sync)

  • Enable Wi-Fi Sync: Ensure both your iPhone and Windows 10 computer are on the same Wi-Fi network.
  • iTunes Settings: Open iTunes on your Windows 10 computer, navigate to the device icon, and check the “Sync with this iPhone over Wi-Fi” option.

Section 3: Syncing Photos and Videos

3.1 Overview

Transferring photos and videos between your iPhone and Windows 10 is a common synchronization task.

3.2 Using Photos App

  • Open Photos App: Launch the Photos app on your Windows 10 computer.
  • Connect iPhone: Connect your iPhone via USB or ensure both devices are on the same Wi-Fi network.
  • Import Photos: Select “Import” and follow the on-screen instructions to import photos and videos from your iPhone.

3.3 Using File Explorer

  • Connect iPhone: Use a USB cable to connect your iPhone to your Windows 10 computer.
  • Open File Explorer: Open File Explorer, locate your iPhone under “This PC,” and access the “Internal Storage” or “DCIM” folder to copy photos and videos.

Section 4: Transferring Music and Audio Files

4.1 Overview

Syncing your iPhone with Windows 10 allows you to transfer music seamlessly, whether purchased from iTunes or acquired from other sources.

4.2 Using iTunes

  • Open iTunes: Launch iTunes on your Windows 10 computer.
  • Connect iPhone: Connect your iPhone using a USB cable.
  • Select Music: Click on the device icon in iTunes and choose “Music” from the left menu.
  • Sync Music: Check the “Sync Music” option and select the desired playlists, artists, or albums to transfer.

4.3 Using File Explorer

  • Connect iPhone: Use a USB cable to connect your iPhone to your Windows 10 computer.
  • Open File Explorer: Navigate to your iPhone under “This PC” and access the “Music” folder. Copy and paste or drag music files directly.

Section 5: Managing Apps and App Data

5.1 Overview

Syncing your iPhone with Windows 10 also extends to managing apps and their associated data.

5.2 Using iTunes

  • Open iTunes: Launch iTunes on your Windows 10 computer.
  • Connect iPhone: Use a USB cable to connect your iPhone.
  • App Management: Click on the device icon, select “Apps” from the left menu, and manage app installations, updates, and data.

Section 6: Backing Up and Restoring iPhone

6.1 Overview

Ensuring that your iPhone data is backed up is a fundamental aspect of syncing with Windows 10.

6.2 Using iTunes

  • Connect iPhone: Use a USB cable to connect your iPhone to your Windows 10 computer.
  • Open iTunes: Launch iTunes and click on the device icon.
  • Backup iPhone: Under the “Backups” section, choose “This computer” and click “Back Up Now” to create a backup.

Section 7: Troubleshooting Sync Issues

7.1 Overview

Occasional issues may arise during the syncing process. This section provides solutions to common problems.

7.2 Common Issues and Solutions

  • iTunes Not Recognizing iPhone: Restart both your iPhone and Windows 10 computer, update iTunes to the latest version, or reinstall iTunes if needed.
  • Wi-Fi Sync Not Working: Ensure both devices are on the same Wi-Fi network, restart your router, and check firewall settings.

Section 8: Privacy and Security Considerations

8.1 Overview

Respecting privacy and ensuring data security is crucial when syncing your iPhone with Windows 10.

8.2 Security Measures

  • Use Strong Passwords: Secure your iPhone and Microsoft account with strong, unique passwords.
  • Enable Two-Factor Authentication: Add an extra layer of security by enabling two-factor authentication on your Apple ID and Microsoft account.

Section 9: Managing Contacts and Calendars

9.1 Overview

Syncing contacts and calendars between your iPhone and Windows 10 streamlines organization and communication.

9.2 Using iCloud

  • Enable iCloud on iPhone: On your iPhone, go to “Settings,” tap your name, select “iCloud,” and toggle on “Contacts” and “Calendars.”
  • Access iCloud on Windows 10: Download and install iCloud for Windows, sign in with your Apple ID, and select “Contacts” and “Calendars.”

Section 10: Conclusion

Syncing your iPhone with Windows 10 is an empowering process that bridges the gap between two powerful ecosystems. This comprehensive guide has covered the entire spectrum, from establishing connections and transferring media to managing apps and ensuring data security. Embrace the seamless integration, explore the possibilities, and unlock the full potential of synchronizing your iPhone with Windows 10 for a unified and efficient digital experience.

Categories
How To Guides Windows 10

Seamless Connectivity: A Comprehensive Guide on How to Sync Your Settings Across Devices in Windows 10

Introduction

In the modern era of interconnected devices, Windows 10 introduces a powerful feature that enhances user experience—Sync Your Settings. This feature allows users to synchronize personalized settings, preferences, and configurations across multiple Windows 10 devices, providing a seamless and consistent computing experience. This comprehensive guide aims to walk you through the step-by-step process of enabling and managing the Sync Your Settings feature, empowering you to effortlessly transition between devices while maintaining a cohesive and personalized computing environment.

Section 1: Understanding Sync Your Settings

1.1 Overview

Sync Your Settings is a cloud-based service in Windows 10 that enables users to harmonize various aspects of their computing environment, such as themes, passwords, language preferences, and more, across multiple devices.

1.2 Benefits of Syncing Settings

  • Consistency: Ensure a consistent user experience across all your Windows 10 devices.
  • Time-Saving: Avoid the manual configuration of each device by syncing settings effortlessly.
  • Security: Sync passwords and credentials securely, reducing the risk of forgetting or misplacing them.

Section 2: Enabling Sync Your Settings

2.1 Overview

Before syncing your settings, it’s crucial to ensure that the feature is enabled on your Windows 10 devices.

2.2 Accessing Sync Settings

  • Open Settings: Click on the Start menu, select “Settings” (gear icon), or press Windows key + I to open Settings directly.
  • Navigate to Accounts: In the Settings menu, select “Accounts.”
  • Access Sync Your Settings: Click on “Sync your settings” in the left pane.

2.3 Enabling Sync Your Settings

  • Toggle On Sync Settings: Ensure that the “Sync settings” toggle switch is turned on.
  • Choose Settings to Sync: Below the toggle switch, select the settings you want to sync across devices. Options include themes, passwords, language preferences, and more.

Section 3: Managing Individual Sync Settings

3.1 Overview

Sync Your Settings offers granular control, allowing you to manage and customize specific settings based on your preferences.

3.2 Accessing Individual Sync Settings

  • Navigate to Sync Settings: Follow steps 2.1 to 2.2 to access the “Sync your settings” page.
  • Choose Individual Settings: Scroll down to the “Individual sync settings” section. Here, you can individually toggle on or off specific settings categories.

Section 4: Syncing Theme and Background

4.1 Overview

Personalizing your device with a consistent theme and background is an integral part of the user experience. Sync Your Settings ensures that these elements stay synchronized across your devices.

4.2 Enabling Theme and Background Sync

  • Navigate to Sync Settings: Follow steps 2.1 to 2.2 to access the “Sync your settings” page.
  • Toggle On Theme: Ensure that the “Theme” toggle switch is turned on.
  • Choose Background Sync: Select the “Background” setting if you want to sync your desktop background across devices.

Section 5: Syncing Passwords and Credentials

5.1 Overview

Maintaining a secure and streamlined authentication process is simplified with Sync Your Settings, allowing you to sync passwords and credentials seamlessly.

5.2 Enabling Password Sync

  • Navigate to Sync Settings: Follow steps 2.1 to 2.2 to access the “Sync your settings” page.
  • Toggle On Passwords: Ensure that the “Passwords” toggle switch is turned on.
  • Additional Credential Settings: Under “Manage passwords saved with Microsoft Edge,” you can also choose to sync passwords saved in Microsoft Edge.

Section 6: Syncing Language Preferences

6.1 Overview

For users who work in multiple languages, syncing language preferences ensures a consistent linguistic experience across devices.

6.2 Enabling Language Preferences Sync

  • Navigate to Sync Settings: Follow steps 2.1 to 2.2 to access the “Sync your settings” page.
  • Toggle On Language Preferences: Ensure that the “Language preferences” toggle switch is turned on.

Section 7: Troubleshooting Sync Your Settings Issues

7.1 Overview

While Sync Your Settings is designed for seamless synchronization, occasional issues may arise. This section addresses common problems and their solutions.

7.2 Common Issues and Solutions

  • Settings Not Syncing: Ensure that you are signed in with the same Microsoft account on all devices. Check the internet connection and verify that the “Sync settings” toggle is turned on.
  • Password Sync Issues: If passwords are not syncing, check that the “Passwords” toggle switch is enabled, and passwords are saved in Microsoft Edge.

Section 8: Understanding Security and Privacy

8.1 Overview

Microsoft prioritizes user security and privacy in the Sync Your Settings feature. It’s essential to understand how your data is handled.

8.2 Security Measures

  • Encryption: Sync Your Settings uses encryption protocols to protect your data during synchronization.
  • Two-Factor Authentication: Enable two-factor authentication on your Microsoft account for an additional layer of security.

Section 9: Limitations and Considerations

9.1 Overview

While Sync Your Settings is a powerful tool, it’s crucial to be aware of its limitations and consider specific factors.

9.2 Limitations

  • Third-Party App Settings: Sync Your Settings primarily focuses on Windows 10 settings and may not synchronize settings for all third-party applications.
  • Device Compatibility: Ensure that Sync Your Settings is supported on all your Windows 10 devices.

Section 10: Conclusion

Sync Your Settings in Windows 10 is a valuable feature for users seeking a cohesive and personalized computing experience across multiple devices. This comprehensive guide has covered the entire process, from enabling the feature and managing individual settings to troubleshooting common issues. Experiment with Sync Your Settings, tailor your computing environment to your preferences, and enjoy the convenience of a seamlessly synchronized Windows 10 experience across all your devices.

Categories
How To Guides Windows 10

Mastering Visual Clarity: A Comprehensive Guide on How to Change Screen Resolution in Windows 10

Introduction

The screen resolution of your Windows 10 computer is a critical factor that directly influences the clarity and quality of the displayed content. Adjusting the screen resolution allows you to optimize the visual experience according to your preferences, the capabilities of your monitor, and the requirements of specific tasks. This comprehensive guide will walk you through the step-by-step process of changing the screen resolution in Windows 10, providing you with the tools to achieve optimal visual clarity and a customized viewing experience.

Section 1: Understanding Screen Resolution

1.1 Overview

Screen resolution refers to the number of pixels displayed on the screen horizontally and vertically. It plays a crucial role in determining the level of detail, clarity, and the amount of content visible on your monitor.

1.2 Importance of Choosing the Right Resolution

  • Visual Quality: Higher resolutions generally result in sharper and more detailed visuals.
  • Productivity: Optimal resolutions enhance productivity by allowing you to view more content on the screen simultaneously.
  • Compatibility: Different tasks and applications may benefit from specific resolutions, and choosing the right one ensures compatibility.

Section 2: Accessing Display Settings in Windows 10

2.1 Overview

Changing the screen resolution in Windows 10 involves accessing the Display Settings, where you can customize various aspects of your display.

2.2 Opening Display Settings

  • Right-Click on Desktop: Begin by right-clicking on an empty area of your desktop.
  • Select Display Settings: From the context menu, choose “Display settings” to access the Display Settings page.

Section 3: Identifying the Current Screen Resolution

3.1 Overview

Before making any changes, it’s essential to identify the current screen resolution to understand the baseline.

3.2 Accessing Resolution Information

  • Navigate to Display Settings: Follow steps 2.1 to 2.2 to open Display Settings.
  • Identify Current Resolution: Scroll down to the “Scale and layout” section, and under “Resolution,” you will find the current resolution marked as “(Recommended).”

Section 4: Changing the Screen Resolution

4.1 Overview

Windows 10 provides a list of available resolutions, allowing you to choose the one that best suits your preferences and requirements.

4.2 Adjusting Screen Resolution

  • Navigate to Display Settings: Follow steps 2.1 to 2.2 to open Display Settings.
  • Access Resolution Settings: Under the “Resolution” dropdown menu, click the arrow to reveal a list of available resolutions.
  • Choose New Resolution: Select the desired resolution from the list. Windows 10 will apply the new resolution, and a prompt will appear asking if you want to keep the changes. Click “Keep changes” to confirm.

Section 5: Customizing Advanced Display Settings

5.1 Overview

In addition to predefined resolutions, Windows 10 provides advanced options for fine-tuning display settings.

5.2 Accessing Advanced Display Settings

  • Navigate to Display Settings: Follow steps 2.1 to 2.2 to open Display Settings.
  • Access Advanced Display Settings: Scroll down and click on “Advanced display settings” to open a menu with additional customization options.

Section 6: Scaling and Layout

6.1 Overview

Scaling and layout settings allow you to control how content is displayed on the screen, especially on high-DPI (dots per inch) monitors.

6.2 Adjusting Scaling and Layout

  • Navigate to Display Settings: Follow steps 2.1 to 2.2 to open Display Settings.
  • Access Scaling and Layout: Scroll down to the “Scale and layout” section.
  • Adjust Settings: Use the dropdown menu under “Change the size of text, apps, and other items” to choose a percentage that suits your preferences.

Section 7: Troubleshooting Display Issues

7.1 Overview

If changing the screen resolution leads to display issues, there are troubleshooting steps to address common problems.

7.2 Common Issues and Solutions

  • Blurry Text: Adjust the scaling settings in the “Scale and layout” section to improve text clarity.
  • Unsupported Resolution: If the chosen resolution is not supported by your monitor, revert to the previous resolution or choose a compatible one.

Section 8: Multiple Display Configurations

8.1 Overview

Windows 10 allows users to configure multiple displays, each with its own resolution settings.

8.2 Configuring Multiple Displays

  • Navigate to Display Settings: Follow steps 2.1 to 2.2 to open Display Settings.
  • Select Display: Click on the dropdown menu under “Select and rearrange displays” to choose the display you want to configure.
  • Adjust Resolution: Change the resolution settings for each display individually, considering the capabilities of each monitor.

Section 9: Conclusion

Changing the screen resolution in Windows 10 is a powerful tool for tailoring your visual experience to meet specific preferences and requirements. This comprehensive guide has walked you through the entire process, from accessing Display Settings to identifying the current resolution, adjusting settings, and troubleshooting common issues. Experiment with different resolutions, explore advanced display settings, and customize your viewing experience to achieve optimal visual clarity and productivity in Windows 10.