Introduction: Adobe Photoshop’s Content-Aware Fill is a revolutionary tool that empowers designers and photographers to seamlessly remove or replace unwanted elements from their images. In this extensive tutorial, we will delve into the intricacies of using Content-Aware Fill in Adobe Photoshop, focusing on advanced methods to achieve precise and nuanced results. From understanding the tool’s capabilities to exploring intricate techniques, this guide will provide step-by-step instructions, creative insights, and expert tips to help you harness the full potential of Content-Aware Fill for advanced image editing.
Section 1: The Evolution of Content-Aware Fill Before diving into the practical steps, it’s crucial to understand the evolution of Content-Aware Fill. Explore the tool’s inception, its growth through Photoshop updates, and the technological advancements that make it a game-changer in image editing. This section will discuss the significance of Content-Aware Fill as a transformative tool in the Photoshop arsenal.
Section 2: Unveiling Content-Aware Fill’s Capabilities Grasp the fundamental capabilities of Content-Aware Fill, including its ability to intelligently analyze image content and generate seamless replacements. Explore scenarios where Content-Aware Fill excels, and understand the tool’s limitations. This section will provide insights into the core functionalities that make Content-Aware Fill a powerful asset in advanced image editing.
Section 3: Selecting and Isolating Areas for Content-Aware Fill Learn how to use selection tools to isolate specific areas for Content-Aware Fill. Explore techniques for creating precise selections, including the Marquee Tool, Lasso Tool, and Quick Selection Tool. This section will guide you through the process of selecting and isolating areas for advanced Content-Aware Fill applications.
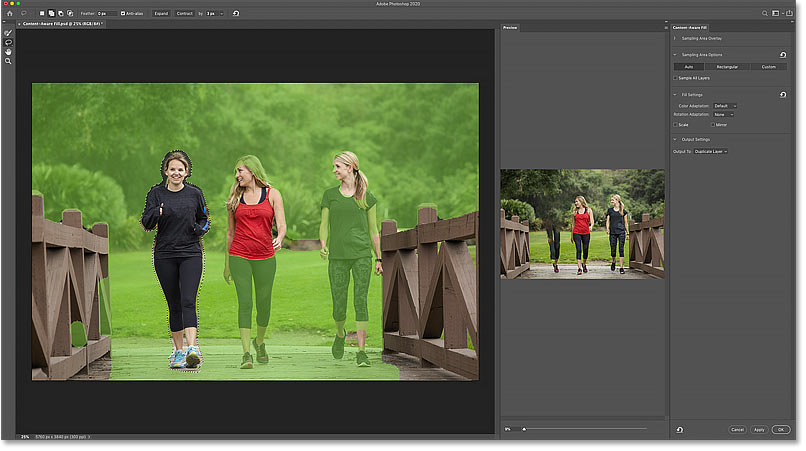
Section 4: Activating Content-Aware Fill Once your selection is made, activate Content-Aware Fill and familiarize yourself with the tool’s options. Understand settings such as Sampling Area, Color Adaptation, and Rotation Adaptation, and learn how they influence the fill results. This section will provide step-by-step instructions on activating and configuring Content-Aware Fill for advanced image editing.
Section 5: Refining Fill Results with Sampling Area Explore advanced techniques for refining fill results using the Sampling Area feature. Learn how to strategically choose sampling points to influence the algorithm and achieve more accurate and desirable replacements. This section will guide you through the process of using Sampling Area for precision in Content-Aware Fill.
Section 6: Harnessing Color Adaptation for Seamless Blending Delve into the intricacies of Color Adaptation and its role in achieving seamless blending in Content-Aware Fill. Understand how this setting influences color matching and learn techniques for adjusting it to enhance the natural look of filled areas. This section will provide insights into harnessing Color Adaptation for advanced blending.
Section 7: Navigating Rotation Adaptation for Perspective Adjustments Master the art of perspective adjustments with Rotation Adaptation in Content-Aware Fill. Explore how this setting enables the tool to adapt to the perspective of the surrounding elements, ensuring a more realistic replacement. This section will guide you through techniques for navigating Rotation Adaptation for precise perspective adjustments.
Section 8: Applying Scale Adaptation for Size Consistency Achieve size consistency in filled areas by leveraging Scale Adaptation. Understand how this setting influences the size of the replacement content, especially in scenarios where scale variation is critical. This section will provide step-by-step instructions on applying Scale Adaptation for advanced size adjustments.
Section 9: Utilizing Mirror for Symmetrical Fills Explore creative possibilities with the Mirror setting in Content-Aware Fill. Learn how to utilize this feature for symmetrical fills and achieve harmonious results in scenarios where symmetry is essential. This section will guide you through techniques for utilizing Mirror for advanced symmetrical content replacement.
Section 10: Fine-Tuning Fills with Content-Aware Fill Workspace Navigate the specialized Content-Aware Fill workspace to fine-tune your fills with precision. Understand the importance of the preview window, adjustments panel, and source options in achieving optimal results. This section will provide insights into fine-tuning fills using the dedicated workspace for advanced control.
Section 11: Introducing Color Adaptation for Text Removal Explore advanced applications of Content-Aware Fill, such as text removal, where Color Adaptation plays a crucial role. Learn techniques for erasing text seamlessly while preserving the surrounding colors and textures. This section will guide you through the process of using Color Adaptation for effective text removal.
Section 12: Mastering Content-Aware Fill for Object Removal Take your skills to the next level by mastering Content-Aware Fill for removing complex objects from images. Learn advanced techniques for selecting and isolating objects, configuring Content-Aware Fill settings, and achieving flawless replacements. This section will provide step-by-step instructions on mastering Content-Aware Fill for object removal.
Section 13: Leveraging Content-Aware Fill for Background Reconstruction Explore the nuances of background reconstruction with Content-Aware Fill. Learn how to replace backgrounds seamlessly, preserving the natural elements and textures of the surrounding environment. This section will guide you through advanced techniques for leveraging Content-Aware Fill in background reconstruction.
Section 14: Incorporating Content-Aware Fill in Composite Images Integrate Content-Aware Fill seamlessly into your composite images. Explore techniques for filling gaps, removing unwanted elements, and ensuring a cohesive and realistic composition. This section will provide insights into incorporating Content-Aware Fill in complex composite image workflows.
Section 15: Handling Challenges and Limitations Navigate challenges and limitations inherent in Content-Aware Fill. Understand scenarios where manual adjustments may be necessary, and explore techniques for addressing common issues such as repeating patterns and complex textures. This section will guide you through strategies for overcoming challenges in advanced Content-Aware Fill applications.
Section 16: Advanced Tips and Tricks Delve into advanced tips and tricks to elevate your proficiency with Content-Aware Fill. Explore lesser-known features, shortcuts, and creative techniques that can streamline your workflow and enhance your editing precision. This section will provide expert tips to take your skills to the next level.
Section 17: Testing and Iterative Refinement The testing phase is crucial for evaluating the effectiveness of your advanced Content-Aware Fills. Explore techniques for testing your edits in different contexts, refining details, and ensuring optimal visual impact. This section will guide you through the iterative process of testing and refining your advanced Content-Aware Fills until they reach a level of excellence.
Section 18: Saving and Exporting Your Edited Image With your advanced Content-Aware Fills perfected, it’s time to save and export your edited image. Uncover the optimal file formats, resolutions, and color profiles to ensure your edited image is ready for sharing across various platforms and applications. This section will provide a seamless transition from creative exploration to a polished final product.
Section 19: Showcasing Advanced Content-Aware Fills Immerse yourself in the satisfaction of showcasing your advanced Content-Aware Fills. Explore creative ways to present your edited images, whether through digital portfolios, social media platforms, or print materials. This section will provide insights into effectively showcasing your advanced Content-Aware Fills and garnering appreciation for your precision and mastery of image editing.
Conclusion: Mastering advanced Content-Aware Fill in Photoshop is a journey into the realm of precise and nuanced image editing. This comprehensive guide has equipped you with the knowledge, techniques, and creative insights needed to navigate the intricate process of using Content-Aware Fill for advanced applications. Embrace the power of this transformative tool, elevate your digital artistry, and embark on a journey of precision within the dynamic realm of Adobe Photoshop. As you experiment with advanced Content-Aware Fills, let your edited images become a testament to the transformative potential and precision offered by this invaluable tool in the world of digital editing.