Building a gaming PC can be a rewarding experience, offering customization options, performance enhancements, and the satisfaction of creating a system tailored to your gaming needs. Whether you’re a beginner or experienced enthusiast, this comprehensive guide will walk you through the step-by-step process of building a gaming PC from choosing components to assembling and setting up your new system.
Understanding Gaming PC Components
Essential Components
- Central Processing Unit (CPU):
- Handles instructions and calculations; critical for gaming performance.
- Popular choices include AMD Ryzen and Intel Core processors.
- Graphics Processing Unit (GPU):
- Renders graphics and enhances gaming visuals.
- NVIDIA GeForce and AMD Radeon GPUs are popular options for gaming.
- Motherboard:
- Connects all components and provides communication between them.
- Consider factors like chipset compatibility, form factor (ATX, micro-ATX), and connectivity options.
- Memory (RAM):
- Temporary storage for data that CPU needs to access quickly.
- Gaming PCs typically require 16GB to 32GB of RAM for optimal performance.
- Storage:
- SSD (Solid State Drive) for fast boot times and game loading.
- HDD (Hard Disk Drive) for mass storage of games and media.
- Power Supply Unit (PSU):
- Supplies power to all components; choose a reliable and efficient PSU with sufficient wattage.
- Case:
- Enclosure that houses and protects all components.
- Consider airflow, cable management, and compatibility with chosen components.
- Cooling System:
- Keeps components cool to maintain performance and longevity.
- Options include air coolers, liquid cooling (AIO coolers), and case fans.
- Peripherals (Optional):
- Monitor, keyboard, mouse, and gaming accessories.
Step-by-Step Guide to Building a Gaming PC
Step 1: Planning and Research
- Define Budget and Requirements:
- Determine your budget, desired gaming performance, and specific requirements (e.g., gaming resolution, FPS targets).
- Research Components:
- Compare CPUs, GPUs, motherboards, RAM, storage options, PSUs, cases, and cooling solutions based on performance benchmarks, reviews, and compatibility.
Step 2: Component Selection
- Choose CPU and GPU:
- Select compatible CPU-GPU pairings based on gaming and budgetary needs.
- Consider factors like core/thread count, clock speeds, and VRAM for GPUs.
- Select Motherboard:
- Ensure compatibility with chosen CPU socket type and chipset.
- Consider features like PCIe slots, RAM capacity, connectivity ports (USB, Ethernet), and overclocking support.
- RAM and Storage:
- Choose RAM modules with sufficient capacity and speed (e.g., DDR4 3200MHz).
- Opt for SSDs for faster boot times and game loading, with HDDs for additional storage capacity.
- Power Supply (PSU):
- Calculate power requirements based on components (use online PSU calculators).
- Choose a PSU with sufficient wattage, efficiency rating (80 Plus), and modular cables for cleaner builds.
- Case and Cooling:
- Select a case with adequate space, good airflow, cable management options, and compatibility with chosen components.
- Choose cooling solutions based on budget and performance requirements (air coolers, AIO liquid coolers).
Step 3: Assembly Process
- Prepare Workspace:
- Clear, well-lit workspace with sufficient room to work comfortably.
- Install CPU and Cooler:
- Align CPU correctly in the socket, apply thermal paste, and install the CPU cooler (air or liquid).
- Install RAM:
- Align RAM sticks correctly in motherboard slots (refer to motherboard manual for optimal configurations).
- Install Motherboard in Case:
- Mount motherboard on standoffs inside the case, aligning I/O shield with case cutouts.
- Install Storage Drives:
- Install SSD and/or HDD in designated drive bays or slots.
- Connect Power Supply:
- Install PSU in case and connect necessary power cables to motherboard, CPU, GPU, and storage drives.
- Install GPU:
- Align GPU with PCIe slot on motherboard and secure with screws or locking mechanism.
- Connect GPU to PSU with PCIe power cables.
- Cable Management:
- Route and secure cables neatly to improve airflow and aesthetics.
- Use cable ties or Velcro straps to manage excess cables.
- Connect Case Fans:
- Install case fans for additional cooling if not pre-installed.
- Connect fans to motherboard fan headers or PSU as required.
- Connect Peripherals:
- Connect monitor, keyboard, mouse, and other peripherals to appropriate ports (USB, HDMI, DisplayPort).
- Double-check Connections:
- Ensure all components are securely installed and connected.
Step 4: BIOS Setup and Operating System Installation
- Access BIOS/UEFI:
- Power on PC and press designated key (Del, F2, Esc) to enter BIOS/UEFI setup.
- Configure boot order (SSD/HDD) and enable XMP (RAM) profile if applicable.
- Install Operating System:
- Insert OS installation media (USB/DVD) and boot from it.
- Follow on-screen prompts to install Windows or preferred OS.
- Install Drivers and Updates:
- Download and install latest drivers for motherboard, GPU, and other components from manufacturer websites.
- Install OS updates and patches for security and performance enhancements.
Step 5: Testing and Benchmarking
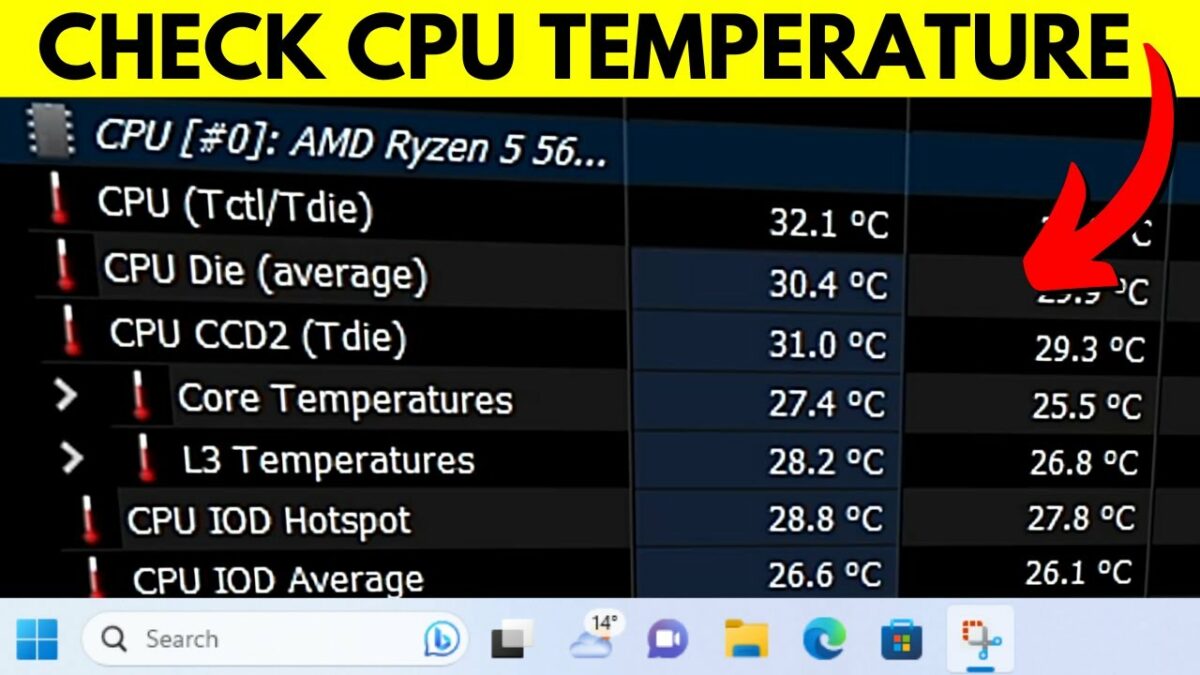
- System Stability Test:
- Run stress tests (e.g., Prime95, AIDA64) to check CPU and GPU stability under load.
- Monitor temperatures and ensure they stay within safe limits.
- Gaming Benchmark:
- Install benchmarking software (e.g., 3DMark, Unigine Heaven) to test gaming performance.
- Compare results with benchmarks of similar hardware configurations.
Step 6: Final Adjustments and Optimization
- Optimize Graphics Settings:
- Adjust in-game graphics settings for optimal performance and visual quality based on hardware capabilities.
- Customize System Settings:
- Configure power settings, display settings, and additional preferences in Windows or preferred OS.
- Backup and Maintenance:
- Create system backups and set up regular maintenance routines (e.g., updating drivers, cleaning dust filters) to keep your gaming PC running smoothly.
Tips for Building a Gaming PC
- Static Electricity Precautions: Use an anti-static wrist strap or mat to prevent static discharge that could damage components.
- Refer to Manuals: Consult motherboard and component manuals for specific installation instructions and compatibility details.
- Take Your Time: Building a PC requires patience and attention to detail; don’t rush through the process.
- Troubleshooting: If encountering issues, refer to troubleshooting guides, forums, or seek assistance from experienced builders or tech support.
- Upgrade Path: Choose components with future upgrades in mind to extend the lifespan and performance of your gaming PC.
Conclusion
Building a gaming PC offers the flexibility to customize hardware, optimize performance, and achieve superior gaming experiences tailored to your preferences. By following this step-by-step guide and considering the components, assembly process, and optimization steps outlined above, you can confidently build a gaming PC that meets your gaming needs and exceeds expectations. Enjoy the process of creating a high-performance gaming rig and immerse yourself in your favorite games with enhanced graphics, speed, and reliability. If unsure about any steps or encountering technical challenges, consult component manuals, seek assistance from online communities, or refer to manufacturer support for additional guidance on building and optimizing your gaming PC.