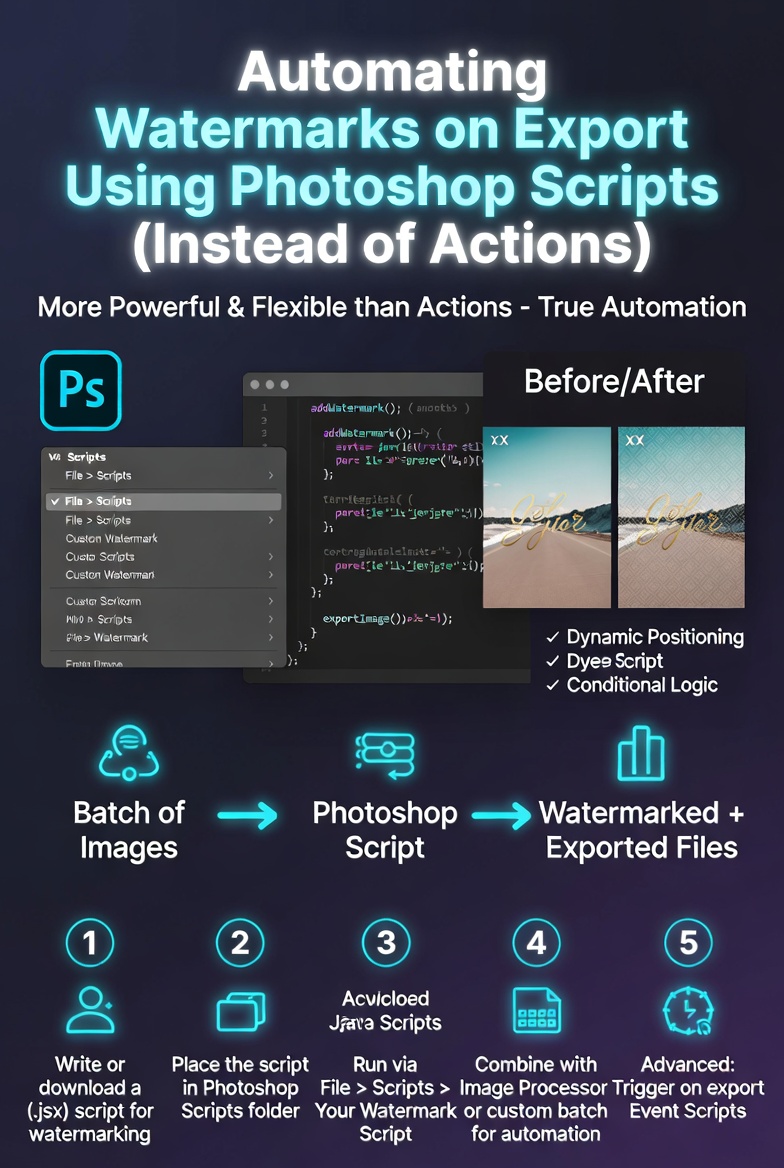
Categories
How To Guides

How to install a RAID setup

Setting up a RAID (Redundant Array of Independent Disks) configuration can significantly enhance data reliability, performance, or both, depending on the RAID level chosen. This comprehensive guide will walk you through the steps involved in installing a RAID setup, covering preparation, types of RAID configurations, hardware and software requirements, configuration methods, and troubleshooting tips.

Table of Contents

  1. Introduction to RAID Setup
    • What is RAID?
    • Benefits of RAID
  2. Preparation
    • Understand RAID Levels
    • Choose RAID Controller or Software
  3. Types of RAID Configurations
    • RAID 0
    • RAID 1
    • RAID 5
    • RAID 10 (1+0)
  4. Hardware and Software Requirements
    • RAID Controller Card (if applicable)
    • Compatible Hard Drives or SSDs
    • RAID Management Software
  5. Methods for Installing RAID
    • Hardware RAID Setup
    • Software RAID Setup
  6. Configuring RAID
    • Step-by-Step Instructions
    • Setting Up RAID in BIOS/UEFI or RAID Management Software
  7. Testing and Verifying RAID Setup
    • Checking RAID Array Status
    • Data Migration and Backup
  8. Maintenance and Monitoring
    • Monitoring RAID Health
    • Performing Regular Backups
  9. Troubleshooting RAID Issues
    • Common Issues
    • Solutions
  10. Conclusion

1. Introduction to RAID Setup

What is RAID?

RAID (Redundant Array of Independent Disks) is a data storage virtualization technology that combines multiple physical disk drives into a single logical unit for the purposes of data redundancy, performance improvement, or both. RAID configurations are defined by RAID levels, each offering different benefits and trade-offs in terms of performance, redundancy, and storage efficiency.

Benefits of RAID

  • Data Redundancy: Provides fault tolerance by duplicating data across multiple drives, protecting against data loss due to disk failure.
  • Performance Improvement: Enhances read and write speeds by distributing data across multiple drives simultaneously (depending on RAID level).
  • Increased Storage Capacity: Combines multiple drives into a larger virtual drive (depending on RAID level).

2. Preparation

Understand RAID Levels

  • RAID 0: Stripes data across multiple drives for increased performance and storage capacity but offers no redundancy.
  • RAID 1: Mirrors data across two drives for redundancy; provides fault tolerance but reduces overall storage capacity.
  • RAID 5: Stripes data across multiple drives with distributed parity for both performance and redundancy; requires at least three drives.
  • RAID 10 (1+0): Mirrors and stripes data across multiple drives for redundancy and performance; requires a minimum of four drives.

Choose RAID Controller or Software

  • Hardware RAID: Requires a RAID controller card installed in the computer; offers dedicated hardware for managing RAID arrays and can provide better performance.
  • Software RAID: Utilizes RAID functionality built into the operating system (OS); typically more flexible and cost-effective for smaller setups but may rely on CPU resources.

3. Types of RAID Configurations

RAID 0

  • Description: Stripes data across multiple drives without redundancy.
  • Advantages: Increased read/write speeds and maximum storage capacity utilization.
  • Disadvantages: No data redundancy; failure of one drive results in data loss across the entire array.

RAID 1

  • Description: Mirrors data across two drives for redundancy.
  • Advantages: Data redundancy and fault tolerance against single drive failure.
  • Disadvantages: Reduced usable storage capacity (half of total drive capacity).

RAID 5

  • Description: Stripes data across multiple drives with distributed parity.
  • Advantages: Balanced performance and redundancy; can withstand single drive failure.
  • Disadvantages: Requires at least three drives; slower write performance due to parity calculations.

RAID 10 (1+0)

  • Description: Mirrors and stripes data across multiple drives.
  • Advantages: Offers both redundancy and performance benefits of RAID 1 and RAID 0.
  • Disadvantages: Requires a minimum of four drives; effective storage capacity is half of total drive capacity.

4. Hardware and Software Requirements

RAID Controller Card (if applicable)

  • Selection: Choose a RAID controller card compatible with your motherboard and RAID level requirements.
  • Installation: Install the RAID controller card into a compatible PCI Express (PCIe) slot on your motherboard.

Compatible Hard Drives or SSDs

  • Selection: Choose hard drives or SSDs that meet the requirements for the RAID level you intend to implement.
  • Compatibility: Ensure drives are compatible with your RAID controller or software.

RAID Management Software

  • Selection: If using software RAID, ensure your operating system supports RAID functionality.
  • Installation: Install necessary RAID management tools or utilities provided by your OS or RAID controller manufacturer.

5. Methods for Installing RAID

Hardware RAID Setup

  1. Install RAID Controller:
    • Power down your computer and install the RAID controller card into a PCIe slot on your motherboard.
  2. Connect Drives:
    • Connect your hard drives or SSDs to the RAID controller card using SATA cables.
  3. Access RAID BIOS:
    • Power on your computer and enter the RAID controller BIOS setup by pressing the designated key (e.g., Ctrl+R, Ctrl+M) during startup.
  4. Configure RAID Array:
    • Create a new RAID array using the RAID controller BIOS interface.
    • Select RAID level, stripe size (if applicable), and configure drives for the array.
  5. Save Settings and Exit:
    • Save the RAID configuration settings and exit the RAID controller BIOS setup.
    • Reboot your computer to proceed with OS installation or data migration.

Software RAID Setup

  1. Prepare Drives:
    • Install your hard drives or SSDs into the computer and ensure they are recognized by the OS.
  2. Access Disk Management:
    • Open Disk Management in Windows or Disk Utility in macOS to initialize and format drives if necessary.
  3. Configure RAID Array:
    • Use the RAID management software provided by your OS to create a new RAID array.
    • Select RAID level, drives to include in the array, and configure settings such as stripe size or parity.
  4. Complete RAID Setup:
    • Follow on-screen prompts to complete the RAID array setup and initialize the array.
    • Format the RAID array with a file system compatible with your operating system.

6. Configuring RAID

Step-by-Step Instructions

  1. Access RAID Configuration:
    • Enter BIOS/UEFI setup or RAID management software interface.
  2. Create RAID Array:
    • Choose the option to create a new RAID array.
    • Select RAID level (0, 1, 5, 10) and configure additional settings (stripe size, parity).
  3. Add Drives to Array:
    • Select the hard drives or SSDs to include in the RAID array.
    • Confirm RAID configuration and proceed with array creation.

7. Testing and Verifying RAID Setup

Checking RAID Array Status

  • RAID Management Software: Use RAID management software to monitor array status, drive health, and performance metrics.
  • Operating System: Verify RAID array status and drive health through Disk Management (Windows) or Disk Utility (macOS).

Data Migration and Backup

  • Copy Data: Transfer existing data to the newly created RAID array.
  • Perform Backups: Regularly backup critical data to ensure data integrity and protection against hardware failures.

8. Maintenance and Monitoring

Monitoring RAID Health

  • Regular Checks: Monitor RAID array status, drive temperatures, and SMART (Self-Monitoring, Analysis, and Reporting Technology) attributes regularly.
  • Alerts and Notifications: Enable alerts or notifications for critical events such as drive failure or degraded array status.

Performing Regular Backups

  • Backup Strategy: Implement a regular backup strategy to protect data stored on the RAID array.
  • Offsite Backup: Consider offsite or cloud backups for added data redundancy and disaster recovery preparedness.

9. Troubleshooting RAID Issues

Common Issues

  • Drive Failure: Replace failed drives promptly and rebuild the RAID array if necessary.
  • Performance Degradation: Investigate potential causes such as outdated firmware, driver issues, or insufficient hardware resources.
  • Data Corruption: Monitor for signs of data corruption and take immediate action to restore data from backups if needed.

Solutions

  • RAID Rebuild: Rebuild RAID arrays after replacing failed drives to restore data redundancy and performance.
  • Firmware and Driver Updates: Keep RAID controller firmware and drivers up to date to ensure compatibility and performance.
  • Data Recovery: In case of data loss or corruption, use data recovery tools or services to recover critical data from backups or failed drives.

10. Conclusion

Installing a RAID setup can significantly enhance data reliability, performance, or both, depending on the RAID level chosen and your specific needs. By following the steps outlined in this guide—preparing for installation, selecting the right RAID level, configuring hardware or software RAID, testing and verifying setup, and performing maintenance—you can successfully implement and manage a RAID configuration. Regular monitoring, maintenance, and backups are essential for ensuring data integrity and protection against hardware failures. If you encounter issues during setup or operation, refer to troubleshooting tips or consult with RAID controller manufacturer support for assistance. RAID technology offers robust data management capabilities suitable for both personal and enterprise environments, providing enhanced data protection and performance for critical applications.

Categories
How To Guides

How to Recover Deleted Files

Recovering deleted files can be a crucial task when important data is accidentally deleted or lost due to various reasons such as hardware failure, software issues, or human error. Whether you’re using a Windows PC, Mac, or Linux system, understanding the methods and tools available for file recovery can help you successfully retrieve your files. This comprehensive guide will walk you through the step-by-step process of recovering deleted files using built-in features, third-party software, and best practices to maximize your chances of successful recovery.

Understanding File Deletion and Recovery

How File Deletion Works

When you delete a file from your computer, it is typically moved to the Recycle Bin (Windows) or Trash (macOS). Emptying the Recycle Bin or Trash permanently deletes the file from the file system, but the actual data remains on the disk until it is overwritten by new data.

Factors Affecting File Recovery

  1. File System: Different file systems (e.g., NTFS, FAT32, HFS+) handle file deletion and recovery differently.
  2. Time since Deletion: The sooner you attempt recovery, the higher the chances of success before the deleted data is overwritten.
  3. Type of Storage Device: Recovery methods may vary for hard drives, SSDs, external drives, and memory cards.

Types of File Recovery

  1. Quick Recovery: Recovering files from the Recycle Bin (Windows) or Trash (macOS) before they are permanently deleted.
  2. Deep Scan Recovery: Using specialized software to scan the storage device for traces of deleted files and recover them.

How to Recover Deleted Files: Step-by-Step Guide

Step 1: Stop Using the Device

  1. Avoid Writing New Data: Stop using the device immediately to prevent overwriting deleted files, which reduces the chance of successful recovery.

Step 2: Check Recycle Bin or Trash

  1. Windows (Recycle Bin):
    • Double-click on the Recycle Bin icon on the desktop.
    • Locate and right-click on the deleted file(s), then select “Restore” to recover them to their original location.
  2. macOS (Trash):
    • Open the Trash from the dock.
    • Right-click on the deleted file(s) and select “Put Back” to restore them to their original location.

Step 3: Use File History or Time Machine (Windows and macOS)

  1. Windows (File History):
    • Type “restore files” in the Windows search bar and select “Restore your files with File History.”
    • Browse through previous versions of files and folders to recover deleted items.
  2. macOS (Time Machine):
    • Open Time Machine from the menu bar or System Preferences.
    • Navigate to the date when the file was last available and select “Restore” to recover deleted files.

Step 4: Use Data Recovery Software

  1. Choose Reliable Software:
    • Select reputable data recovery software that supports your operating system and file system (e.g., NTFS, APFS).
  2. Install and Run Software:
    • Download and install the data recovery software on a separate drive or external device to avoid overwriting deleted files.
    • Run the software and follow on-screen instructions to scan the storage device for deleted files.
  3. Scan and Recover Files:
    • Perform a deep scan to search for deleted files, including documents, photos, videos, and other file types.
    • Preview recoverable files and select those you wish to restore to a safe location (not the same drive you’re recovering from).

Step 5: Use Command Line (Advanced Users)

  1. Windows (Command Prompt):
    • Open Command Prompt as administrator.
    • Use commands like chkdsk or attrib to check for and recover deleted files from the command line.
  2. macOS (Terminal):
    • Open Terminal from Applications > Utilities.
    • Use commands like sudo grep or sudo photorec to search and recover deleted files from the command line.

Step 6: Consult Data Recovery Services (Last Resort)

  1. Professional Services:
    • If unable to recover files using software, consider consulting professional data recovery services.
    • These services use specialized hardware and techniques to recover data from damaged or inaccessible storage devices.

Best Practices for File Recovery

  1. Act Quickly: Attempt recovery as soon as possible to prevent overwritten data.
  2. Avoid Writing to Drive: Minimize use of the storage device until recovery is complete.
  3. Backup Regularly: Maintain backups of important files to prevent data loss.
  4. Use Reliable Software: Choose trusted data recovery software to maximize recovery success.
  5. Scan Thoroughly: Perform deep scans to maximize chances of recovering deleted files.

Conclusion

Recovering deleted files is possible with the right tools and methods, whether you’re using Windows, macOS, or Linux. By following the steps outlined in this guide and utilizing built-in features, third-party software, or advanced command-line techniques, you can effectively retrieve deleted files from various storage devices. Remember to act quickly, avoid writing new data to the drive, and consider professional data recovery services if needed. If unsure about any steps or encountering technical challenges, consult software documentation, seek assistance from support services, or refer to online resources for additional guidance on recovering deleted files effectively.

Categories
How To Guides

How to Build a Gaming PC

Building a gaming PC can be a rewarding experience, offering customization options, performance enhancements, and the satisfaction of creating a system tailored to your gaming needs. Whether you’re a beginner or experienced enthusiast, this comprehensive guide will walk you through the step-by-step process of building a gaming PC from choosing components to assembling and setting up your new system.

Understanding Gaming PC Components

Essential Components

  1. Central Processing Unit (CPU):
    • Handles instructions and calculations; critical for gaming performance.
    • Popular choices include AMD Ryzen and Intel Core processors.
  2. Graphics Processing Unit (GPU):
    • Renders graphics and enhances gaming visuals.
    • NVIDIA GeForce and AMD Radeon GPUs are popular options for gaming.
  3. Motherboard:
    • Connects all components and provides communication between them.
    • Consider factors like chipset compatibility, form factor (ATX, micro-ATX), and connectivity options.
  4. Memory (RAM):
    • Temporary storage for data that CPU needs to access quickly.
    • Gaming PCs typically require 16GB to 32GB of RAM for optimal performance.
  5. Storage:
    • SSD (Solid State Drive) for fast boot times and game loading.
    • HDD (Hard Disk Drive) for mass storage of games and media.
  6. Power Supply Unit (PSU):
    • Supplies power to all components; choose a reliable and efficient PSU with sufficient wattage.
  7. Case:
    • Enclosure that houses and protects all components.
    • Consider airflow, cable management, and compatibility with chosen components.
  8. Cooling System:
    • Keeps components cool to maintain performance and longevity.
    • Options include air coolers, liquid cooling (AIO coolers), and case fans.
  9. Peripherals (Optional):
    • Monitor, keyboard, mouse, and gaming accessories.

Step-by-Step Guide to Building a Gaming PC

Step 1: Planning and Research

  1. Define Budget and Requirements:
    • Determine your budget, desired gaming performance, and specific requirements (e.g., gaming resolution, FPS targets).
  2. Research Components:
    • Compare CPUs, GPUs, motherboards, RAM, storage options, PSUs, cases, and cooling solutions based on performance benchmarks, reviews, and compatibility.

Step 2: Component Selection

  1. Choose CPU and GPU:
    • Select compatible CPU-GPU pairings based on gaming and budgetary needs.
    • Consider factors like core/thread count, clock speeds, and VRAM for GPUs.
  2. Select Motherboard:
    • Ensure compatibility with chosen CPU socket type and chipset.
    • Consider features like PCIe slots, RAM capacity, connectivity ports (USB, Ethernet), and overclocking support.
  3. RAM and Storage:
    • Choose RAM modules with sufficient capacity and speed (e.g., DDR4 3200MHz).
    • Opt for SSDs for faster boot times and game loading, with HDDs for additional storage capacity.
  4. Power Supply (PSU):
    • Calculate power requirements based on components (use online PSU calculators).
    • Choose a PSU with sufficient wattage, efficiency rating (80 Plus), and modular cables for cleaner builds.
  5. Case and Cooling:
    • Select a case with adequate space, good airflow, cable management options, and compatibility with chosen components.
    • Choose cooling solutions based on budget and performance requirements (air coolers, AIO liquid coolers).

Step 3: Assembly Process

  1. Prepare Workspace:
    • Clear, well-lit workspace with sufficient room to work comfortably.
  2. Install CPU and Cooler:
    • Align CPU correctly in the socket, apply thermal paste, and install the CPU cooler (air or liquid).
  3. Install RAM:
    • Align RAM sticks correctly in motherboard slots (refer to motherboard manual for optimal configurations).
  4. Install Motherboard in Case:
    • Mount motherboard on standoffs inside the case, aligning I/O shield with case cutouts.
  5. Install Storage Drives:
    • Install SSD and/or HDD in designated drive bays or slots.
  6. Connect Power Supply:
    • Install PSU in case and connect necessary power cables to motherboard, CPU, GPU, and storage drives.
  7. Install GPU:
    • Align GPU with PCIe slot on motherboard and secure with screws or locking mechanism.
    • Connect GPU to PSU with PCIe power cables.
  8. Cable Management:
    • Route and secure cables neatly to improve airflow and aesthetics.
    • Use cable ties or Velcro straps to manage excess cables.
  9. Connect Case Fans:
    • Install case fans for additional cooling if not pre-installed.
    • Connect fans to motherboard fan headers or PSU as required.
  10. Connect Peripherals:
    • Connect monitor, keyboard, mouse, and other peripherals to appropriate ports (USB, HDMI, DisplayPort).
  11. Double-check Connections:
    • Ensure all components are securely installed and connected.

Step 4: BIOS Setup and Operating System Installation

  1. Access BIOS/UEFI:
    • Power on PC and press designated key (Del, F2, Esc) to enter BIOS/UEFI setup.
    • Configure boot order (SSD/HDD) and enable XMP (RAM) profile if applicable.
  2. Install Operating System:
    • Insert OS installation media (USB/DVD) and boot from it.
    • Follow on-screen prompts to install Windows or preferred OS.
  3. Install Drivers and Updates:
    • Download and install latest drivers for motherboard, GPU, and other components from manufacturer websites.
    • Install OS updates and patches for security and performance enhancements.

Step 5: Testing and Benchmarking

  1. System Stability Test:
    • Run stress tests (e.g., Prime95, AIDA64) to check CPU and GPU stability under load.
    • Monitor temperatures and ensure they stay within safe limits.
  2. Gaming Benchmark:
    • Install benchmarking software (e.g., 3DMark, Unigine Heaven) to test gaming performance.
    • Compare results with benchmarks of similar hardware configurations.

Step 6: Final Adjustments and Optimization

  1. Optimize Graphics Settings:
    • Adjust in-game graphics settings for optimal performance and visual quality based on hardware capabilities.
  2. Customize System Settings:
    • Configure power settings, display settings, and additional preferences in Windows or preferred OS.
  3. Backup and Maintenance:
    • Create system backups and set up regular maintenance routines (e.g., updating drivers, cleaning dust filters) to keep your gaming PC running smoothly.

Tips for Building a Gaming PC

  1. Static Electricity Precautions: Use an anti-static wrist strap or mat to prevent static discharge that could damage components.
  2. Refer to Manuals: Consult motherboard and component manuals for specific installation instructions and compatibility details.
  3. Take Your Time: Building a PC requires patience and attention to detail; don’t rush through the process.
  4. Troubleshooting: If encountering issues, refer to troubleshooting guides, forums, or seek assistance from experienced builders or tech support.
  5. Upgrade Path: Choose components with future upgrades in mind to extend the lifespan and performance of your gaming PC.

Conclusion

Building a gaming PC offers the flexibility to customize hardware, optimize performance, and achieve superior gaming experiences tailored to your preferences. By following this step-by-step guide and considering the components, assembly process, and optimization steps outlined above, you can confidently build a gaming PC that meets your gaming needs and exceeds expectations. Enjoy the process of creating a high-performance gaming rig and immerse yourself in your favorite games with enhanced graphics, speed, and reliability. If unsure about any steps or encountering technical challenges, consult component manuals, seek assistance from online communities, or refer to manufacturer support for additional guidance on building and optimizing your gaming PC.