Introduction:
In the ever-expanding universe of graphic design, the art of creating visually captivating layouts often involves the delicate dance between text and imagery. While dedicated desktop publishing software may offer native text-wrapping functionalities, Adobe Photoshop, primarily known for image editing, lacks this feature. However, fear not, as this comprehensive guide unveils the secrets of faking text wrap in Photoshop. By leveraging smart techniques and creative solutions, designers can achieve the illusion of text gracefully wrapping around images, opening up a world of possibilities for dynamic and aesthetically pleasing compositions.
Understanding the Need for Faking Text Wrap:
Text wrap is a crucial design element that allows text to flow harmoniously around images or objects, avoiding visual clutter and enhancing readability. In Photoshop, where image manipulation takes center stage, designers often encounter scenarios where the absence of a native text-wrap feature poses a challenge. Faking text wrap becomes the key to achieving seamless integration of text and images, creating layouts that appear as if text naturally conforms to the contours of the visual elements.
Step-by-Step Guide to Faking Text Wrap in Photoshop:
- Open Photoshop and Create a New Document: Launch Adobe Photoshop on your computer and create a new document by selecting File > New. Choose the dimensions and resolution that suit your design requirements. Click “OK” to create the new canvas.
- Import the Image: Open the image around which you want to fake the text wrap. Use the “Place” command (File > Place) to import the image into your Photoshop document. This allows for easy resizing and positioning.
- Create a New Layer for Text: Create a new layer for your text by selecting the Text tool (T) from the toolbar. Click on the canvas and type the desired text. Choose the font, size, and color from the options in the toolbar or Character panel.
- Rasterize the Text Layer: Right-click on the text layer in the Layers panel and choose “Rasterize Type.” This step is essential for applying various transformations and effects to the text.
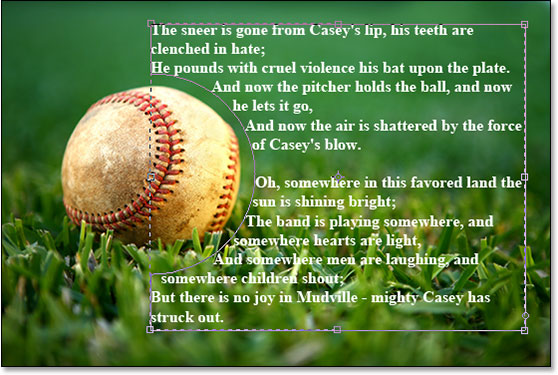
- Use the Pen Tool to Outline the Image: Select the Pen tool (P) from the toolbar and carefully outline the contours of the image. Create a path around the areas where you want the text to wrap. Ensure that the path follows the natural curves and shapes of the image.
- Convert Path to Selection: Right-click on the path you’ve created with the Pen tool and choose “Make Selection.” Adjust the feather radius if needed to soften the selection edges. Click “OK” to convert the path to a selection.
- Apply the Selection as a Mask: With the text layer selected, click the “Add layer mask” icon at the bottom of the Layers panel. This will apply the selection as a mask to the text layer, creating the illusion of the text wrapping around the outlined areas of the image.
- Refine the Mask (Optional): Use the Brush tool (B) with a soft brush to refine the mask. This step allows you to manually adjust the mask’s edges, ensuring a smooth transition between the text and the image. Painting with black conceals parts of the text, while painting with white reveals them.
- Experiment with Layer Styles: Enhance the realism of the text wrap effect by experimenting with layer styles. Double-click on the text layer to open the Layer Style dialog. Explore options such as Drop Shadow, Inner Shadow, or Bevel and Emboss to add depth and dimension to the text.
- Adjust Text Size and Position: Fine-tune the size and position of the text to optimize its interaction with the image. This step ensures that the text appears convincingly wrapped around the visual elements, maintaining a cohesive and balanced design.
- Create Multiple Text Layers (Optional): For more complex text wrap effects, consider creating multiple text layers with different portions of the text wrapping around various elements in the image. This approach provides greater control and flexibility in crafting intricate layouts.
- Experiment with Opacity and Blending Modes: Adjust the opacity of the text layer to control its transparency and blend it seamlessly with the image. Experiment with blending modes (e.g., Multiply, Overlay) to achieve different visual effects. This step allows for further customization based on the desired aesthetic.
- Add Decorative Elements (Optional): To enhance the overall design, consider adding decorative elements or graphics between the text and image layers. This can contribute to the illusion of a more complex and visually appealing text wrap effect.
- Fine-Tune and Preview: Regularly toggle the visibility of layers, experiment with different settings, and fine-tune the text wrap effect to achieve the desired appearance. Preview the design in different contexts to ensure it remains visually impactful.
- Save and Export: Once satisfied with the design, save your work in the desired format. For web or print use, consider exporting the image in common formats like JPEG or PNG. Preserve the layered Photoshop file (PSD) to retain the flexibility for future edits.
Examples of Creative Applications for Faked Text Wrap:
- Magazine Layouts and Editorials: Create visually engaging magazine layouts and editorials by faking text wrap around images. This technique enhances the flow of content and adds a dynamic element to editorial designs.
- Product Packaging and Labels: Elevate product packaging and labels by incorporating faked text wrap around product images. This approach is effective for showcasing product details and enhancing the overall packaging design.
- Web Graphics and Banners: Capture attention on websites by using faked text wrap in web graphics and banners. This technique is ideal for creating interactive and visually appealing layouts on digital platforms.
- Infographics and Educational Material: Enhance infographics and educational material by faking text wrap around relevant images. This approach facilitates the seamless integration of text and visuals in informative content.
- Branding and Promotional Material: Incorporate faked text wrap in branding materials and promotional graphics. This technique adds a touch of creativity and sophistication to promotional campaigns and brand communication.
Conclusion:
The ability to fake text wrap in Photoshop opens up a realm of creative possibilities for designers seeking to seamlessly integrate text and images in their compositions. By following the comprehensive steps outlined in this guide, you gain valuable insights into the process of crafting layouts that give the illusion of text gracefully wrapping around visual elements. Whether you’re working on magazine layouts, product packaging, web graphics, or educational material, the art of faking text wrap provides a versatile and effective solution within the Photoshop toolkit.
As you embark on the journey of creating visually compelling designs, let your creativity guide you. Experiment with different images, text arrangements, and layer styles to tailor the text wrap effect to the unique requirements of each project. The fusion of text and imagery through faked text wrap offers a flexible and impactful approach to design, allowing you to craft layouts that resonate with your audience. So, dive into the world of faking text wrap in Photoshop, and let your designs speak with the eloquence of seamless integration and visual harmony.