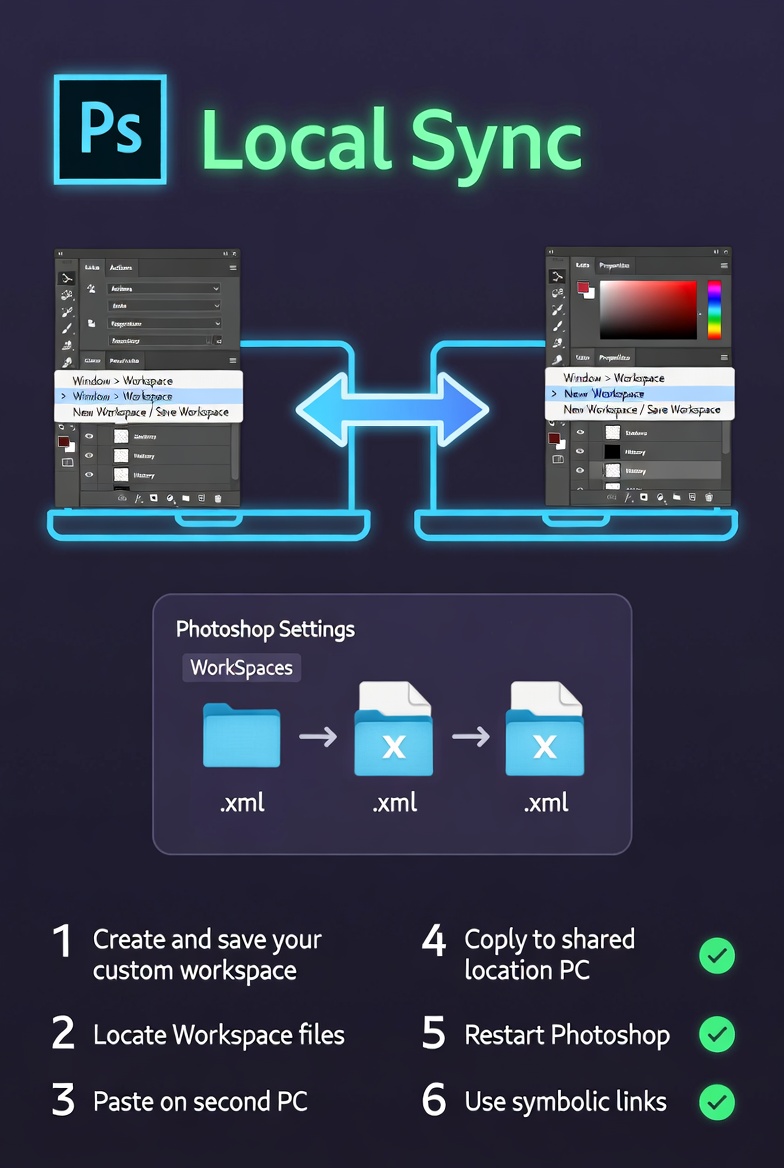
How to Sync Your Custom Photoshop Workspace Across Multiple PCs Locally
Maintaining a consistent Photoshop workspace across multiple PCs can significantly improve productivity, especially for professionals who switch between systems in a studio, office, or home setup. It is typically annoying to have to manually rebuild custom workspaces, keyboard shortcuts, panels, and settings on each individual workstation since these alterations are often made over time to correspond with the workflows of certain individuals. Despite the fact that there are cloud-based synchronization alternatives available, many users choose a local synchronization technique since it provides them with better control, speed, and privacy. Through the use of local storage, shared drives, or solutions that are dependent on the network, you can guarantee that your Photoshop environment will stay consistent across all types of computers. Utilizing this method cuts down on the amount of time spent setting up, minimizes interruptions to production, and guarantees consistency in editing chores. In order to achieve smooth local synchronization, it is essential to have a solid understanding of how Photoshop keeps its configuration files and how to transmit them in an effective manner. In this post, you will learn how to synchronize your customized Photoshop workspace across several computers by using approaches that are both practical and dependable.
Comprehending the Locations Where Photoshop Stores Settings for Workspace
There are various directories inside the system that Photoshop uses to store workspace setups, preferences, and special settings. In addition to other individual options, these files include workspace layouts, keyboard shortcuts, panel setups, and other configurations. On Windows-based computers, these configurations are often found inside folders that are particular to the user, which makes them available for copying and backup purposes. If you are aware of the precise location of these files, you will be able to move them across other computers and keep the configurations of those machines similar. Due to the fact that various versions of Photoshop may save their data in somewhat different locations, it is essential to guarantee compatibility while synchronizing across numerous personal computers. Understanding this file structure is the first step toward building a reliable synchronization process.
Recognizing the Most Important Files Related to Workspace Synchronization
It is not necessary to synchronize all of your Photoshop files in order to reproduce your workspace. The workspace configuration files, keyboard shortcut presets, actions, brushes, and custom preferences are the ones that are considered to be the most significant. These files, when taken as a whole, form your working environment and dictate how Photoshop operates. Through the process of isolating and replicating just these key components, you may prevent clutter that is not required and lessen the likelihood of disputes occurring. You will find that it is much simpler to maintain and update these files across several platforms if you organize them into a specific folder. With this targeted strategy, you can be certain that your synchronization process will continue to be effective and will concentrate on the aspects that are most critically important.
Utilizing External Storage for the Purpose of Manual Syncing
Utilizing external storage devices, such as portable solid-state drives (SSDs) or USB drives, is one of the most straightforward approaches of synchronizing your Photoshop workspace on a local level. By copying your configuration files onto the device, you can transfer them between PCs quickly and reliably. When it comes to situations that restrict or limit access to the network, this strategy is very helpful. Following the completion of the file transfer, it is necessary to guarantee that Photoshop instantly identifies the files by putting them in the appropriate folders on the destination machine. In spite of the fact that this method requires manual updates, it provides complete control over the synchronization process and removes the need for internet access.
Establishing a Shared Folder on a Local Network
When you want to sync your Photoshop workspace across different computers, you may utilize a local network shared folder. This will allow you to take a more automatic approach. In order to do this, a shared directory must be created on a single computer or a storage device that is connected to a network, and access must be granted to all systems that are pertinent. Because you have stored your configuration files in this shared area, you will have the ability to simply access and update them from any connected computer. Mapping the shared folder as a network drive simplifies file management and ensures consistent access. Due to the fact that it allows quicker and more effective synchronization, this strategy is perfect for studios or teams who are operating inside the same network environment.
Using File Synchronization Tools to Help Automate the Sync Process
You may use file synchronization solutions to automatically update the files in your Photoshop workspace across several PCs. This will further simplify the process and make it seem more professional. It is possible to reproduce changes in real time or at predetermined intervals using these programs, which monitor certain folders. By configuring synchronization rules, you can ensure that updates made on one PC are reflected on others without manual intervention. Your workplace will remain constant at all times thanks to this, which also lowers the likelihood of version mismatches occurring. Automation is especially advantageous for users who regularly change their settings or operate across many devices. This is because automation reduces the amount of effort required for maintenance and enhances the continuity of workflow.
The Management of Version Compatibility From System to System
Taking into consideration version compatibility is an essential step in the process of synchronizing Photoshop workspaces. There is a possibility that various versions of Photoshop may save settings in disparate formats or places, which, if not handled correctly, might result in conflicts. In order to simplify the process of synchronization and limit the chance of mistakes, it is important to make sure that all personal computers are running the same version of Photoshop. It is helpful to discover potential problems by testing the transferred files on each system, even if it is impossible to eliminate version discrepancies. For the purpose of preserving the integrity of your workspace and ensuring that all features perform as anticipated across devices, maintaining compatibility is a crucial component.
Preventing the Most Frequent Syncing Problems and Conflicts
If the process is not controlled correctly, there is the potential for certain problems to occur, despite the fact that local synchronization is successful. In the absence of backups, overwriting files may lead to the loss of custom settings, and synchronizing files that are not essential can lead to performance concerns. When you make any modifications to your configuration files, it is essential to ensure that you have a backup of the original data. Further, it is important to make sure that Photoshop is closed before uploading files in order to avoid any instances of corruption or missing updates. Maintaining an orderly and scientific approach to the synchronization process helps to prevent conflicts and guarantees a seamless experience across all platforms.
Advanced Workflow Tips for Seamless Multi-PC Usage
The combination of local synchronization and organized workflows may further boost productivity for people who have the advanced level of expertise. By developing common workspace profiles for various jobs, such as graphic design or picture editing, it is possible to transition between different configurations in a short amount of time. It is also possible to enhance efficiency by updating files via the use of scripts or batch procedures. In addition, keeping a single repository of your Photoshop files guarantees that all of your systems continue to be in sync with the most recent settings you have made. You may develop a smooth multi-PC workflow that supports consistent, high-quality output across all of your projects by improving your synchronization approach and adopting sophisticated methods. This will allow you to provide consistent results across all of your projects.