In today’s interconnected world, the need for secure and private communication over the internet is paramount. Virtual Private Networks (VPNs) offer users a reliable solution to safeguard their online activities, protect sensitive information, and access restricted content from anywhere in the world. Windows XP provides built-in support for configuring VPN connections, allowing users to establish secure connections to remote networks and servers effortlessly. In this comprehensive guide, we’ll walk you through the step-by-step process of setting up a VPN connection in Windows XP, empowering you to stay safe and secure while navigating the digital landscape.
Understanding VPNs and Their Benefits:
Before we delve into the setup process, let’s first understand what VPNs are and the benefits they offer. A VPN creates a secure, encrypted connection between your computer and a remote server or network, effectively shielding your online activities from prying eyes, such as hackers, ISPs, or government surveillance. By routing your internet traffic through a VPN server, you can mask your IP address, encrypt data transmissions, and access geo-restricted content with ease. VPNs are indispensable tools for maintaining privacy, anonymity, and security in today’s digital age.
Step-by-Step Guide to Setting Up a VPN Connection:
Now, let’s explore the systematic process of setting up a VPN connection in Windows XP:
Step 1: Gather VPN Connection Information:
- Before setting up the VPN connection, gather the necessary information from your VPN service provider, including the server address, authentication credentials (username and password), and VPN protocol (e.g., PPTP, L2TP/IPsec, or SSTP).
- Ensure that you have an active VPN subscription with a reputable VPN service provider.
Step 2: Access Network Connections:
- Click on the “Start” button located at the bottom-left corner of the screen.
- Navigate to “Control Panel” and double-click to open it.
- In the Control Panel window, locate and open the “Network Connections” icon.
Step 3: Create a New VPN Connection:
- In the Network Connections window, click on the “Create a new connection” link located in the left pane.
- The New Connection Wizard will launch. Click “Next” to proceed.
Step 4: Choose a Connection Type:
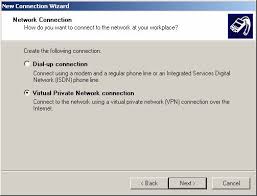
- Select the option for “Connect to the network at my workplace” and click “Next.”
- Choose the option for “Virtual Private Network connection” and click “Next.”
Step 5: Enter VPN Server Information:
- Enter the server address provided by your VPN service provider in the appropriate field.
- Optionally, you can provide a descriptive name for the VPN connection to distinguish it from other connections.
- Click “Next” to continue.
Step 6: Configure Connection Options:
- Choose whether to create a shortcut for the VPN connection on your desktop.
- Click “Finish” to create the VPN connection.
Step 7: Configure VPN Authentication:
- Once the VPN connection is created, it will appear in the Network Connections window.
- Right-click on the newly created VPN connection and select “Properties” from the context menu.
- In the Properties window, navigate to the “Security” tab.
- Select the appropriate VPN protocol (e.g., PPTP, L2TP/IPsec) from the dropdown menu.
- Enter your VPN username and password in the respective fields.
- Optionally, you can configure advanced authentication and encryption settings.
- Click “OK” to save the changes.
Step 8: Connect to the VPN:
- To connect to the VPN, double-click on the VPN connection icon in the Network Connections window.
- Enter your VPN username and password when prompted.
- Click “Connect” to establish the VPN connection.
Step 9: Verify Connection Status:
- Once connected, the VPN connection icon will change its appearance to indicate a successful connection.
- You can verify the connection status by checking the Network Connections window or the system tray icon.
Step 10: Disconnect from the VPN:
- To disconnect from the VPN, right-click on the VPN connection icon in the Network Connections window.
- Select “Disconnect” from the context menu.
Advanced Configuration and Troubleshooting:
For advanced users or troubleshooting purposes, Windows XP offers additional options for configuring VPN connections:
- Advanced VPN Settings: In the Properties window of the VPN connection, you can access advanced settings for configuring VPN protocols, authentication methods, and encryption algorithms.
- VPN Logging: Enable VPN logging to track connection activities, diagnose connection issues, and troubleshoot connectivity problems effectively.
- Update VPN Client: Ensure that your VPN client software is up-to-date with the latest security patches and bug fixes to maintain optimal performance and compatibility.
Conclusion:
In conclusion, setting up a VPN connection in Windows XP is a straightforward process that offers users enhanced privacy, security, and accessibility benefits. By following the step-by-step guide outlined in this article and leveraging advanced configuration options, users can establish secure connections to remote networks and servers with ease. Whether accessing sensitive information on public Wi-Fi networks, circumventing geo-restrictions, or protecting confidential data, mastering the setup of a VPN connection empowers users to navigate the digital landscape with confidence and peace of mind. So take control of your online privacy and security today by setting up a VPN connection in Windows XP, and unlock the full potential of your internet experience.
