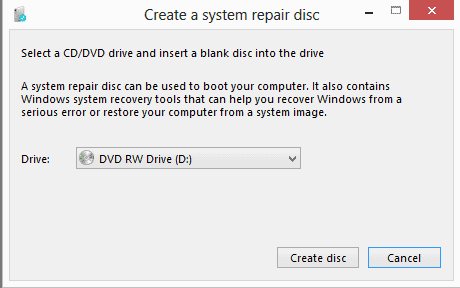
Creating a system repair disc in Windows 8 is a crucial step in ensuring that you have a backup solution in case your computer encounters startup issues or system errors. A system repair disc contains tools and utilities that can help diagnose and fix problems with the Windows operating system, including startup failures, corrupted system files, and system recovery. In this comprehensive guide, we’ll explore everything you need to know about creating a system repair disc in Windows 8, from accessing the system repair disc tool to using the disc to troubleshoot system problems effectively.
Understanding System Repair Disc:
A system repair disc is a bootable disc or USB drive that contains a set of diagnostic and recovery tools designed to help troubleshoot and repair issues with the Windows operating system. It includes utilities such as Startup Repair, System Restore, Command Prompt, and System Image Recovery, which can be used to fix common system problems and restore your computer to a working state.
Accessing System Repair Disc Tool:
To create a system repair disc in Windows 8, follow these steps:
- Open Control Panel: Press the Windows key + X to open the Power User menu, then click or tap on “Control Panel.”
- Access Recovery Options: In the Control Panel, navigate to “System and Security” > “File History” > “Recovery.” Alternatively, you can search for “Recovery” in the Control Panel search bar.
- Create a System Repair Disc: In the Recovery window, click or tap on “Create a system repair disc” in the left pane.
- Insert Media: If you haven’t already done so, insert a blank CD or DVD into your computer’s optical drive. If prompted, select the drive containing the blank disc.
- Start Creation: Click or tap on “Create disc” to begin the process of creating the system repair disc. The tool will copy the necessary files to the disc and verify the disc’s integrity.
- Completion: Once the creation process is complete, you’ll see a message indicating that the system repair disc was successfully created. Click or tap on “Close” to exit the wizard.
Using the System Repair Disc:
After creating a system repair disc, you can use it to troubleshoot and repair issues with your Windows 8 computer. Here’s how to use the system repair disc:
- Insert Disc: Insert the system repair disc into your computer’s optical drive.
- Boot from Disc: Restart your computer and access the BIOS or UEFI settings to change the boot order. Set the optical drive as the first boot device, then save changes and exit BIOS/UEFI settings.
- Start Repair: When prompted, press any key to boot from the system repair disc. The computer will load the Windows Recovery Environment (WinRE), which contains the diagnostic and recovery tools.
- Choose Language and Keyboard: Select your preferred language and keyboard layout when prompted.
- Choose Options: In the System Recovery Options window, you’ll see a list of available recovery options, including Startup Repair, System Restore, Command Prompt, and System Image Recovery. Choose the appropriate option based on the nature of the problem you’re experiencing.
- Follow Instructions: Follow the on-screen instructions to complete the selected recovery process. For example, if you choose Startup Repair, the tool will attempt to diagnose and fix startup issues automatically.
- Eject Disc: Once you’ve finished using the system repair disc, eject it from the optical drive and restart your computer. Remember to restore the boot order settings in BIOS/UEFI to their original configuration.
Conclusion:
Creating a system repair disc in Windows 8 is a crucial step in preparing for potential system problems and ensuring that you have a reliable recovery solution at your disposal. By following the steps outlined in this guide, you can create a system repair disc and use it to troubleshoot and repair issues with your Windows 8 computer effectively. Whether you’re dealing with startup failures, corrupted system files, or system recovery, having a system repair disc on hand can help you resolve these issues and restore your computer to a working state with minimal downtime.
