Installing a sound card allows you to enhance audio capabilities on your computer, whether for better sound quality, additional audio inputs/outputs, or support for specialized audio tasks like recording and editing. This comprehensive guide covers everything you need to know about installing a sound card, including preparation, types of sound cards, hardware requirements, installation methods, configuration steps, and troubleshooting tips.
Table of Contents
- Introduction to Installing a Sound Card
- Importance of Sound Quality
- Types of Sound Cards
- Preparation
- Choose the Right Sound Card
- Gather Tools and Materials
- Types of Sound Cards
- Internal Sound Cards
- External USB Sound Cards
- Hardware Requirements
- Compatibility with Operating System
- Available Slots (PCI, PCIe for internal cards)
- Methods for Installing a Sound Card
- Installing an Internal Sound Card
- Installing an External USB Sound Card
- Configuring the Sound Card
- Installing Drivers
- Setting Default Audio Device
- Testing and Verifying Audio
- Testing Audio Output/Input
- Adjusting Sound Settings
- Maintenance Tips
- Updating Drivers
- Audio Quality Optimization
- Troubleshooting
- Common Issues
- Solutions
- Conclusion
1. Introduction to Installing a Sound Card
Importance of Sound Quality
Sound cards play a crucial role in delivering high-quality audio output and providing additional audio inputs for tasks such as recording and live streaming. Installing a sound card can significantly enhance the overall audio experience on your computer, whether for gaming, multimedia production, or professional audio work.
Types of Sound Cards
- Internal Sound Cards: Installed directly into your computer’s motherboard, offering dedicated audio processing capabilities and connections for speakers, headphones, microphones, and other audio devices.
- External USB Sound Cards: Plug-and-play devices that connect to your computer via USB ports, providing portable and versatile audio solutions with improved sound quality over integrated audio.
2. Preparation
Choose the Right Sound Card
- Considerations: Determine whether you need an internal sound card for permanent installation or an external USB sound card for flexibility and portability.
- Compatibility: Ensure the sound card is compatible with your operating system (Windows, macOS, Linux) and supports the audio standards and connections you require.
Gather Tools and Materials
- Tools: Screwdriver (if installing an internal sound card).
- Materials: Sound card (internal or external), driver installation disc or download link (for initial setup).
3. Types of Sound Cards
Internal Sound Cards
- Description: Installed directly onto the motherboard via PCI or PCIe slots.
- Advantages: Dedicated audio processing, potentially higher sound quality, and multiple audio input/output ports.
- Disadvantages: Requires opening the computer case for installation and limited portability.
External USB Sound Cards
- Description: Connect externally to your computer via USB ports.
- Advantages: Plug-and-play convenience, portable, and improved audio quality compared to integrated audio.
- Disadvantages: May not offer as many features as internal sound cards and can be more susceptible to external interference.
4. Hardware Requirements
Compatibility with Operating System
- Drivers: Ensure the sound card is compatible with your operating system version.
- System Requirements: Check minimum system requirements specified by the manufacturer (CPU, RAM, available ports).
Available Slots (PCI, PCIe for Internal Cards)
- PCI Slots: Older interface for expansion cards, less common in modern motherboards.
- PCIe Slots: Current standard for expansion cards, offering higher bandwidth and compatibility with modern motherboards.
5. Methods for Installing a Sound Card
Installing an Internal Sound Card
- Prepare the Computer:
- Power down your computer completely.
- Disconnect all cables and peripherals.
- Open the Computer Case:
- Remove the side panel of your computer case to access the internal components.
- Ground yourself to discharge any static electricity by touching a metal part of the case.
- Locate PCI/PCIe Slot:
- Identify an available PCI or PCIe slot on your motherboard where you will install the sound card.
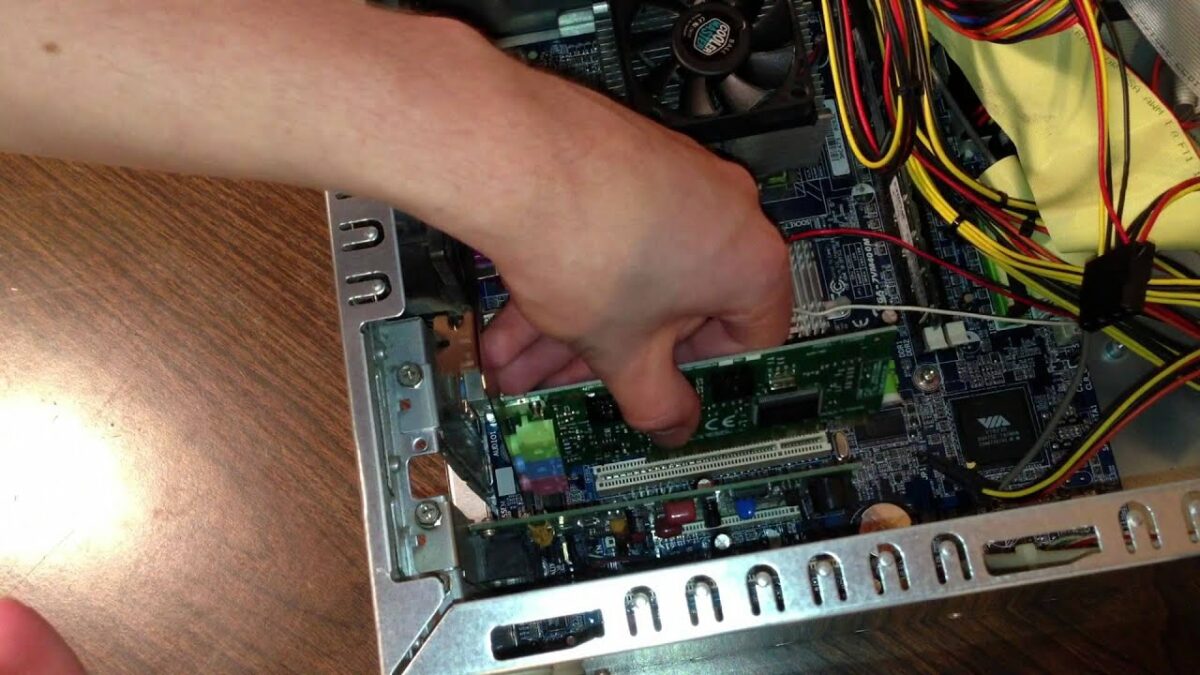
- Install the Sound Card:
- Remove the metal cover from the PCI or PCIe slot (if necessary).
- Align the sound card with the slot and gently press it into place until it is fully seated.
- Secure the sound card to the case using the screw or latch provided.
- Close the Computer Case:
- Ensure the sound card is securely installed and does not interfere with other components.
- Replace the side panel of the computer case and secure it with screws.
- Install Drivers:
- Power on your computer and wait for the operating system to detect the new hardware.
- Use the provided driver installation disc or download the latest drivers from the manufacturer’s website.
- Follow on-screen prompts to install the drivers.
- Set Default Audio Device:
- Open the Sound settings in your operating system and set the newly installed sound card as the default audio playback device.
- Adjust audio settings such as volume and sound effects as needed.
Installing an External USB Sound Card
- Prepare the External Sound Card:
- Remove the external USB sound card from its packaging.
- Identify an available USB port on your computer where you will connect the sound card.
- Connect the Sound Card:
- Plug the USB sound card into the available USB port on your computer.
- Wait for the operating system to detect the new hardware and install necessary drivers automatically.
- Install Drivers (if required):
- If the operating system does not automatically install drivers, use the provided driver installation disc or download the latest drivers from the manufacturer’s website.
- Follow on-screen prompts to install the drivers.
- Set Default Audio Device:
- Open the Sound settings in your operating system and set the USB sound card as the default audio playback device.
- Configure audio settings and test audio output/input as needed.
6. Configuring the Sound Card
Installing Drivers
- Driver Installation: Install the drivers as per the instructions provided with the sound card or from the manufacturer’s website.
- Software Utility: Some sound cards come with a software utility that allows advanced audio configuration, such as equalizer settings, surround sound effects, and microphone enhancements.
Setting Default Audio Device
- Operating System Settings: Open the Sound settings in your operating system (e.g., Windows Sound settings, macOS Audio MIDI Setup) to set the newly installed sound card as the default audio device for playback and recording.
7. Testing and Verifying Audio
Testing Audio Output/Input
- Playback Test: Play audio files or videos to verify sound output through speakers or headphones connected to the sound card.
- Recording Test: Use a microphone or other audio input device to test recording capabilities through the sound card.
Adjusting Sound Settings
- Volume Control: Adjust volume levels using the volume control options in your operating system or the sound card’s software utility.
- Sound Effects: Customize sound effects, such as bass boost or virtual surround sound, through the sound card’s software utility (if available).
8. Maintenance Tips
Updating Drivers
- Regular Updates: Periodically check for driver updates from the manufacturer’s website to ensure compatibility and performance improvements.
- Automatic Updates: Enable automatic updates if available to receive the latest driver versions.
Audio Quality Optimization
- Equalizer Settings: Adjust equalizer settings to fine-tune audio output based on personal preferences or specific use cases (e.g., gaming, music production).
- Noise Reduction: Enable noise reduction or echo cancellation features for clearer audio during voice calls or recordings.
9. Troubleshooting
Common Issues
- Driver Issues: Incorrect or outdated drivers may cause audio playback or recording problems.
- Device Recognition: Ensure the sound card is properly recognized by the operating system and configured as the default audio device.
- Audio Playback/Recording Problems: Check connections, settings, and audio cables for issues affecting sound quality or performance.
Solutions
- Driver Update: Install the latest drivers from the manufacturer’s website to resolve compatibility issues and improve audio performance.
- Device Configuration: Verify sound settings in the operating system and adjust configurations for optimal audio playback and recording.
- Hardware Check: Ensure all connections are secure and cables are properly connected to the sound card and audio devices.
10. Conclusion
Installing a sound card allows you to enhance audio capabilities on your computer, whether for improved sound quality, additional audio inputs/outputs, or specialized audio tasks. By following the steps outlined in this guide—preparing for installation, choosing the right sound card, installing drivers, configuring audio settings, testing audio output/input, and performing maintenance—you can successfully set up and utilize a sound card. Whether you opt for an internal sound card for dedicated audio processing or an external USB sound card for flexibility, sound cards play a vital role in achieving high-quality audio experiences. If you encounter any issues during installation or operation, refer to troubleshooting tips or consult with the sound card manufacturer’s support for assistance.