Rotating a video can be an essential editing task for various reasons, including correcting the orientation of footage, creating dynamic visual effects, or fitting a specific aspect ratio. PowerDirector, developed by CyberLink, offers a robust video rotate tool that simplifies this process. This detailed guide will walk you through everything you need to know about using the video rotate tool in PowerDirector, from basic rotations to advanced techniques.
Understanding the Video Rotate Tool in PowerDirector
The video rotate tool in PowerDirector allows you to change the orientation of your video. This can be useful for:
- Correcting Orientation: Fixing videos shot in the wrong orientation (e.g., portrait instead of landscape).
- Creative Effects: Adding rotation effects for artistic or cinematic purposes.
- Fitting Aspect Ratios: Adjusting the video to fit specific screen sizes or aspect ratios.
Getting Started with PowerDirector
Before you begin rotating your video, ensure you have PowerDirector installed on your computer. If you haven’t installed it yet, download and install the latest version from the CyberLink website. Once installed, open PowerDirector and follow these steps:
Step 1: Create a New Project
- Launch PowerDirector: Open the software.
- Start a New Project: Click on “New Project” or select “Create New Project” from the File menu.
Step 2: Import Your Video
- Media Room: Navigate to the “Media Room” tab.
- Import Media: Click on “Import Media Files” and select the video you want to edit.
Basic Rotation Operations
Now that your video is imported, you can begin using the rotate tool. Here’s a step-by-step guide to basic rotation operations in PowerDirector:
Step 1: Add Your Video to the Timeline
- Drag and Drop: Drag your video from the Media Room to the timeline.
- Select the Video: Click on the video clip in the timeline to select it.
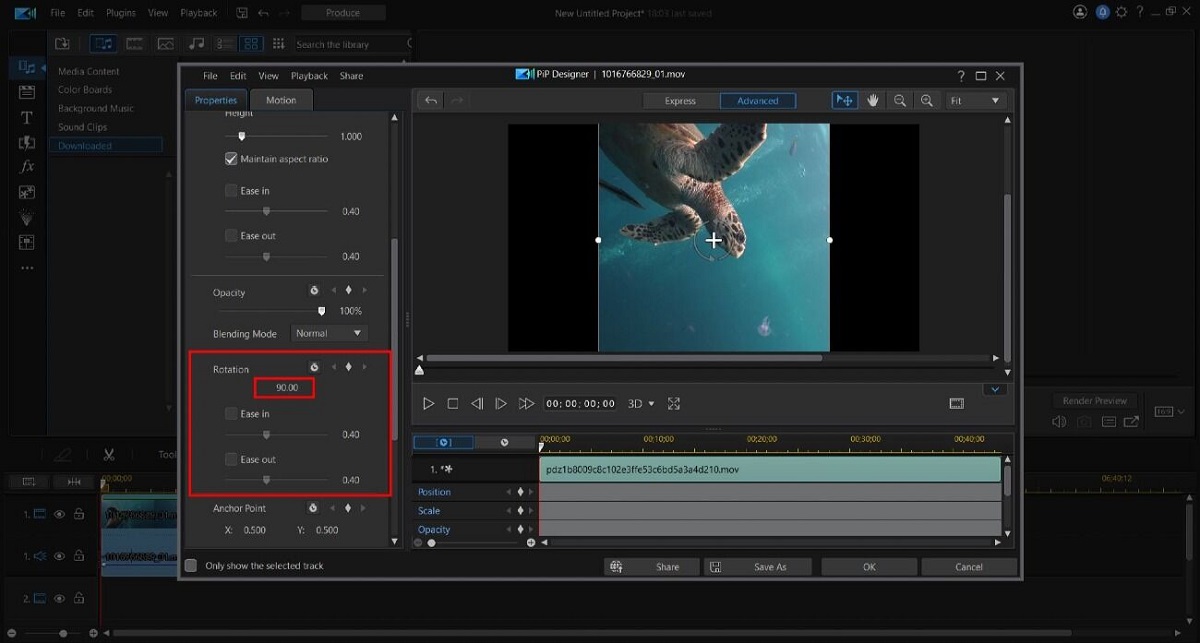
Step 2: Open the Rotate Tool
- Tools Menu: Click on the “Tools” button located above the timeline.
- Power Tools: Select “Power Tools” from the dropdown menu. This will open the Power Tools window.
- Video Rotation: Check the “Video Rotation” box to enable the rotation options.
Step 3: Rotate the Video
- Rotate Options: Use the rotation sliders or input specific degree values to rotate your video. You can rotate the video by 90, 180, 270 degrees, or any custom angle.
- Preview the Rotation: Use the preview window to see how the rotated video will look. Make any necessary adjustments to the rotation angle.
Step 4: Apply the Rotation
- OK Button: Once you are satisfied with the rotation, click the “OK” button to apply the changes.
- Playback: Play the video in the timeline to see the rotated result.
Advanced Rotation Techniques
PowerDirector offers several advanced features to enhance your rotation process. These techniques can help you achieve more precise and creative results.
Using Keyframes for Dynamic Rotation
Keyframes allow you to create dynamic rotation effects, where the rotation angle changes over time. This can be useful for creating smooth transitions, rotating elements, or adding visual interest to your video.
Step 1: Open the Keyframe Settings
- Select the Video Clip: Click on the video clip in the timeline.
- Keyframe Settings: Click on the “Keyframe” button above the timeline to open the keyframe settings panel.
Step 2: Add Keyframes
- Position the Playhead: Move the playhead to the point in the timeline where you want the rotation effect to start.
- Set the First Keyframe: Adjust the rotation angle as desired and click the “Add Keyframe” button.
- Move the Playhead: Move the playhead to the point where you want the rotation effect to end.
- Set the Second Keyframe: Adjust the rotation angle again and click the “Add Keyframe” button.
Step 3: Preview and Adjust
- Playback: Play the video to see the dynamic rotation effect. The rotation angle will transition smoothly between the keyframes.
- Adjust Keyframes: If needed, adjust the rotation angles at each keyframe to refine the effect.
Combining Rotation with Other Effects
You can combine rotation with other effects, such as zoom, pan, and motion, to create more complex and engaging visual effects.
Step 1: Open the Power Tools
- Select the Video Clip: Click on the video clip in the timeline.
- Power Tools: Click on the “Tools” button and select “Power Tools.”
Step 2: Enable Multiple Effects
- Enable Effects: Check multiple effect options such as “Video Rotation,” “Crop/Zoom/Pan,” and “Motion.”
- Adjust Each Effect: Configure each effect as desired. For instance, you can rotate the video while also zooming in or panning across the frame.
Step 3: Apply and Preview
- OK Button: Click “OK” to apply the effects.
- Playback: Play the video to see how the combined effects work together.
Rotating Specific Parts of a Video
If you only want to rotate a specific part of your video, you can split the video clip and apply the rotation to the desired section.
Step 1: Split the Video Clip
- Select the Video Clip: Click on the video clip in the timeline.
- Split Tool: Position the playhead at the start of the section you want to rotate and click the “Split” button (scissors icon) to divide the clip.
Step 2: Rotate the Selected Section
- Select the Section: Click on the newly created clip section that you want to rotate.
- Rotate Tool: Open the Power Tools, enable “Video Rotation,” and adjust the rotation angle for the selected section.
Step 3: Apply and Preview
- OK Button: Click “OK” to apply the rotation to the selected section.
- Playback: Play the video to see the rotated section in context with the rest of the video.
Tips and Best Practices for Rotating Videos
- Correct Orientation Early: If your video was shot in the wrong orientation, correct it early in the editing process to avoid complications later.
- Smooth Transitions: Use keyframes to create smooth rotation transitions, especially when combining with other effects.
- Avoid Over-Rotating: Be mindful of the rotation angles to avoid disorienting the viewer or cropping out important parts of the video.
- Combine Effects Judiciously: While combining rotation with other effects can be powerful, use it judiciously to avoid overwhelming the viewer.
Troubleshooting Common Issues
Issue 1: Rotated Video Appears Cropped
- Solution: Ensure the rotation angle does not exceed the dimensions of the video frame. You may need to zoom out slightly to fit the rotated video within the frame.
Issue 2: Rotation Not Applied Uniformly
- Solution: Verify that the rotation angle is consistent across keyframes. Use the keyframe settings to ensure smooth transitions between rotation angles.
Issue 3: Rotated Video Loses Quality
- Solution: Start with high-resolution footage to minimize quality loss when rotating. Avoid excessive zooming or other effects that may degrade video quality.
Issue 4: Rotated Section Not Aligned with Rest of Video
- Solution: Use the alignment tools in the Power Tools interface to ensure the rotated section aligns seamlessly with the rest of the video. Adjust keyframes if necessary for a smooth transition.
Conclusion
Using the video rotate tool in PowerDirector is an effective way to enhance your video editing projects. Whether you’re correcting orientation, creating dynamic effects, or combining multiple effects, the rotate tool offers a range of options to suit your needs. By following this comprehensive guide, you can master the basics and explore advanced techniques to take your video editing skills to the next level. Happy editing!