Introduction:
Creating well-structured and organized documents is a fundamental aspect of effective communication, and Microsoft Word 2013 provides powerful tools for achieving this. Bulleted and numbered lists are essential elements that enhance readability and help convey information in a clear and systematic manner. In this comprehensive guide, we will explore the intricacies of adding and modifying bulleted and numbered lists in Word 2013, providing you with a thorough understanding of the tools and customization options available.
Understanding Bulleted and Numbered Lists in Word 2013:
1. Definition and Purpose:
- Bulleted Lists:
- A bulleted list presents information in a series of items, each preceded by a bullet point. It is useful for presenting non-sequential or unordered information.
- Numbered Lists:
- A numbered list organizes information in a sequential or ordered manner. Each item is numbered, providing a clear structure to the content.
2. Types of Lists:
- Simple Bulleted or Numbered Lists:
- Basic lists with default bullet points or numbers.
- Multilevel Lists:
- Lists with hierarchical levels, suitable for organizing information with subpoints.
- Customized Lists:
- Lists that can be customized with different symbols, styles, or formatting.
Adding Bulleted and Numbered Lists:
1. Adding Bulleted Lists:
- Using the Ribbon:
- Procedure:
- Select the text you want to turn into a bulleted list.
- Go to the “Home” tab.
- Click the “Bullets” button in the Paragraph group.
- Procedure:
- Keyboard Shortcut:
- Procedure:
- Type your list items.
- Press “Ctrl + Shift + L” to apply bullets.
- Procedure:
2. Adding Numbered Lists:
- Using the Ribbon:
- Procedure:
- Select the text you want to turn into a numbered list.
- Go to the “Home” tab.
- Click the “Numbering” button in the Paragraph group.
- Procedure:
- Keyboard Shortcut:
- Procedure:
- Type your list items.
- Press “Ctrl + Shift + L” to apply numbering.
- Procedure:
Modifying Lists in Word 2013:
1. Customizing Bulleted Lists:
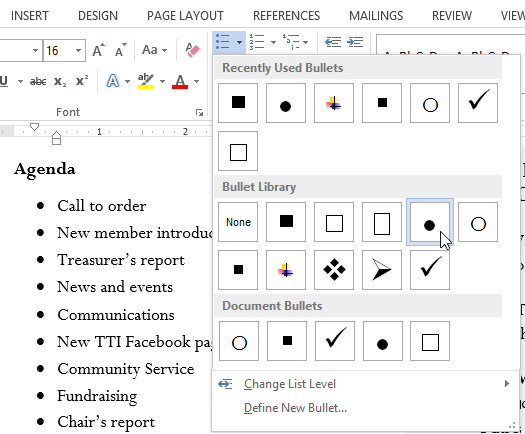
- Changing Bullets:
- Procedure:
- Right-click on a bulleted item.
- Choose “Bullets and Numbering.”
- Select a different bullet style.
- Procedure:
- Adjusting Indents:
- Procedure:
- Use the Increase Indent and Decrease Indent buttons in the Paragraph group to adjust indentation.
- Procedure:
- Custom Symbols:
- Procedure:
- Right-click on a bulleted item.
- Choose “Bullets and Numbering.”
- Select “Define New Bullet” to choose custom symbols.
- Procedure:
2. Customizing Numbered Lists:
- Changing Numbering Styles:
- Procedure:
- Right-click on a numbered item.
- Choose “Bullets and Numbering.”
- Select a different numbering style.
- Procedure:
- Altering Number Formats:
- Procedure:
- Right-click on a numbered item.
- Choose “Bullets and Numbering.”
- Select “Define New Number Format” to customize number formats.
- Procedure:
- Multilevel Lists:
- Procedure:
- Use the “Multilevel List” button in the Paragraph group to create hierarchical lists.
- Customize levels using the “Define New Multilevel List” option.
- Procedure:
Advanced List Features:
1. Restarting Numbering:
- Procedure:
- Right-click on the numbered list.
- Choose “Restart Numbering” to reset the numbering at the selected point.
2. Using Styles for Consistency:
- Procedure:
- Apply styles like “Heading 1” or “Heading 2” to maintain consistent formatting.
3. Removing Bullets or Numbers:
- Procedure:
- Select the list items.
- Click the “Bullets” or “Numbering” button to remove formatting.
4. Adjusting List Spacing:
- Procedure:
- Access the Paragraph dialog box.
- Modify spacing options for precise control.
Best Practices and Tips:
- Consistency is Key:
- Maintain consistent list formatting throughout the document for a professional appearance.
- Use Styles for Efficiency:
- Apply styles to headings and lists to ensure consistent formatting across the document.
- Utilize Multilevel Lists Sparingly:
- Use multilevel lists for complex information but avoid overusing them for simpler documents.
- Consider Reader Experience:
- Optimize list formatting for readability and ease of understanding.
- Customize for Emphasis:
- Customize list styles to draw attention to key points or create a visual hierarchy.
- Preview Before Finalizing:
- Use Print Preview to ensure that lists appear as intended before printing or sharing.
Conclusion:
Mastering the creation and customization of bulleted and numbered lists in Word 2013 is essential for producing well-organized and visually appealing documents. By understanding the various options, customization settings, and advanced features available, you can confidently leverage these tools to enhance the structure and clarity of your content. As you embark on your document formatting journey, let the principles of consistency, customization, and reader-centric design guide you to documents that not only convey information effectively but also exhibit a professional and polished appearance. Happy formatting!