Introduction
Microsoft 365, a comprehensive suite of productivity tools, empowers users to collaborate, communicate, and manage their work seamlessly. One of the key features that enhance user navigation and accessibility is the customizable navigation bar on Microsoft365.com. In this in-depth guide, we will explore the intricacies of customizing the navigation bar, offering step-by-step instructions, best practices, and creative strategies to tailor the user experience to individual and organizational needs.
I. The Importance of a Customizable Navigation Bar
- Personalization for Enhanced Productivity: A customizable navigation bar allows users to tailor their Microsoft 365 experience, placing frequently accessed tools and applications front and center. This personalization fosters a more efficient workflow, enabling users to navigate effortlessly through the diverse array of Microsoft 365 offerings.
- Organizational Alignment: For businesses and enterprises, customizing the navigation bar ensures that the most relevant and essential applications are prominently featured. This alignment with organizational priorities streamlines user interactions and promotes consistency in tool usage across teams.
- Adaptability to Evolving Workflows: As work processes evolve, so do the tools and applications that users rely on. A customizable navigation bar provides the flexibility to adapt to changing workflows, ensuring that users have instant access to the tools they need at any given moment.
II. Navigating to the Navigation Bar Customization
- Accessing Microsoft 365: To begin the customization process, users need to navigate to Microsoft365.com and sign in to their Microsoft 365 account. Once logged in, the navigation bar can be customized based on individual preferences.
- Locating the Customization Options: The customization options for the navigation bar can typically be found by clicking on the ellipsis (…) or a similar icon next to the existing navigation items. This action opens a menu where users can choose to edit or customize the navigation bar.
III. Step-by-Step Guide to Customizing the Navigation Bar
- Accessing the Edit Mode: Click on the ellipsis (…) next to the navigation bar or a similar customization icon to enter the edit mode. This mode allows users to add, remove, or rearrange items on the navigation bar.
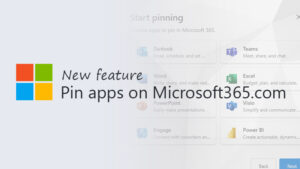
- Adding Apps and Tools: Users can add their preferred apps and tools to the navigation bar by selecting the “Add apps” or similar option. This opens a menu where users can choose from a list of available applications and add them to the navigation bar for quick access.
- Removing Unnecessary Items: To declutter the navigation bar, users can remove unnecessary or less frequently used items. Click on the “Edit” or “Customize” option, and then select the “Remove” option next to the items to be taken off the navigation bar.
- Rearranging Items: Customization also includes rearranging the order of items on the navigation bar. Users can click and drag items to their preferred positions, ensuring that the most important tools are conveniently located for easy access.
- Saving Changes: Once the customization is complete, users should save their changes to apply the new navigation bar settings. This may involve clicking a “Save” or “Done” button, depending on the platform and interface.
IV. Best Practices for Navigation Bar Customization
- Prioritize Essential Tools: Consider the most crucial tools and applications that align with daily tasks and responsibilities. Prioritize these items on the navigation bar to optimize efficiency and reduce the time spent searching for frequently used tools.
- Consider User Roles: In an organizational context, tailor the navigation bar based on user roles and responsibilities. Sales teams might prioritize CRM tools, while marketing teams might prioritize design and content creation applications.
- Regularly Review and Update: Workflows and tool preferences evolve over time. Periodically review and update the navigation bar to ensure that it aligns with current work requirements and priorities.
- Utilize Folders and Categories: For users with a diverse range of tools, organizing them into folders or categories can prevent the navigation bar from becoming cluttered. This categorization enhances visual clarity and simplifies navigation.
- Leverage Integrations: Explore integrations between Microsoft 365 applications and third-party tools. Where possible, integrate external tools directly into the navigation bar to create a seamless and unified user experience.
V. Troubleshooting Navigation Bar Customization Issues
- Permission Challenges: If users encounter issues customizing the navigation bar, ensure that they have the necessary permissions to modify settings. Administrators can review and adjust user roles to grant the appropriate customization privileges.
- Browser Compatibility: Certain customization features may be browser-specific. If users experience issues, recommend trying a different browser to determine if the problem persists.
- Clearing Cache and Cookies: Browser cache and cookies can sometimes interfere with customization processes. Instruct users to clear their browser cache and cookies before attempting to customize the navigation bar.
- Platform-Specific Guidance: Different platforms (Windows, macOS, mobile devices) may have variations in the customization process. Provide platform-specific guidance to ensure users follow the correct steps for their devices.
VI. Advanced Customization Techniques
- Power Platform Integration: For users seeking advanced customization options, the Power Platform offers extensive capabilities. Power Apps, Power Automate, and Power BI can be integrated into the navigation bar, providing a customized interface for specific business processes.
- SharePoint Hub Sites Integration: Organizations utilizing SharePoint Hub Sites can integrate them into the navigation bar, providing a centralized access point for related sites, news, and resources.
- Custom Branding and Theming: Explore custom branding and theming options to align the navigation bar with organizational branding. This can include custom colors, logos, and branding elements for a cohesive look.
- User Training and Documentation: As organizations adopt advanced customization features, providing user training and documentation becomes crucial. Ensure that users are equipped with the knowledge and skills to leverage advanced customization effectively.
VII. Conclusion
Customizing the navigation bar on Microsoft 365 is a powerful tool for enhancing user experience, improving productivity, and aligning digital workspaces with organizational goals. In this comprehensive guide, we’ve explored the significance of a customizable navigation bar, provided a step-by-step guide to customization, shared best practices, and delved into advanced techniques. Whether you’re an individual user seeking to optimize your Microsoft 365 experience or an administrator looking to enhance the navigation bar for an entire organization, this guide equips you with the knowledge and strategies needed to master the art of navigation bar customization. As organizations continue to leverage the collaborative power of Microsoft 365, tailoring the navigation bar becomes instrumental in creating a personalized and efficient digital workspace that aligns seamlessly with the diverse needs of users and teams.