Introduction: Vehicle dynamics modeling and simulation play a crucial role in the automotive industry, enabling engineers to analyze and optimize the performance, handling, and safety of vehicles in various driving conditions. CarSim is a leading software tool developed by Mechanical Simulation Corporation for modeling and simulating vehicle dynamics, providing engineers with a comprehensive platform for virtual testing and validation of vehicle systems and components. In this comprehensive guide, we will delve into the intricacies of modeling and simulating vehicle dynamics in CarSim, covering everything from basic concepts to advanced techniques and optimization strategies.
Section 1: Understanding Vehicle Dynamics Simulation
1.1 Overview of Vehicle Dynamics Simulation: Vehicle dynamics simulation involves modeling the behavior of vehicles in response to driver inputs, road conditions, and environmental factors, such as terrain, weather, and traffic. Vehicle dynamics simulation helps engineers understand how vehicles accelerate, brake, steer, and maneuver in various scenarios, enabling them to evaluate performance, stability, and safety characteristics and optimize vehicle design and control strategies accordingly.
1.2 Importance of Vehicle Dynamics Simulation: Vehicle dynamics simulation is essential for automotive engineers and manufacturers to develop safe, reliable, and high-performance vehicles that meet customer expectations and regulatory requirements. By simulating vehicle dynamics in virtual environments, engineers can identify potential issues, assess design alternatives, and validate control algorithms early in the development process, reducing time and cost associated with physical testing and prototyping.
1.3 Role of CarSim: CarSim is a powerful software tool for modeling and simulating vehicle dynamics, offering a range of features and capabilities for simulating vehicle behavior, testing control systems, and analyzing performance metrics. CarSim enables engineers to create accurate and realistic vehicle models, simulate complex driving scenarios, and evaluate vehicle dynamics under various conditions, providing valuable insights into vehicle performance and behavior.
Section 2: Introduction to CarSim Software
2.1 Overview of CarSim: CarSim is a comprehensive vehicle dynamics simulation software developed by Mechanical Simulation Corporation for engineers involved in vehicle design, development, and testing. CarSim offers a user-friendly interface, advanced modeling capabilities, and high-fidelity simulation algorithms, making it a valuable tool for automotive engineers, researchers, and educators.
2.2 CarSim Features and Capabilities: CarSim provides a wide range of features and capabilities for modeling and simulating vehicle dynamics, including:
- Vehicle modeling: CarSim enables engineers to create detailed vehicle models, including chassis, suspension, steering, tires, drivetrain, and control systems, using a combination of analytical models, empirical data, and CAD geometry.
- Environment simulation: CarSim simulates realistic driving environments, including roads, terrain, weather conditions, and traffic patterns, allowing engineers to evaluate vehicle performance and behavior in diverse scenarios.
- Control system integration: CarSim integrates with control system development tools, such as Simulink and MATLAB, enabling engineers to design, simulate, and validate vehicle control algorithms for stability, traction, and driver assistance systems.
- Post-processing and analysis: CarSim provides tools for post-processing and analyzing simulation results, including visualization, data logging, and performance metrics, facilitating interpretation of simulation data and generation of test reports.
2.3 Benefits of Using CarSim: CarSim offers several benefits for engineers and organizations involved in vehicle dynamics simulation, including:
- Accurate and realistic simulation: CarSim uses advanced modeling techniques and validated simulation algorithms to provide accurate and realistic results, enabling engineers to predict vehicle behavior with confidence and precision.
- Time and cost savings: CarSim accelerates the vehicle development process by enabling virtual testing and validation of vehicle systems and components, reducing the need for physical prototypes and testing iterations.
- Design optimization: CarSim enables engineers to evaluate design alternatives, assess performance trade-offs, and optimize vehicle design and control strategies to meet performance, safety, and regulatory requirements.
- Knowledge transfer and training: CarSim provides a platform for knowledge transfer and training in vehicle dynamics simulation, allowing engineers to gain hands-on experience with vehicle modeling, simulation, and analysis techniques, enhancing their skills and expertise in the field.
Section 3: Modeling Vehicle Dynamics in CarSim
3.1 Vehicle Modeling: Engineers begin by creating a detailed vehicle model in CarSim, including chassis geometry, suspension kinematics, tire properties, and drivetrain characteristics. CarSim provides a graphical interface for defining vehicle components, specifying parameters, and configuring subsystems, such as suspension types, tire models, and steering systems.
3.2 Road and Terrain Modeling: Engineers simulate realistic driving environments by defining roads, terrain profiles, and surface conditions in CarSim. CarSim offers tools for generating road profiles, specifying road characteristics, and simulating road irregularities, such as bumps, potholes, and roughness, to emulate real-world driving conditions accurately.
3.3 Driver Inputs and Control Systems: Engineers model driver inputs, such as throttle, brake, and steering commands, using predefined driver models or custom control algorithms in CarSim. CarSim integrates with control system development tools, such as Simulink, enabling engineers to design, simulate, and validate vehicle control algorithms for stability, traction, and driver assistance systems.
3.4 Simulation Setup and Parameters: Engineers configure simulation settings and parameters in CarSim, including time step, integration method, solver options, and numerical tolerances, to ensure accuracy, stability, and efficiency of simulations. CarSim provides options for specifying simulation duration, sampling rates, and output formats, allowing engineers to tailor simulations to specific requirements and objectives.
Section 4: Simulating Vehicle Dynamics in CarSim
4.1 Running Simulations: Once the vehicle model and simulation setup are defined, engineers run simulations in CarSim to simulate vehicle dynamics under various driving scenarios and conditions. CarSim provides options for interactive simulation, batch simulation, and parameter sweeps, enabling engineers to explore design alternatives, analyze performance metrics, and evaluate vehicle behavior efficiently.
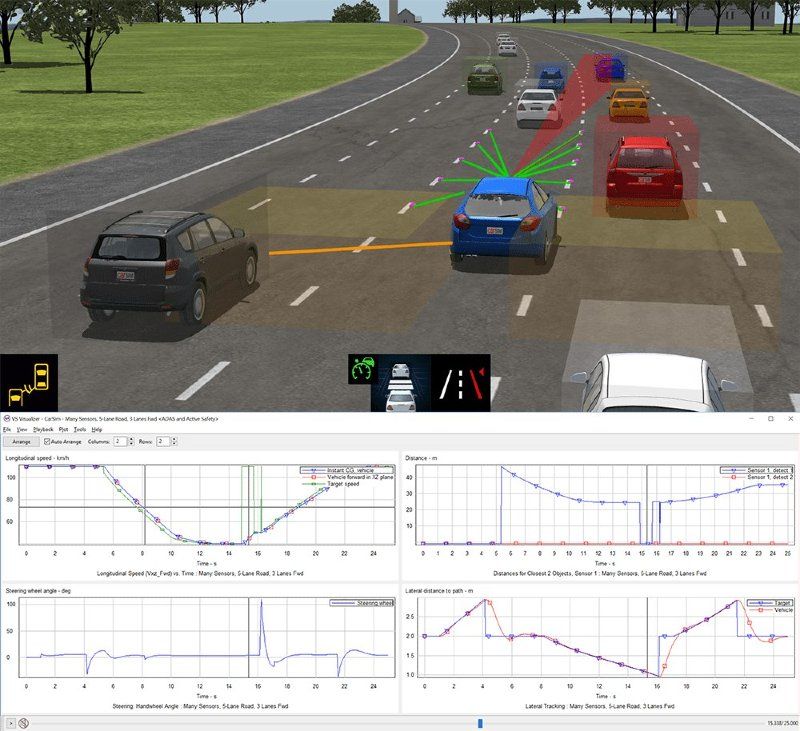
4.2 Analyzing Simulation Results: After running simulations, engineers analyze simulation results in CarSim to assess vehicle performance, stability, and safety characteristics. CarSim provides tools for visualizing simulation data, plotting time histories, and generating performance metrics, such as vehicle speed, acceleration, braking distance, and lateral dynamics, facilitating interpretation of simulation results and comparison of design alternatives.
4.3 Validating Simulation Results: Engineers validate simulation results in CarSim by comparing them against experimental data, field measurements, or benchmark simulations to ensure accuracy and reliability. CarSim offers options for sensitivity analysis, parameter tuning, and model validation, enabling engineers to refine vehicle models, improve simulation accuracy, and increase confidence in simulation predictions.
Section 5: Advanced Techniques and Optimization Strategies
5.1 Parameter Optimization: Engineers use optimization techniques in CarSim to optimize vehicle design and control parameters, such as suspension settings, tire properties, and control gains, to achieve desired performance objectives, such as ride comfort, handling stability, and fuel efficiency. CarSim provides options for sensitivity analysis, design of experiments (DOE), and optimization algorithms, such as genetic algorithms and gradient-based methods, to automate parameter optimization and search for optimal solutions efficiently.
5.2 Design Exploration and Trade-off Analysis: Engineers explore design alternatives and analyze performance trade-offs in CarSim by systematically varying design parameters, such as vehicle geometry, component properties, and control strategies, and evaluating their impact on vehicle dynamics and performance metrics. CarSim provides tools for sensitivity analysis, response surface modeling, and multi-objective optimization, enabling engineers to identify design sensitivities, assess trade-offs, and optimize vehicle design and control strategies effectively.
5.3 Integration with Vehicle Development Process: Engineers integrate CarSim with the vehicle development process by linking CarSim models with other engineering tools and workflows, such as CAD software, finite element analysis (FEA), and vehicle dynamics testing rigs, to facilitate data exchange, model validation, and design iteration. CarSim supports standard file formats, such as OpenSim, FMI, and MATLAB/Simulink, enabling seamless integration with third-party tools and platforms, and enhancing collaboration and interoperability across the vehicle development lifecycle.
Section 6: Best Practices and Tips for Vehicle Dynamics Modeling and Simulation in CarSim
6.1 Model Validation and Calibration: Validate and calibrate vehicle models in CarSim using experimental data, field measurements, or benchmark simulations to ensure accuracy and reliability of simulation predictions. Compare simulation results against reference data, adjust model parameters, and refine model assumptions to improve correlation with real-world observations and increase confidence in simulation predictions.
6.2 Sensitivity Analysis and Uncertainty Quantification: Perform sensitivity analysis and uncertainty quantification in CarSim to assess the impact of input uncertainties, model assumptions, and parameter variations on simulation results and identify sources of uncertainty and sensitivity in vehicle dynamics predictions. Use Monte Carlo simulation, Latin hypercube sampling, and probabilistic analysis techniques to quantify uncertainties and assess their implications on design decisions and risk management.
6.3 Model Documentation and Version Control: Document vehicle models, simulation setups, and analysis results in CarSim to maintain a comprehensive record of simulation studies, design iterations, and validation efforts. Use version control systems, such as Git or SVN, to manage model files, track changes, and collaborate with team members effectively, ensuring consistency, traceability, and reproducibility of simulation data and results.
Conclusion: Modeling and simulating vehicle dynamics in CarSim provide engineers with a powerful and versatile tool for analyzing and optimizing vehicle performance, handling, and safety characteristics in virtual environments. By mastering the principles, techniques, and best practices discussed in this guide, engineers can leverage CarSim to create accurate and realistic vehicle models, simulate complex driving scenarios, and evaluate design alternatives efficiently and effectively. With its advanced features, comprehensive functionality, and user-friendly interface, CarSim continues to be a trusted software solution for vehicle dynamics modeling and simulation in the automotive industry, driving innovation and excellence in vehicle development and engineering.