Introduction: Adobe Photoshop is a powerful and feature-rich tool, but as creatives, we’re always seeking ways to optimize our workflow and work more efficiently. In this extensive guide, we will explore three time-saving tips that can significantly enhance your speed and productivity in Photoshop. From optimizing settings to leveraging keyboard shortcuts, these tips are designed to streamline your creative process and allow you to focus on bringing your ideas to life without unnecessary delays.
Section 1: Optimizing Photoshop Settings for Speed Efficiency begins with a well-optimized workspace. In this section, we will delve into key settings and preferences in Photoshop that can significantly impact your speed and overall performance. Explore adjustments to cache levels, history states, and other essential settings to ensure that Photoshop operates smoothly, allowing you to navigate and edit your projects without lag.
Subsection 1.1: Adjusting Cache Levels for Responsive Editing Learn how adjusting cache levels can impact the responsiveness of your Photoshop experience. Discover the optimal cache level settings for your system and projects, ensuring that image rendering and editing are swift and seamless. This subsection will guide you through the process of fine-tuning cache levels for optimal performance.
Subsection 1.2: Managing History States for Efficient Undo Options Efficiently manage your undo options by optimizing the number of history states in Photoshop. Learn how to strike a balance between having enough history states for flexibility and minimizing the burden on system resources. This subsection will provide insights into managing history states to enhance your workflow.
Subsection 1.3: Utilizing Graphics Processor Settings Explore the impact of graphics processor settings on Photoshop performance. Understand how leveraging your computer’s graphics processor can accelerate certain tasks and operations. This subsection will guide you through configuring and utilizing graphics processor settings for a faster editing experience.
Subsection 1.4: Customizing Keyboard Shortcuts for Quick Access Customize keyboard shortcuts to create a personalized and efficient editing experience. Learn how to assign shortcuts to frequently used tools and commands, reducing the time spent navigating menus. This subsection will provide step-by-step instructions on customizing keyboard shortcuts for quick and intuitive access to essential functions.
Section 2: Harnessing the Power of Keyboard Shortcuts Keyboard shortcuts are a game-changer when it comes to working swiftly in Photoshop. In this section, we will explore a variety of keyboard shortcuts that cover everything from basic navigation to advanced editing commands. Discover how memorizing and incorporating these shortcuts into your workflow can significantly speed up your creative process.
Subsection 2.1: Essential Navigation Shortcuts for Seamless Movement Master essential navigation shortcuts that allow you to move around your canvas with ease. From panning and zooming to quickly switching between open documents, these shortcuts will enhance your overall navigation efficiency. This subsection will provide a comprehensive list of navigation shortcuts for seamless movement within Photoshop.
Subsection 2.2: Time-Saving Selection Shortcuts for Precision Optimize your selection process by mastering selection shortcuts. Learn how to create, modify, and navigate selections quickly, allowing for more precise editing. This subsection will guide you through a range of selection shortcuts to expedite your workflow and achieve accurate selections.
Subsection 2.3: Accelerating Layer Management with Shortcuts Efficiently manage layers using keyboard shortcuts. Explore shortcuts for creating, duplicating, and organizing layers, as well as toggling layer visibility and blending modes. This subsection will provide a collection of layer management shortcuts to expedite your editing process and maintain a well-organized project.
Subsection 2.4: Speeding Up Brush and Tool Actions Enhance your brushwork and overall tool efficiency by incorporating keyboard shortcuts. Learn how to quickly switch between brush presets, adjust opacity and flow, and toggle essential tool options. This subsection will guide you through keyboard shortcuts for accelerating your use of brushes and other essential tools in Photoshop.
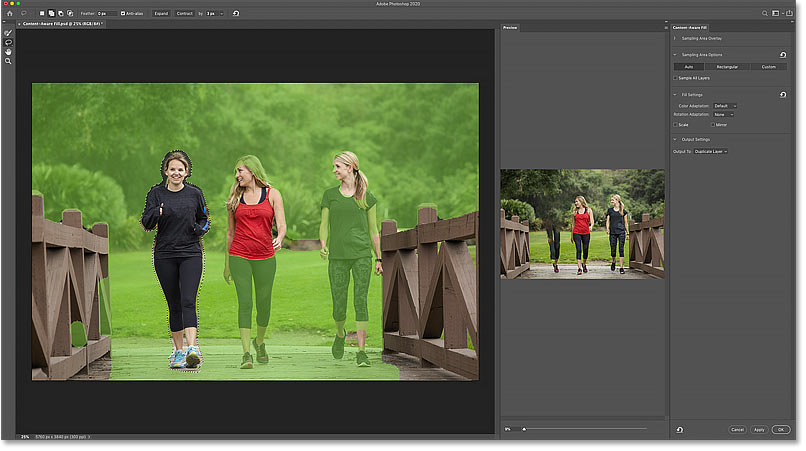
Section 3: Utilizing Time-Saving Features and Techniques Beyond settings and shortcuts, Photoshop offers a plethora of features and techniques designed to save you time during your creative process. In this section, we will explore three advanced time-saving tips that leverage specific tools and functionalities to boost your efficiency.
Subsection 3.1: Leveraging Smart Objects for Non-Destructive Editing Harness the power of Smart Objects for non-destructive editing. Understand how converting layers into Smart Objects can streamline your workflow, allowing for flexibility in adjustments and transformations without compromising image quality. This subsection will guide you through the process of leveraging Smart Objects for efficient and adaptable editing.
Subsection 3.2: Streamlining Batch Processes with Actions Explore the efficiency of batch processing using Photoshop Actions. Learn how to record and automate repetitive tasks, allowing you to apply edits to multiple files simultaneously. This subsection will provide step-by-step instructions on creating and utilizing Actions to streamline your workflow for bulk editing.
Subsection 3.3: Expediting Color Correction with Adjustment Layers Speed up your color correction process with Adjustment Layers. Discover how Adjustment Layers offer a non-destructive and efficient way to fine-tune colors and tones in your images. This subsection will guide you through using Adjustment Layers for quick and targeted color corrections, enhancing your overall editing speed.
Conclusion: Mastering efficiency in Photoshop is a continuous journey of exploration and adaptation. By optimizing settings, embracing keyboard shortcuts, and leveraging time-saving features, you can significantly enhance your speed and productivity. This comprehensive guide has equipped you with three key time-saving tips, providing a foundation for a faster and more efficient creative process in Adobe Photoshop. As you implement these tips into your workflow, embrace the newfound speed and precision, allowing your creativity to flow seamlessly within the dynamic realm of Photoshop.