Introduction
The horror genre has long captivated audiences with its spine-chilling tales of the supernatural, and zombies stand out as iconic figures in the realm of the undead. Adobe Photoshop provides a digital playground where artists can bring these creatures to life—or unlife—with startling realism. In this extensive tutorial, we will embark on a step-by-step journey through the process of creating a zombie in Photoshop. From gory wounds to decaying flesh, this guide will cover various techniques to help you master the art of crafting a convincing and spine-tingling zombie masterpiece.
Step 1: Setting the Gruesome Scene
- Create a New Document: Launch Adobe Photoshop and create a new document. Choose dimensions suitable for your project, keeping in mind the level of detail you want to achieve. A standard canvas size like 1920×1080 pixels is a good starting point.
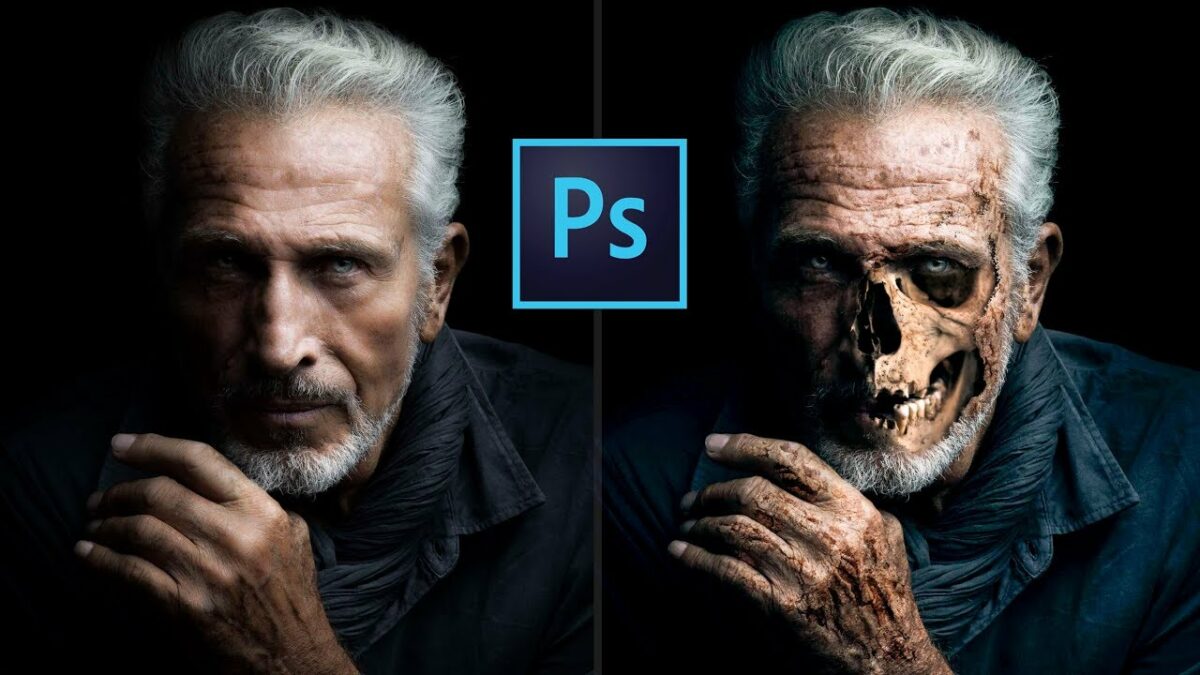
- Choose Your Base Image: Select a base image that serves as the canvas for your zombie creation. This could be a portrait or any image you want to transform into the undead. Ensure the lighting and composition are suitable for a spooky atmosphere.
Step 2: Establishing the Undead Foundation
- Convert to Black and White: Begin by converting your base image to black and white. This sets the stage for a classic, eerie aesthetic and allows you to focus on creating realistic textures without the distraction of color.
- Adjust Levels and Contrast: Use the Levels adjustment to enhance the contrast in your image. This step helps bring out details and prepares the canvas for the transformation into a zombie.
Step 3: Creating Gory Wounds and Decay
- Select Wound Locations: Identify areas on the face or body where you want to create wounds or signs of decay. Common locations include the forehead, cheeks, and exposed areas of flesh.
- Use the Liquefy Tool: Employ the Liquefy tool to distort the selected areas subtly. Create uneven and asymmetrical features to simulate the effects of decay. Pay attention to the natural contours of the face for a convincing result.
- Add Wound Details: Utilize brushes and layer masks to add detailed wound textures. Experiment with brushes that mimic torn flesh, exposed muscle, or decaying skin. Adjust the opacity to blend the wounds seamlessly with the base image.
Step 4: Transforming Eyes into the Undead
- Darken and Redden Eyes: Select the eyes in your image and darken them using the Burn Tool. Add a reddish tint to create the unsettling effect of bloodshot eyes. This step contributes to the overall undead appearance.
- Enhance Pupil Details: Use a small brush to enhance the details of the pupils. Add irregularities and imperfections to make the eyes appear more menacing and less human.
Step 5: Texturing Decaying Flesh
- Overlay Texture Images: Find high-resolution images of decaying flesh or zombie textures. Overlay these textures onto the areas you’ve designated for decay. Adjust blending modes and opacity to integrate the textures seamlessly.
- Use Layer Masks for Realism: Apply layer masks to blend the textures with the base image. Utilize brushes with varied opacities to create a gradual transition between healthy and decaying skin. This meticulous step enhances the realism of your zombie creation.
Step 6: Adding Blood and Grime
- Select Bloodied Areas: Identify areas where blood or grime would naturally accumulate, such as around wounds, the mouth, and hands. Use the selection tools to isolate these regions.
- Apply Blood Splatters: Find or create blood splatter brushes to add realistic gore to your zombie. Adjust the size, angle, and opacity of the brushes to mimic the appearance of fresh blood or dried stains.
Step 7: Adjusting Overall Atmosphere
- Fine-Tune Lighting and Shadows: Evaluate the overall lighting in your image. Adjust shadows and highlights to match the new features you’ve added. Pay attention to the direction of light for a cohesive and realistic atmosphere.
- Experiment with Color Grading: Introduce a color grading adjustment layer to enhance the mood. Experiment with desaturated tones, eerie greens, or sickly yellows to achieve a haunting atmosphere.
Step 8: Detailing Hair and Clothing
- Add Grime to Hair: Create a new layer and use brushes to add grime or dirt to the hair. Pay attention to the roots and areas that would naturally accumulate debris, contributing to the overall unkempt appearance of a zombie.
- Distress Clothing: Apply similar techniques to distress and dirty clothing. Use brushes to mimic torn fabric, blood stains, and general wear and tear. This step completes the transformation, ensuring the entire subject exudes a convincingly zombie-like vibe.
Step 9: Final Touches and Refinements
- Fine-Tune Details: Zoom in and scrutinize the details of your zombie creation. Make subtle adjustments to wounds, textures, and overall blending to achieve a polished and realistic result.
- Apply Atmospheric Effects: Experiment with atmospheric effects such as fog, haze, or vignettes to enhance the overall creepiness of your composition. These details contribute to the eerie ambiance associated with zombie encounters.
Step 10: Save and Share Your Undead Masterpiece
- Save Your Photoshop Document: Save your project in a layered format to retain editability. Additionally, save a flattened version in a format suitable for your intended use, such as PNG or JPEG.
- Showcase Your Zombie Creation: Share your undead masterpiece on social media, design platforms, or within horror-themed communities. Consider creating a before-and-after presentation to showcase the transformation and your creative process.
Step 11: Seek Feedback and Continue Evolving
- Gather Feedback: Share your creation with peers, mentors, or online design communities to receive constructive feedback. Consider the insights of others to refine and improve your design skills.
- Iterate and Experiment: Use the feedback as a springboard for experimentation. Iterative design is a powerful approach; revisit your project, make adjustments, and explore variations to continue refining your skills.
Conclusion: Unleash Your Inner Zombie Artist
Creating a zombie in Photoshop is a testament to the software’s transformative capabilities and your artistic prowess. Through careful attention to details, texture manipulation, and atmospheric effects, you’ve brought the undead to life on the digital canvas. As you celebrate your creative achievement, remember that each Photoshop project is an opportunity to explore new techniques, push your artistic boundaries, and continue evolving as a digital artist. Unleash your inner zombie artist, let your creativity roam freely, and keep experimenting with the eerie and macabre in the vast realm of Adobe Photoshop.
