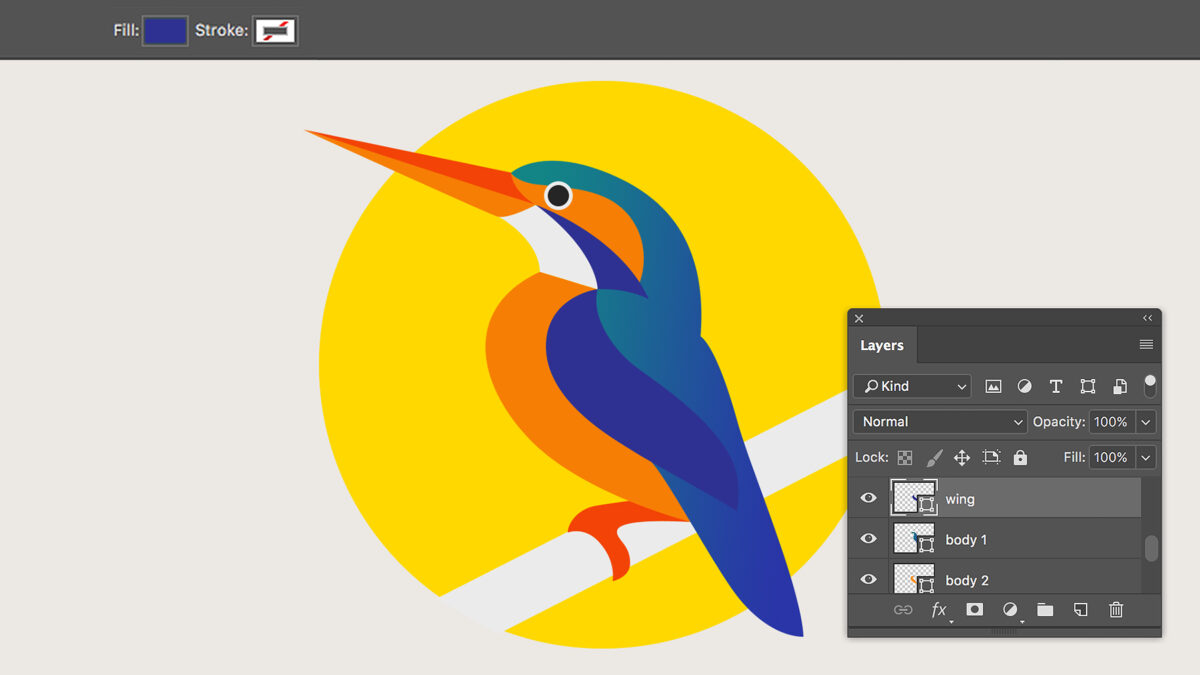
Categories
How To Guides

Unlocking Connections: A Comprehensive Guide to Unblocking Someone on Instagram

Introduction: In the dynamic world of social media, relationships and interactions can evolve over time, leading to changes in our online connections and networks. While blocking someone on Instagram is a decisive action taken to assert boundaries or manage unwanted interactions, there may come a time when you decide to reestablish contact or reopen communication with a previously blocked user. In such instances, knowing how to unblock someone on Instagram is essential for fostering healthy relationships and facilitating positive interactions on the platform. In this comprehensive guide, we’ll explore everything you need to know about unblocking someone on Instagram, from understanding the implications of unblocking to step-by-step instructions for reversing a block, as well as tips for navigating reconnections and managing relationships in the digital realm.

Understanding the Implications of Unblocking Someone on Instagram

Unblocking someone on Instagram signifies a willingness to reopen communication and potentially reestablish a connection with a previously blocked user. It’s important to consider the implications of unblocking someone, including:

  • Reopening Communication: By unblocking someone, you’re giving them access to interact with your profile, including liking your posts, sending you messages, or commenting on your content.
  • Resolving Conflict: Unblocking someone may signal a desire to resolve conflicts or misunderstandings that led to the block in the first place. It’s an opportunity to address issues and potentially mend relationships.
  • Setting Boundaries: Unblocking someone doesn’t necessarily mean that you’re fully welcoming them back into your digital space. It’s important to establish clear boundaries and communicate your expectations for future interactions.

How to Unblock Someone on Instagram

Unblocking someone on Instagram is a straightforward process that can be done in a few simple steps:

  1. Open the Instagram App: Launch the Instagram app on your mobile device and log in to your account if you haven’t already done so.
  2. Access Blocked Accounts: Navigate to your profile by tapping on your profile picture in the bottom right corner of the screen. From your profile, tap on the menu icon (three horizontal lines) in the top right corner to access the settings menu.
  3. Go to Blocked Accounts: Scroll down the settings menu and select “Settings” > “Privacy” > “Blocked Accounts.” This will display a list of users you’ve previously blocked on Instagram.
  4. Select the User to Unblock: From the list of blocked accounts, locate the user you want to unblock. Tap on their profile to view their account details.
  5. Unblock the User: On the user’s profile, you’ll see an option to unblock them. Tap on “Unblock” to confirm that you want to remove the block.
  6. Confirmation Message: Instagram will display a confirmation message asking if you’re sure you want to unblock the user. Tap “Unblock” again to confirm and complete the process.

Tips for Navigating Reconnections on Instagram

  1. Communicate Openly: If you’ve unblocked someone to reopen communication, be transparent about your intentions and expectations for future interactions. Honest communication can help prevent misunderstandings and promote healthy relationships.
  2. Establish Boundaries: Set clear boundaries for how you want to interact with the unblocked user, including what types of messages or comments are acceptable and what behaviors are off-limits.
  3. Monitor Interactions: Pay attention to how the unblocked user interacts with your profile and content after being unblocked. If their behavior becomes inappropriate or crosses your boundaries, don’t hesitate to reestablish the block or take further action.
  4. Trust Your Instincts: If you feel uncomfortable or uneasy about reconnecting with a previously blocked user, trust your instincts and prioritize your well-being. You have the right to maintain boundaries and protect your mental and emotional health.
  5. Seek Support if Needed: If you’re unsure about unblocking someone or navigating reconnections on Instagram, seek support from friends, family members, or mental health professionals who can offer guidance and perspective.

Conclusion

Unblocking someone on Instagram can be a meaningful step towards reconciliation, resolution, or reconnection in the digital realm. By understanding the implications of unblocking, following the step-by-step instructions for reversing a block, and implementing tips for navigating reconnections, you can manage relationships and interactions on Instagram with confidence and clarity. Whether you’re seeking to mend relationships, resolve conflicts, or simply extend a second chance, remember to prioritize your well-being and set boundaries that align with your values and comfort level. Ultimately, the decision to unblock someone is yours to make, and it’s important to approach it with thoughtfulness, empathy, and self-awareness.

Categories
How To Guides

Safeguarding Your Digital Space: A Comprehensive Guide to Blocking Someone on Instagram

Introduction: In the vast realm of social media, maintaining control over your online interactions and protecting your digital space is paramount. While platforms like Instagram offer opportunities for connection and expression, they also come with the risk of unwanted attention, harassment, or negative interactions. In such cases, the ability to block users provides a powerful tool for asserting boundaries and safeguarding your online experience. In this comprehensive guide, we’ll explore everything you need to know about blocking someone on Instagram, from understanding when to use this feature to step-by-step instructions for blocking users, as well as tips for managing blocked accounts and maintaining a safe and positive environment on the platform.

Understanding When to Block Someone on Instagram

Blocking someone on Instagram is a decision that should be made thoughtfully and with consideration for your own well-being and comfort. You may choose to block someone if:

  • They are engaging in harassing or abusive behavior, such as sending threatening messages or posting harmful content.
  • They are consistently violating your boundaries or making you feel uncomfortable with their interactions.
  • You no longer want to see their content or have them interact with your profile for personal reasons.

Blocking someone on Instagram is a personal choice, and you should feel empowered to do so if you believe it is necessary to maintain your safety, privacy, and peace of mind on the platform.

How to Block Someone on Instagram

Blocking someone on Instagram is a straightforward process that can be done in a few simple steps:

  1. Open the Instagram App: Launch the Instagram app on your mobile device and log in to your account if you haven’t already done so.
  2. Navigate to the Profile: Go to the profile of the user you want to block. You can do this by searching for their username in the search bar or tapping on their profile picture if you see their content in your feed.
  3. Access the Options Menu: Once you’re on the user’s profile, tap on the three dots (ellipsis) in the top right corner of the screen. This will open a menu of options for managing the user’s profile.
  4. Select “Block”: From the menu of options, tap on “Block.” Instagram will prompt you to confirm whether you want to block the user.
  5. Confirm the Block: After selecting “Block,” Instagram will display a confirmation message asking if you’re sure you want to block the user. Tap “Block” again to confirm and complete the process.
  6. Verification of Block: Once the user is blocked, Instagram will display a notification confirming that the user has been blocked. The user will no longer be able to interact with your profile, and you will no longer see their content or activity on the platform.

Managing Blocked Accounts on Instagram

Blocking someone on Instagram not only prevents them from interacting with your profile but also provides options for managing blocked accounts:

  • Unblocking Users: If you decide to unblock someone in the future, you can do so by going to your “Blocked Accounts” list in the settings menu and selecting the user you want to unblock.
  • Reporting Harassment or Abuse: If the user you’ve blocked continues to harass or abuse you through other means, such as creating new accounts, you can report their behavior to Instagram for review.
  • Adjusting Privacy Settings: In addition to blocking specific users, you can also adjust your privacy settings to control who can see your content, send you messages, or interact with your profile.

Tips for Maintaining a Positive Environment on Instagram

  1. Trust Your Instincts: If someone’s behavior makes you feel uncomfortable or unsafe, trust your instincts and take action to protect yourself, whether that means blocking them or reporting their behavior.
  2. Set Boundaries: Establish clear boundaries for how you want to interact with others on Instagram and assert them confidently if they are crossed.
  3. Surround Yourself with Support: Surround yourself with supportive friends, family members, or online communities who can offer guidance, validation, and encouragement during challenging times.
  4. Practice Self-Care: Prioritize self-care and mental health by taking breaks from social media when needed, engaging in activities that bring you joy and relaxation, and seeking professional support if necessary.
  5. Stay Informed: Stay informed about Instagram’s community guidelines, privacy policies, and reporting procedures to ensure you know your rights and options for addressing inappropriate behavior.

Conclusion

Blocking someone on Instagram is a powerful tool for asserting boundaries, protecting your privacy, and maintaining a positive environment on the platform. By understanding when to use this feature, following the step-by-step instructions for blocking users, and implementing tips for managing blocked accounts, you can navigate the digital landscape with confidence and assert control over your online interactions. So, trust your instincts, prioritize your well-being, and remember that you have the power to create a safe and enjoyable experience on Instagram by setting boundaries and enforcing them decisively.

Categories
How To Guides

Mastering HTML and CSS Validation: A Comprehensive Guide to Validating Code in Adobe Dreamweaver

Introduction: Validating HTML and CSS code is essential for ensuring the quality, compatibility, and accessibility of web pages. Adobe Dreamweaver, a leading web design and development tool, provides built-in tools and features to validate HTML and CSS code effectively. In this extensive guide, we’ll explore the importance of code validation, the process of validating HTML and CSS in Dreamweaver, common validation errors, and best practices for maintaining standards-compliant code.

Understanding the Importance of Code Validation: Code validation is the process of checking HTML and CSS code against established standards and specifications to ensure correctness, consistency, and compliance with web standards. Validating HTML and CSS code offers several benefits:

  1. Standard Compliance: Validate HTML and CSS code to ensure compliance with web standards such as HTML5, CSS3, and accessibility guidelines. Standards-compliant code improves interoperability, browser compatibility, and future-proofing of web projects.
  2. Error Detection: Identify syntax errors, structural issues, and semantic inconsistencies in HTML and CSS code through validation. Validation tools highlight errors and warnings, enabling developers to fix issues and maintain code quality.
  3. Cross-Browser Compatibility: Validate CSS code to ensure consistent rendering and styling across different web browsers and browser versions. Valid CSS code reduces layout inconsistencies and improves visual consistency on various platforms and devices.
  4. Accessibility: Validate HTML code for accessibility compliance to ensure that web content is perceivable, operable, and understandable for users with disabilities. Accessible code improves usability, inclusivity, and compliance with web accessibility standards such as WCAG (Web Content Accessibility Guidelines).
  5. SEO (Search Engine Optimization): Valid HTML code enhances search engine crawlers’ ability to index and rank web pages effectively. Well-structured HTML code improves search engine visibility, organic search rankings, and overall website performance in search engine results pages (SERPs).

Step 1: Validating HTML Code in Dreamweaver Adobe Dreamweaver offers several tools and methods for validating HTML code against web standards and specifications. Follow these steps to validate HTML code in Dreamweaver:

  1. Built-in Validator: Access Dreamweaver’s built-in HTML validator to check HTML code for syntax errors, structural issues, and compliance with HTML standards. Navigate to the “File” menu, select “Validate,” and choose “Markup” to run the HTML validator.
  2. Live Code Checking: Enable Dreamweaver’s live code checking feature to receive real-time feedback and warnings as you write HTML code. Dreamweaver highlights syntax errors and structural issues in the code editor, allowing you to address them immediately.
  3. Design View Inspection: Inspect HTML code in Dreamweaver’s design view to identify structural issues, invalid elements, and layout inconsistencies visually. Switch between code view and design view to review HTML code and its corresponding visual representation.
  4. Code Cleanup: Use Dreamweaver’s code cleanup feature to automatically fix common HTML formatting issues, such as mismatched tags, missing attributes, and unnecessary code. Run the code cleanup tool periodically to maintain code consistency and readability.

Step 2: Validating CSS Code in Dreamweaver Validating CSS code ensures consistent styling, layout, and presentation of web pages across different browsers and devices. Follow these steps to validate CSS code in Dreamweaver:

  1. CSS Validator Integration: Integrate external CSS validation services or browser extensions with Dreamweaver to validate CSS code against CSS standards and specifications. Use online CSS validation tools such as W3C CSS Validator or browser extensions like CSSLint to check CSS syntax and compliance.
  2. CSS Syntax Checking: Enable Dreamweaver’s CSS syntax checking feature to identify syntax errors, typos, and invalid properties in CSS code. Dreamweaver highlights CSS code errors in the code editor, allowing you to correct them promptly.
  3. Browser Compatibility Testing: Test CSS code across multiple web browsers and browser versions to ensure consistent rendering and styling. Use Dreamweaver’s browser preview features to preview CSS changes and inspect layout rendering in popular browsers such as Chrome, Firefox, Safari, and Edge.
  4. Responsive Design Testing: Validate CSS code for responsive design compatibility to ensure that layouts adapt and respond appropriately to different screen sizes and devices. Use Dreamweaver’s responsive design tools and features to test CSS styles across various breakpoints and viewports.

Common Validation Errors and Solutions: While validating HTML and CSS code in Dreamweaver, you may encounter common errors and issues. Here are some examples of common validation errors and their solutions:

  1. Missing or Unclosed Tags: Check HTML code for missing or unclosed tags, which can cause layout inconsistencies and rendering errors. Use Dreamweaver’s code inspection tools to identify and correct missing or unclosed tags.
  2. Invalid Attributes: Validate HTML code for invalid attributes or deprecated HTML features that may not be supported in modern browsers. Replace deprecated attributes with standard-compliant alternatives and update HTML code accordingly.
  3. Syntax Errors: Review CSS code for syntax errors, typos, and misspelled properties that may cause styling issues. Use Dreamweaver’s CSS syntax checking feature to identify and fix syntax errors in CSS code.
  4. Compatibility Issues: Test CSS code for compatibility with older web browsers and browser versions that may not support modern CSS features. Use CSS vendor prefixes, polyfills, or fallbacks to ensure backward compatibility and consistent styling across browsers.
  5. Accessibility Violations: Validate HTML code for accessibility compliance and address accessibility violations such as missing alt attributes, improper heading structures, and insufficient contrast ratios. Use Dreamweaver’s accessibility tools and features to audit and improve the accessibility of web content.

Best Practices for Maintaining Valid HTML and CSS Code: Follow these best practices to maintain valid HTML and CSS code in Adobe Dreamweaver:

  1. Semantic Markup: Use semantic HTML elements and attributes to provide meaningful structure and context to web content. Use HTML5 semantic elements such as <header>, <nav>, <main>, <section>, and <footer> to enhance accessibility and SEO.
  2. Modular CSS Architecture: Adopt a modular CSS architecture such as BEM (Block Element Modifier) or SMACSS (Scalable and Modular Architecture for CSS) to organize and manage CSS code effectively. Separate CSS styles into reusable components, modules, and utilities for easier maintenance and scalability.
  3. External Stylesheets: Externalize CSS styles into separate stylesheet files to promote code reusability, maintainability, and caching. Link external stylesheets to HTML documents using <link> tags to apply consistent styling across multiple pages and improve page loading performance.
  4. CSS Preprocessors: Use CSS preprocessors such as Sass or Less to write more maintainable, modular, and efficient CSS code. Take advantage of features like variables, mixins, nesting, and functions to streamline CSS authoring and improve code organization.
  5. Regular Code Reviews: Conduct regular code reviews and peer evaluations to ensure code quality, adherence to coding standards, and compliance with web standards. Collaborate with team members to identify and address code issues, share best practices, and improve coding skills collectively.

Conclusion: Validating HTML and CSS code is essential for creating high-quality, standards-compliant web pages in Adobe Dreamweaver. By following the principles, techniques, and best practices outlined in this comprehensive guide, you can ensure that your HTML and CSS code is error-free, compliant with web standards, and optimized for performance, accessibility, and cross-browser compatibility. Whether you’re a beginner or experienced web developer, mastering the art of code validation in Dreamweaver empowers you to create professional, reliable, and user-friendly web experiences that meet the highest standards of quality and excellence.