Introduction:
CorelDRAW, a powerhouse in vector graphics editing, equips designers with an array of tools to create visually stunning and detailed illustrations. Among these tools, specifying arrowhead attributes for lines or curves is essential for guiding the viewer’s eye and adding emphasis to critical elements. In this extensive guide, we will explore the intricacies of specifying arrowhead attributes in CorelDRAW, delving into various techniques, customization options, and advanced tips. Whether you’re crafting detailed diagrams, designing complex flowcharts, or illustrating intricate paths, mastering arrowhead attributes elevates your creative possibilities within the dynamic world of CorelDRAW.
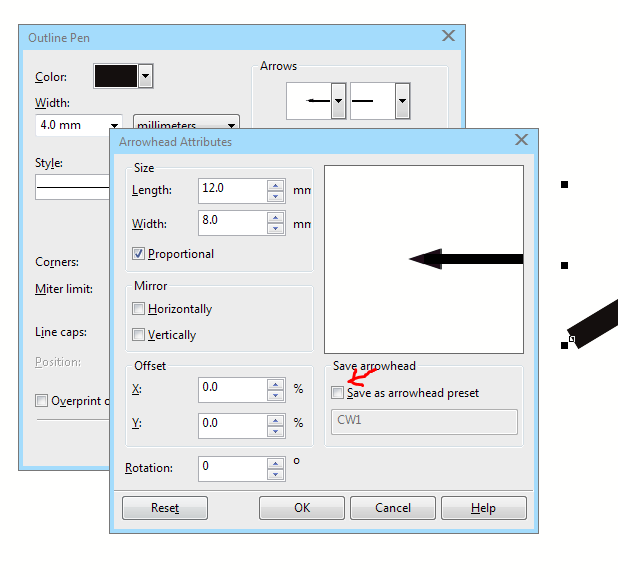
Understanding Arrowhead Attributes in CorelDRAW:
Arrowhead attributes in CorelDRAW encompass a range of characteristics defining the appearance and behavior of arrowheads on lines or curves. These attributes include the type of arrowhead, size, rotation angle, and more. By specifying arrowhead attributes, designers can tailor the visual impact of their creations, providing clarity, direction, and aesthetic appeal to the viewer.
Basic Techniques for Specifying Arrowhead Attributes:
- Selecting the Line or Curve: Commence by selecting the line or curve for which you want to specify arrowhead attributes. Use the Pick tool to click on the desired line or curve, ensuring it is highlighted.
- Accessing Arrowhead Attributes: Navigate to the ‘Properties’ docker, typically found on the right side of the interface. Within the ‘Properties’ docker, locate the ‘Arrowheads’ section, where you can customize the arrowhead attributes.
- Choosing Arrowhead Type: Within the ‘Arrowheads’ section, click on the dropdown menu to access a variety of predefined arrowhead types. CorelDRAW offers a range of arrowhead styles, from simple pointers to more intricate symbols. Select the type that suits your design requirements.
- Adjusting Arrowhead Size: Tailor the size of the arrowhead by using the ‘Size’ slider within the ‘Arrowheads’ section. This parameter determines the length of the arrowhead in relation to the thickness of the line or curve.
Advanced Techniques for Fine-Tuning Arrowhead Attributes:
- Customizing Arrowhead Styles: For a personalized touch, explore the ‘Arrowheads Manager’ by clicking on the ‘Customize’ button within the ‘Arrowheads’ section. Here, you can design and save custom arrowhead styles with specific shapes, sizes, and proportions.
- Rotating Arrowheads: CorelDRAW allows for the rotation of arrowheads to achieve a dynamic look. In the ‘Arrowheads Manager,’ adjust the ‘Rotation Angle’ option to set a specific angle for the rotation of the arrowhead.
- Fine-Tuning Arrowhead Placement: Utilize the ‘Inset’ and ‘Outset’ sliders within the ‘Arrowheads’ section to fine-tune the placement of arrowheads along the line or curve. These sliders control how far the arrowhead extends beyond the endpoint of the line.
Customization Options for Precision:
- Applying Arrowhead Attributes to Multiple Objects: To ensure consistency in your design, apply the same arrowhead attributes to multiple objects. Select the objects, access the ‘Arrowheads’ section in the ‘Properties’ docker, and choose the desired arrowhead type, size, and other attributes.
- Fine-Tuning with the Shape Tool: After specifying arrowhead attributes, use the Shape tool to fine-tune individual nodes and segments. Click and drag nodes or segments to achieve pixel-perfect adjustments, enhancing precision in your design.
- Snapping Options for Alignment: Utilize snapping options to ensure accurate alignment of arrowheads. Enable ‘Snap to Grid,’ ‘Snap to Guidelines,’ or ‘Snap to Objects’ to facilitate precise placement and maintain consistency.
Troubleshooting and Optimization Strategies:
- Global vs. Local Arrowhead Attributes: Distinguish between global and local changes. Global changes, applied through the ‘Properties’ docker, affect all instances of the selected line or curve in the document. Local changes, made through the ‘Arrowheads Manager’ or ‘Arrowheads’ section, apply only to the selected object.
- Undo and Redo: If the result doesn’t align with your vision, utilize the ‘Undo’ command (Ctrl + Z) to revert the action. Conversely, use ‘Redo’ (Ctrl + Y) to reapply changes that were undone.
- Saving Custom Arrowhead Styles: To streamline your workflow, save custom arrowhead styles for commonly used designs. In the ‘Arrowheads Manager,’ click ‘Save As’ to create a library of custom arrowhead styles, allowing for quick application across different projects.
Conclusion:
Specifying arrowhead attributes in CorelDRAW is a nuanced skill that empowers designers to enhance the visual communication and aesthetics of their digital creations. By exploring the various techniques, customization options, and advanced tips presented in this comprehensive guide, you’ll gain the confidence to incorporate arrowhead attributes with ease and finesse. Whether you’re guiding the viewer through a diagram, emphasizing directional flow, or adding dynamic elements to your illustrations, CorelDRAW provides a versatile platform to unleash your creativity within the dynamic world of vector graphics. Embrace the comprehensive tools that allow you to specify arrowhead attributes, and let your designs flourish on the digital canvas with precision and visual impact.