Introduction:
Windows 10, Microsoft’s versatile operating system, empowers users to customize their desktop environment to suit individual preferences. Among the myriad customization options, changing the icon size stands out as a practical and visually impactful adjustment. In this extensive guide, we will explore the intricacies of modifying the icon size in Windows 10, offering users a step-by-step walkthrough, insights into the benefits of icon size customization, and tips for achieving a personalized and visually optimized desktop experience.
Understanding the Importance of Icon Size Customization:
The size of icons on your desktop and in File Explorer plays a crucial role in your overall user experience. Customizing the icon size can have several advantages:
- Visual Clarity:
- Adjusting the icon size enhances visual clarity, making it easier to identify and locate files, folders, and applications on your desktop or within File Explorer.
- Personalization:
- Icon size customization allows users to personalize their desktop, adapting it to their preferred visual style and optimizing it for their unique needs.
- Aesthetic Appeal:
- Changing the icon size contributes to the overall aesthetic appeal of the desktop, creating a more visually pleasing and harmonious interface.
- Enhanced Accessibility:
- Larger icons can improve accessibility for users with visual impairments, providing a more comfortable and user-friendly experience.
- Organizational Efficiency:
- By customizing the icon size, users can organize their desktop or File Explorer in a way that maximizes efficiency, ensuring a more productive workflow.
Methods to Change the Icon Size in Windows 10:
Windows 10 offers multiple pathways for users to customize the size of their icons, providing flexibility based on individual preferences and visual needs. The following methods outline how to modify the icon size seamlessly:
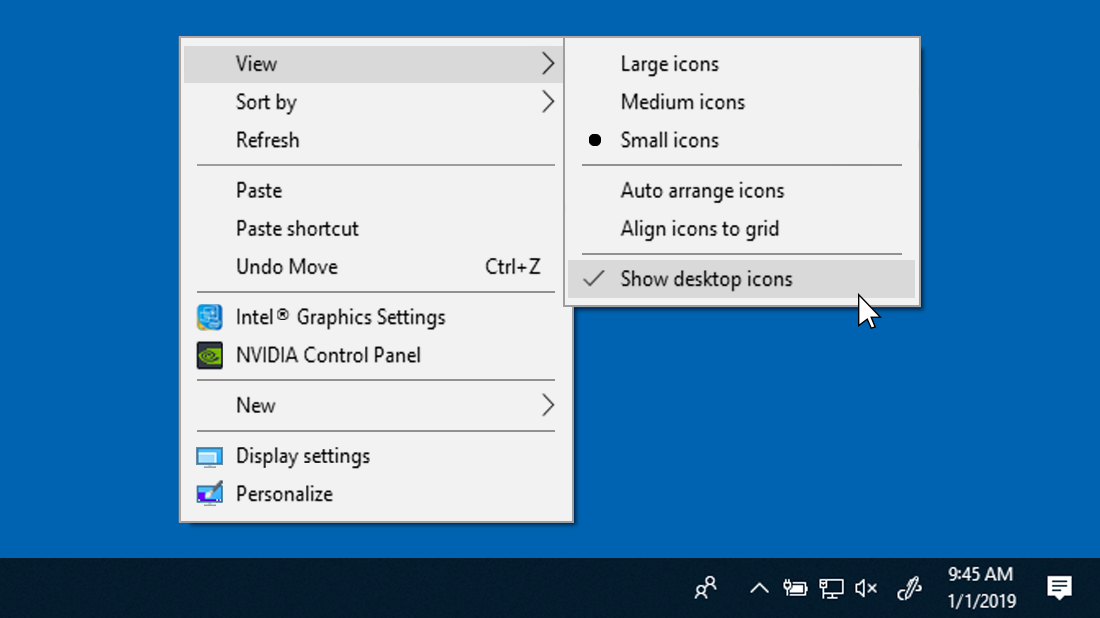
Method 1: Using Desktop Context Menu
- Right-Click on the Desktop:
- Right-click on an empty space on your desktop to open the context menu.
- Hover Over “View”:
- Hover your cursor over the “View” option in the context menu.
- Choose Icon Size:
- In the sub-menu that appears, select the desired icon size: Small icons, Medium icons, or Large icons.
- Observe Changes:
- Observe the changes on your desktop as the icons adjust to the selected size.
Method 2: Using File Explorer
- Open File Explorer:
- Open File Explorer by clicking on the File Explorer icon in the taskbar or pressing “Windows key + E.”
- Navigate to a Folder:
- Navigate to a folder where you want to change the icon size.
- Select “View” Tab:
- In the upper menu, select the “View” tab.
- Choose Icon Size:
- Click on the “Icon size” dropdown menu and choose the desired size: Small, Medium, Large, or Extra Large icons.
- Apply Changes:
- Observe the changes within File Explorer as the icons adjust to the selected size.
Method 3: Using Display Settings
- Open Settings:
- Press “Windows key + I” to open the Settings app.
- Navigate to System:
- In the Settings app, select “System.”
- Choose Display:
- In the left sidebar, click on “Display.”
- Adjust the Slider:
- Under the “Scale and layout” section, adjust the slider for “Change the size of text, apps, and other items” to the desired percentage.
- Apply Changes:
- Click on “Apply” to implement the changes. You may need to sign out and sign back in for the adjustments to take full effect.
Considerations and Additional Tips:
- Desktop Grid Spacing:
- Changing the icon size may affect the spacing between icons on the desktop. Users can adjust the grid spacing in the “View” submenu for a more customized layout.
- Quick Access Icons:
- Quick Access icons in File Explorer can be resized separately. Right-click on an empty space in File Explorer, go to “View,” and choose the desired icon size under “Icon size.”
- High DPI Settings:
- Users with high-DPI displays may need to consider adjusting their display settings in conjunction with icon size changes for optimal visual clarity.
- Custom Icon Packs:
- Explore custom icon packs that offer a wide range of icon sizes and styles to further personalize your desktop.
- Reset to Default Size:
- If needed, users can reset the icon size to the default setting by following the same steps outlined in the methods above.
- Community Forums and Discussions:
- Engage with Windows 10 community forums and discussions to share experiences, discover additional customization tips, and troubleshoot any issues related to icon size changes.
Conclusion:
Changing the icon size in Windows 10 is a practical and visually impactful customization that empowers users to create a desktop environment tailored to their preferences. By following the comprehensive methods outlined in this guide, users can effortlessly optimize the visual clarity, personalization, and efficiency of their desktop or File Explorer. Embrace the versatility of Windows 10, fine-tune your desktop for enhanced usability, and immerse yourself in a visually optimized and aesthetically pleasing digital workspace. Windows 10 is not just an operating system—it’s a canvas for personal expression and customization, and adjusting icon size is a key element in creating a desktop environment that truly suits your needs.
