Introduction:
In the realm of digital image editing, the pursuit of sharpness is a paramount objective for photographers, designers, and visual artists alike. Among the plethora of tools available in Adobe Photoshop, the Unsharp Mask (USM) filter stands out as a stalwart for achieving precise and controlled image sharpening. This extensive guide aims to unravel the mysteries of the Unsharp Mask, providing a comprehensive exploration of its features, applications, and advanced techniques to empower users in enhancing the clarity and detail of their images.
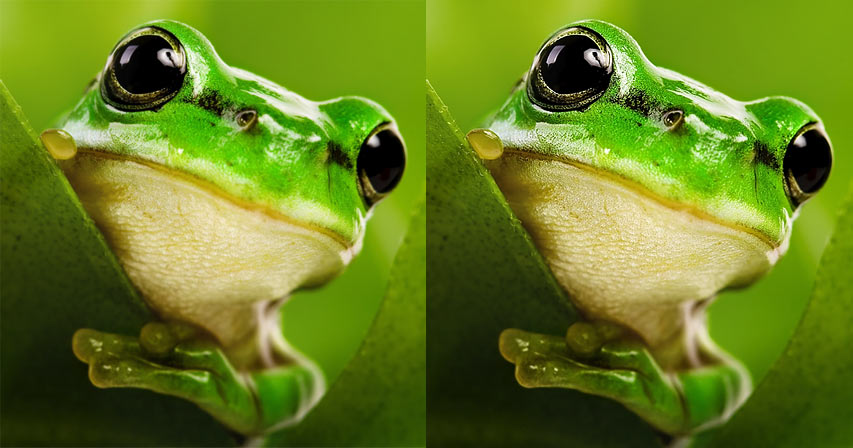
Understanding the Basics of Image Sharpening:
- The Role of Image Sharpness: Image sharpness is a critical element in visual communication, influencing the overall impact and legibility of photographs and graphics. Sharpening is employed to enhance fine details, refine edges, and elevate the overall visual acuity of an image.
- Common Causes of Image Blurring: Blurring in images can result from various factors, including camera shake, lens imperfections, and resizing. Identifying the cause of blurring is essential for applying targeted sharpening techniques.
Introduction to Unsharp Mask (USM) in Photoshop:
- Historical Context of Unsharp Mask: The Unsharp Mask technique originated in traditional darkroom photography. By intentionally introducing a blurred version of an image and subtracting it from the original, the process accentuated edges, creating the illusion of enhanced sharpness.
- Digital Implementation in Photoshop: In the digital realm, the Unsharp Mask in Photoshop became a staple for image sharpening. Its name, somewhat counterintuitive, stems from the traditional process of using a blurred “mask” to enhance perceived sharpness.
Optimal Workflow for Unsharp Mask:
- Preparing the Image for Sharpening: Before applying the Unsharp Mask, ensure that the image is properly preprocessed. Basic adjustments, color corrections, and noise reduction should be addressed to create a solid foundation for sharpening.
- Accessing Unsharp Mask: Navigate to the “Filter” menu in Photoshop, select “Sharpen,” and choose “Unsharp Mask.” This opens the Unsharp Mask dialog box, providing a range of controls for customization.
- Fine-Tuning Sharpening Settings: Adjust the three key parameters: “Amount,” “Radius,” and “Threshold.” The “Amount” determines the strength of the sharpening effect, “Radius” controls the size of the sharpening halo, and “Threshold” prevents sharpening of low-contrast areas.
Advanced Techniques for Unsharp Mask:
- Targeted Sharpening with Masks: Combine Unsharp Mask with layer masks to selectively apply sharpening to specific areas. This technique is particularly effective for preserving skin texture in portraits or enhancing details in specific regions of a landscape.
- High-Pass Filter and Blending Modes: Use the High-Pass filter to create a gray overlay representing image details. By adjusting the blending mode and opacity of this overlay, you can achieve a customizable sharpening effect, providing greater control over the final result.
- Applying Unsharp Mask Non-Destructively: Convert the layer to a smart object before applying Unsharp Mask for non-destructive sharpening. This preserves the original image data, allowing for adjustments even after sharpening has been applied.
- Batch Processing with Actions: For efficiency in workflows involving multiple images, create Photoshop actions to automate the application of Unsharp Mask with predefined settings. This ensures consistency across a series of images.
Preserving Natural Appearance and Avoiding Over-Sharpening:
- Balancing Sharpening and Realism: The goal of sharpening is to enhance details while maintaining a natural appearance. Strive for a balance that prevents over-sharpening, which can introduce artifacts and create an unnatural look.
- Previewing Sharpening Effects: Use the preview option in the Unsharp Mask dialog box to assess the sharpening effect at various zoom levels. This allows for real-time adjustments to achieve the desired level of sharpness.
- Observing Image at 100% Zoom: Evaluate the sharpening effect by zooming in to 100% view. This level of magnification provides a more accurate representation of how the sharpening will appear when the image is viewed at its actual size.
Conclusion:
Mastering the Unsharp Mask in Photoshop unveils a realm of possibilities for photographers and designers seeking to elevate the sharpness and detail of their images. As a versatile tool with a rich history and a robust set of features, Unsharp Mask empowers users to achieve precision in image sharpening. By understanding the nuances of its parameters, implementing advanced techniques, and adhering to best practices, creatives can navigate the intricacies of digital image sharpening with finesse. As technology advances and creative tools evolve, the Unsharp Mask remains a steadfast companion in the journey to create visually compelling and razor-sharp compositions.