How to Find and Kill “Ghost” Background Processes Keeping Files Locked in Windows
It is possible to experience frustration while dealing with file locking difficulties in Windows, particularly when a file refuses to be deleted, renamed, or moved because of an unknown background process. They continue to retain system resources and file handles despite the fact that they are known as “ghost” processes because they often operate invisibly and without visible windows. program crashes, unfinished operations, or poorly maintained background services are major causes of this scenario, which often happens after the program has crashed. These kinds of disruptions have the potential to disrupt workflows and dramatically delay activities carried out by developers, designers, and power users. In order to successfully diagnose and resolve these problems, it is vital to have a solid understanding of how Windows handles the management of processes and file locks. You may recover complete control over your data if you locate the hidden process that is responsible for the problem and then terminate it in a secure manner. This article will walk you through the process of locating and terminating ghost processes that are running in the background and keeping files locked. This will result in a Windows experience that is more fluid and responsive.
Comprehending the Reasons Behind the Locking of Files in Windows
In order to prevent several processes from concurrently making changes to the same file, Windows employs a feature known as file-locking functionality. It is possible for a software to lock a file when it opens it in order to protect the integrity of the contents and prevent disputes. In the event that the program has a crash or fails to release the file in the appropriate manner, the lock may continue to exist even after the application seems to have terminated successfully. Background services, system processes, or hidden instances of apps are often the culprits behind these persistent locks. Once you have a better understanding of this behavior, you will be better able to identify the reasons why specific files become unavailable and why the typical procedures do not address the problem.
How to Recognize the Signs and Symptoms of Ghost Machines
Generally speaking, ghost processes do not manifest themselves in apparent ways, which makes it difficult to identify them. There are a number of common symptoms, such as error messages claiming that a file is now being used, the inability to remove or rename files, and slowdowns in the system that cannot be explained. There are situations in which the initial program may no longer be visible, but the process associated with it could still be actively operating in the background. It is possible for these hidden processes to use up system resources and disrupt regular operations because of their presence. The first step in determining the underlying cause of the issue and finding an effective solution to the problem is having the ability to recognize these symptoms.
Recognizing Hidden Processes Through the Use of Task Manager
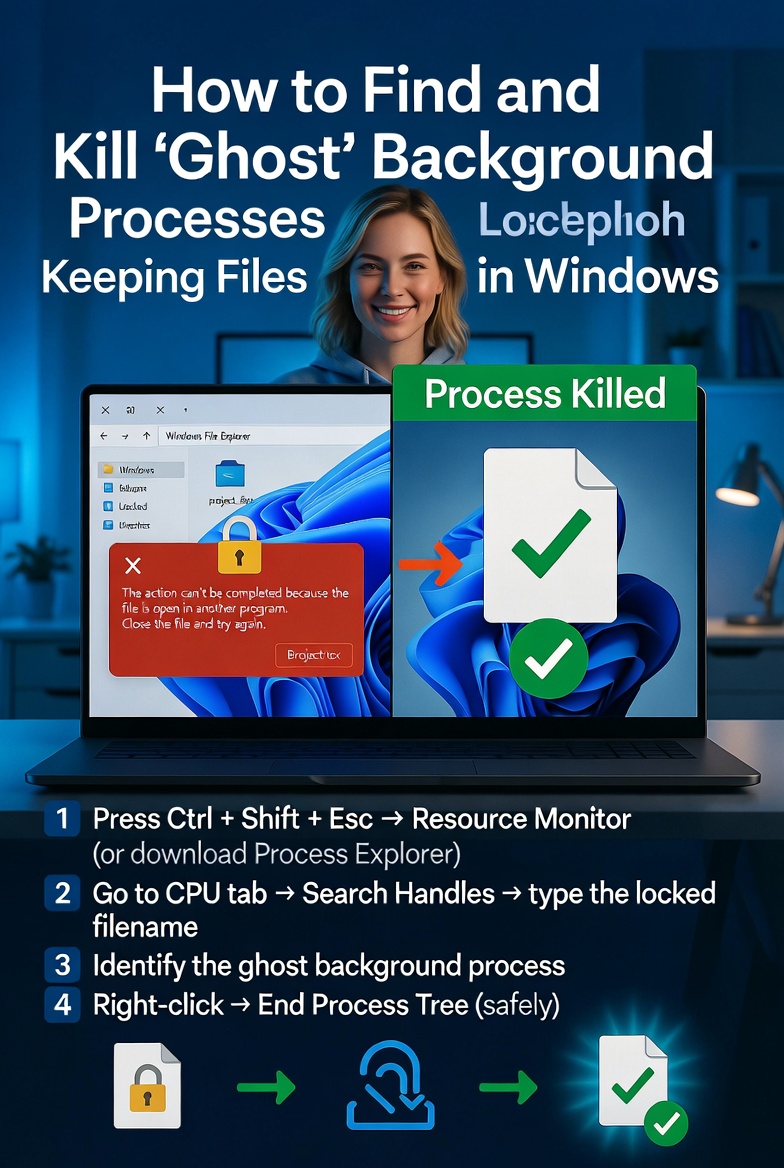
In the event that you are examining problems with file locking, the first tool you should utilize is Task Manager. Through the examination of the list of processes that are now executing, it is possible to recognize apps that may still be operating in the background. It is possible to limit down likely perpetrators by sorting processes according to the resources they use or their names. Even if only one instance of the same program is displayed, there may be several instances of the application operating under specific circumstances. In order to recover access and remove the file lock, it is necessary to terminate these programs. Despite the fact that Task Manager is helpful, it does not always expose the deeper system-level operations that are taking responsibility for the problem.
Incorporating Resource Monitor into the Process of Identifying Locked Files
For a more in-depth study, Resource Monitor offers sophisticated insights into the activities of the system, including information about which programs are using certain files. You are able to look for the file name and determine the specific process that is holding the lock if you visit the CPU or disk sections. Because it provides such a high degree of information, Resource Monitor is an effective instrument for analyzing complicated file access problems. Following the identification of the process, you have the option of either immediately terminating it or taking the necessary steps to release the file. Identifying processes that are not immediately evident or concealed is a particularly effective use of this strategy.
Utilizing Command Line Tools for Greater Control and Command
Utility programs that run on the command line provide an additional layer of control for controlling ghost processes. It is possible to utilize tools to list processes that are currently running, locate file handles, and terminate processes in an arbitrary manner. Specifically designed for expert users who want a speedy resolution to chronic difficulties, these commands provide exact control and are particularly valuable for such users. You are able to eliminate even the most tenacious file locks by using command-line tools in conjunction with your expertise of the system. In circumstances in which graphical tools are either limited or unavailable, this technique is an excellent choice.
Methods for Terminating Processes Confidently and Without Creating Problems
In spite of the fact that terminating a process might fix file locks, it is essential to do so with caution in order to prevent the system from becoming unstable or losing data. The termination of important system processes may result in unexpected behavior or system failures. Prior to concluding a process, it is necessary to confirm its authenticity and make certain that it is secure to shut. By saving your work and shutting any programs that are connected to it, you may assist avoid data corruption. Making use of a careful approach guarantees that you will be able to address the problem without causing any further complications.
Finding Ways to Avoid Ghost Processes in the Time to Come
The maintenance of a stable system environment and the responsible use of applications are both necessary steps in the prevention of ghost processes. It is possible to lessen the chance of lingering processes by doing routine software updates, shutting applications in the appropriate manner, and avoiding doing forced shutdowns. Monitoring the performance of the system and fixing problems as soon as they arise are also helpful in preventing difficulties with file locking. When you use effective system practices, you can reduce the number of interruptions that occur and keep the workflow running smoothly.
More Advanced Troubleshooting for File Locks That Remain Permanent
When traditional approaches are unsuccessful, it may be necessary to resort to more complex troubleshooting techniques. Utilizing specialist tools to inspect file handles, rebooting the system, or booting into safe mode are all examples of possible solutions to this problem. When you check for malware or software that is in conflict with one another, you could also discover hidden causes of persistent locks. In addition to assisting in the identification of recurrent problems, system logs may give useful insights into the behavior of processes. You are able to repair even the most challenging file locking issues and restore the full functioning of the system if you investigate these advanced alternatives in a methodical manner.