In the realm of document design, clarity and organization are paramount to effectively communicating complex information to readers. Captions for tables and figures serve as invaluable tools for providing context, identifying content, and guiding the reader’s interpretation of visual elements within a document. Whether you’re writing a research paper, report, or presentation, well-crafted captions enhance understanding, facilitate navigation, and elevate the overall professionalism of your work. In this extensive guide, we’ll explore the intricacies of inserting captions for tables or figures in Microsoft Word, empowering you to enhance your document’s clarity and readability with precision and ease.
Understanding the Significance of Captions:
Before delving into the practical aspects of inserting captions, it’s crucial to grasp the significance of these elements in document design. Captions serve multiple purposes, including:
- Providing context: Captions offer brief descriptions or explanations of tables, figures, or other visual elements, helping readers understand their relevance and significance within the document.
- Identifying content: Captions label tables and figures with clear titles or numbers, allowing readers to easily locate and reference specific visual elements as they navigate the document.
- Enhancing accessibility: Captions improve document accessibility by providing alternative descriptions of visual content for readers with visual impairments or using assistive technologies.
By incorporating captions into your document design strategy, you can create documents that are not only informative and visually appealing but also accessible and user-friendly.
Basic Caption Insertion:
Inserting a caption for a table or figure in Microsoft Word is a straightforward process that can be accomplished using built-in tools and features. Here’s how to do it:
- Insert Table or Figure:
- Create or insert the table or figure into your document at the desired location. You can create a table using Word’s table tools or insert an image or graphic as a figure.
- Select Table or Figure:
- Click on the table or figure to select it. You can click once to select the entire table or figure, or click and drag to select specific elements within the table or figure.
- Insert Caption:
- With the table or figure selected, navigate to the “References” tab located in the top menu bar.
- In the “Captions” group, click on the “Insert Caption” button. This will open the “Caption” dialog box.
- Specify Caption Options:
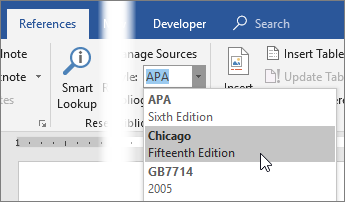
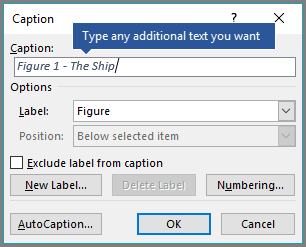
- In the “Caption” dialog box, specify the label and numbering format for the caption. You can choose from predefined label options such as “Table” or “Figure” and customize the numbering format as needed.
- Enter a brief description or title for the table or figure in the “Caption” text box.
- Insert Caption:
- After specifying the caption options and entering the description, click “OK” to insert the caption. The caption will appear below the table or figure, labeled with the specified label and number.
Advanced Caption Customization:
While basic caption insertion suffices for most scenarios, Microsoft Word offers advanced features and customization options to further enhance the appearance and functionality of captions. Here are some additional features you may explore:
- Custom Caption Labels:
- Word allows users to create custom caption labels for tables, figures, or other visual elements. This feature is particularly useful for documents with specialized terminology or formatting requirements.
- Access the “Caption” dialog box, click on the “Numbering” button, and choose “Define New Label” to create a custom caption label.
- Modify Caption Styles:
- Customize the appearance of captions by modifying caption styles, including font, size, color, alignment, and spacing.
- Use Word’s style editing tools to modify the “Caption” style or create a new style specifically for captions.
- Cross-Referencing Captions:
- Word allows users to cross-reference captions within the document, enabling readers to navigate between tables, figures, and their corresponding captions.
- Insert cross-references by navigating to the “References” tab, clicking on the “Cross-reference” button, and selecting the desired caption label and number.
Best Practices for Caption Usage:
While inserting captions is relatively straightforward, it’s essential to adhere to best practices for caption usage to ensure clarity, consistency, and professionalism. Here are some tips to consider:
- Be Descriptive:
- Provide clear and concise descriptions or titles for tables and figures in the captions. Ensure that the caption accurately reflects the content and purpose of the visual element.
- Maintain Consistency:
- Use consistent formatting and labeling conventions for captions throughout the document to enhance readability and document aesthetics.
- Ensure that captions are consistently positioned relative to the corresponding tables or figures, either above or below as per your preferred style guide.
- Check for Clarity:
- Review captions for clarity and comprehensibility, especially if using technical terminology or abbreviations. Ensure that captions are accessible to all readers, including those with limited domain knowledge.
- Proofread Carefully:
- Double-check captions for spelling, grammar, and punctuation errors to maintain professionalism and credibility.
- Pay attention to the accuracy of numerical references and cross-references between captions and corresponding visual elements.
Conclusion:
Inserting captions for tables or figures in Microsoft Word is an essential aspect of document design, facilitating understanding, navigation, and accessibility for readers. By mastering the basic insertion process, exploring advanced customization options, and adhering to best practices for caption usage, you can create documents that are not only informative and visually appealing but also accessible and user-friendly. Whether you’re writing a research paper, report, or presentation, well-crafted captions enhance the clarity, professionalism, and impact of your work, guiding readers through complex information with ease and precision. So, the next time you embark on a document creation journey in Word, remember to leverage the power of captions to enhance the clarity and readability of your tables, figures, and visual content, and communicate your ideas effectively to your audience.