Introduction: Parallel computing has become essential for achieving high performance and scalability in modern software applications, enabling faster execution times and increased throughput by leveraging multiple processing units simultaneously. Julia, a high-level programming language designed for scientific computing and numerical analysis, provides robust support for parallel programming, making it easy for developers to harness the full potential of parallelism in their code. In this comprehensive guide, we will explore the principles, techniques, and best practices for using parallel computing in Julia, empowering developers to write efficient, scalable, and parallelizable code.
- Understanding Parallel Computing: Parallel computing involves executing multiple tasks or computations concurrently to improve performance and efficiency. Parallelism can be achieved at different levels, including task parallelism, data parallelism, and model parallelism. Task parallelism involves executing independent tasks concurrently, while data parallelism involves dividing data into smaller chunks and processing them simultaneously across multiple processing units. Model parallelism involves splitting a computation or algorithm into smaller parts and executing them in parallel.
- Parallelism in Julia: Julia provides native support for parallel computing through its built-in primitives, libraries, and abstractions. Julia’s lightweight tasks (also known as coroutines) allow developers to create concurrent computations without the overhead of heavyweight threads. Julia’s parallel computing capabilities are based on the message-passing paradigm, where processes communicate with each other through message passing using channels. Julia also offers high-level abstractions for parallelism, such as parallel maps, parallel loops, and distributed arrays, making it easy to parallelize computations across multiple cores or nodes.
- Basic Parallelism with Julia Tasks: Julia’s task-based parallelism allows developers to create lightweight tasks that execute concurrently and communicate with each other through channels. Tasks in Julia are lightweight, non-blocking, and cooperative, enabling efficient concurrency without the overhead of operating system threads. Developers can create tasks using the
@asyncmacro or theTaskconstructor and coordinate their execution using channels or synchronization primitives such as@syncand@async. - Parallel Maps and Loops: Julia provides high-level abstractions for parallelizing common operations such as mapping functions over collections or iterating over ranges in parallel. Parallel maps in Julia allow developers to apply a function to each element of a collection concurrently, distributing the work across multiple tasks or processes. Parallel loops in Julia enable developers to parallelize loop iterations by splitting the loop range into smaller chunks and processing them concurrently using tasks or processes.
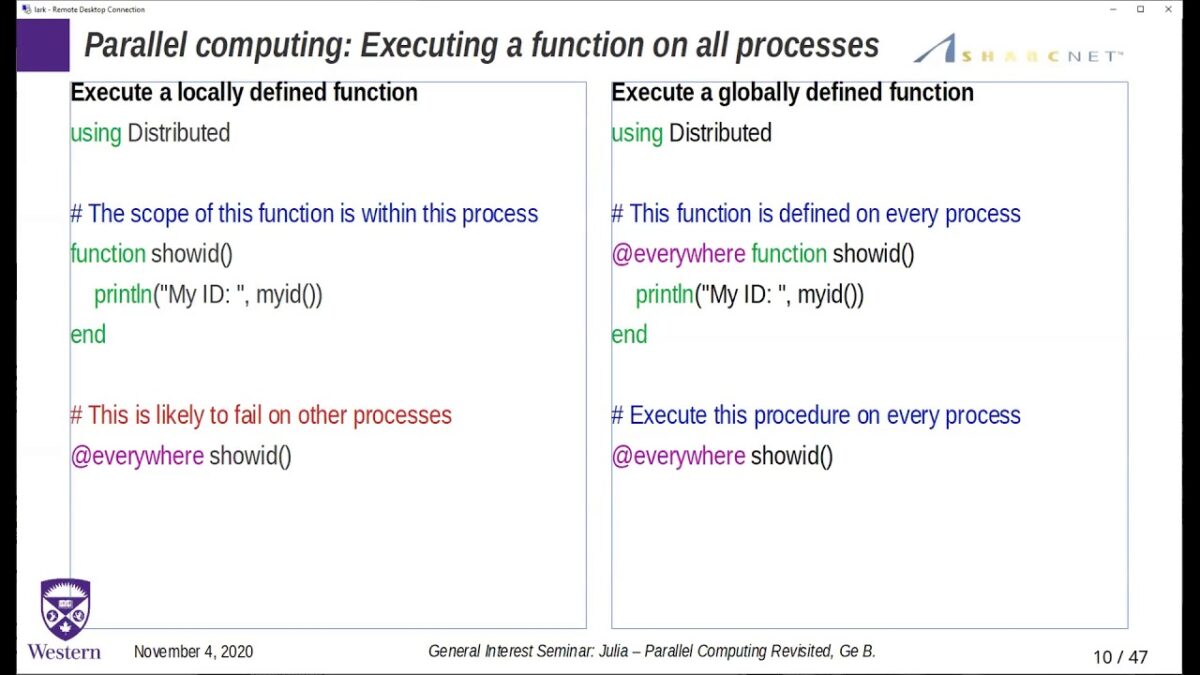
- Distributed Computing with Julia: Julia’s distributed computing capabilities allow developers to distribute computations across multiple nodes or machines in a cluster environment. Julia’s distributed computing model is based on a master-worker architecture, where a master process coordinates the execution of worker processes across different machines. Developers can launch Julia worker processes on remote machines using SSH or other communication mechanisms and distribute tasks or data across the workers using Julia’s distributed arrays or message passing primitives.
- Parallel Data Structures and Algorithms: Julia provides parallel versions of common data structures and algorithms, optimized for parallel execution and scalability. Parallel data structures such as parallel arrays, parallel dictionaries, and parallel queues allow developers to store and manipulate data concurrently across multiple processing units. Parallel algorithms such as parallel sorting, parallel searching, and parallel reduction enable developers to perform common computational tasks in parallel, leveraging the full computational power of modern hardware.
- Shared Memory Parallelism: Julia’s support for shared memory parallelism allows developers to parallelize computations on multicore CPUs using shared memory constructs such as threads and locks. Julia’s
Threadsmodule provides primitives for creating and managing lightweight threads, allowing developers to execute concurrent computations within a single process. Julia’sSharedArraytype allows developers to create shared-memory arrays that can be accessed and modified concurrently by multiple threads, enabling efficient parallelization of numerical computations. - GPU Computing with Julia: Julia provides support for GPU computing through its
CUDA.jlandAMDGPU.jlpackages, allowing developers to harness the computational power of modern GPUs for parallel execution of numerical algorithms. Julia’s GPU computing capabilities enable developers to offload computationally intensive tasks to the GPU, achieving significant speedups compared to CPU-based execution. Julia’s GPU programming model is based on CUDA, a parallel computing platform and programming model developed by NVIDIA for GPU-accelerated computing. - Performance Optimization and Scalability: When using parallel computing in Julia, developers should pay attention to performance optimization and scalability to achieve maximum efficiency and throughput. Techniques such as load balancing, data partitioning, task scheduling, and memory optimization can help improve performance and scalability in parallel programs. Profiling tools and performance monitoring libraries in Julia allow developers to identify performance bottlenecks and optimize critical sections of code for parallel execution.
- Best Practices and Considerations: To effectively use parallel computing in Julia, developers should follow best practices and considerations such as minimizing synchronization overhead, avoiding race conditions and data races, maximizing parallelism and concurrency, choosing appropriate parallelization strategies, and testing code thoroughly under different parallel execution scenarios. Understanding the trade-offs between parallelism, concurrency, and overhead is essential for writing efficient, scalable, and maintainable parallel code in Julia.
Conclusion: Parallel computing in Julia offers developers a powerful and flexible framework for harnessing the full potential of parallelism in their code. By mastering the principles, techniques, and best practices covered in this guide, developers can write efficient, scalable, and parallelizable code that takes advantage of modern multicore CPUs, clusters, and GPUs. Whether working on scientific simulations, data analytics, machine learning, or numerical computing tasks, Julia’s parallel computing capabilities provide developers with the tools they need to tackle complex computational problems with confidence and efficiency.