In the digital landscape, accurate date and time settings are essential for various computing tasks, including scheduling events, organizing files, and maintaining system logs. Windows XP offers users a straightforward method for adjusting date and time settings, allowing for precise control over system timekeeping. In this comprehensive guide, we’ll delve deep into the intricacies of changing date and time settings in Windows XP, empowering users to manage time effectively and ensure accurate time synchronization on their systems.
Understanding Date and Time Settings in Windows XP:
Before we delve into the methods for changing date and time settings, it’s essential to understand the significance of these settings within the Windows XP operating system. Date and time settings govern the system clock, which tracks the current date and time on the computer. Windows XP relies on accurate date and time information for various system functions, including file timestamping, event scheduling, and system logging. By configuring date and time settings correctly, users can ensure accurate timekeeping and synchronize their systems with global time standards.
Step-by-Step Guide to Changing Date and Time Settings:
Now, let’s explore a systematic approach to changing date and time settings in Windows XP:
Step 1: Accessing Date and Time Properties:
- Click on the “Start” button located at the bottom-left corner of the screen.
- Navigate to “Control Panel” and double-click to open it.
- In the Control Panel window, locate and open the “Date and Time” icon.
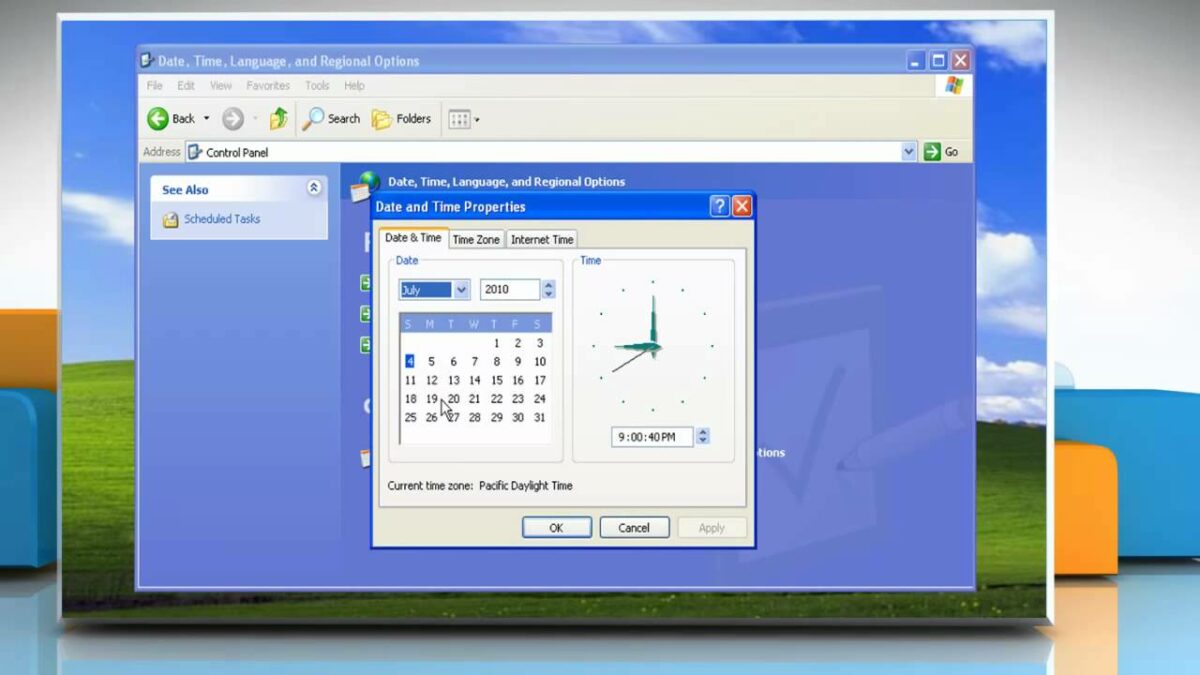
Step 2: Adjusting Date and Time:
- In the Date and Time Properties window, navigate to the “Date and Time” tab.
- Here, you’ll find options for adjusting the current date and time.
- To change the date, click on the calendar icon next to the date field and select the desired date from the calendar.
- To change the time, click on the time field and enter the desired time using the 24-hour format (e.g., HH:MM:SS).
Step 3: Time Zone Settings:
- Navigate to the “Time Zone” tab in the Date and Time Properties window.
- Here, you’ll find options for selecting the time zone and adjusting daylight saving time settings.
- Click on the dropdown menu next to “Time zone” and select the appropriate time zone from the list.
- Optionally, check the box next to “Automatically adjust clock for daylight saving changes” to enable automatic daylight saving time adjustments.
Step 4: Additional Time Settings:
- Explore additional time settings and options available in the Date and Time Properties window.
- Navigate to the “Internet Time” tab to enable synchronization with an online time server and ensure accurate timekeeping.
- Click on the “Change settings” button to configure internet time settings and select a time server from the list.
- Optionally, check the box next to “Automatically synchronize with an internet time server” to enable automatic time synchronization.
Step 5: Applying Changes:
- Once you’ve adjusted the date and time settings to your preferences, click on the “Apply” button.
- Click “OK” to save the changes and close the Date and Time Properties window.
Step 6: Verifying Date and Time:
- After applying the changes, verify that the date and time settings have been updated correctly.
- Check the system tray in the bottom-right corner of the screen to ensure that the system clock reflects the changes.
Advanced Techniques and Tips:
For advanced users or those seeking additional customization options, consider the following tips:
- Command Line Options: Advanced users can use command-line utilities such as “date” and “time” to change date and time settings from the command prompt. Type “date” or “time” followed by the desired date or time in the appropriate format to make changes.
- Registry Settings: Date and time settings are stored in the Windows registry, allowing for manual customization and fine-tuning. Exercise caution when editing registry settings, as incorrect changes can cause system instability.
- Third-Party Tools: There are many third-party utilities available that offer advanced date and time management features, including automatic time synchronization, time zone conversion, and more.
Conclusion:
In conclusion, changing date and time settings in Windows XP is a straightforward process that offers users precise control over system timekeeping. By following the step-by-step guide outlined in this article and leveraging advanced techniques and tips, users can adjust date and time settings with confidence and precision. Whether configuring the current date and time, adjusting time zone settings, or enabling automatic time synchronization, mastering date and time management empowers users to ensure accurate timekeeping and synchronize their systems effectively. So take control of your system time today, adjust date and time settings to your preferences, and unlock the full potential of your Windows XP experience.