Categories
Microsoft Office

Unleashing Automation with Macros in MS Access 2016: Simplifying Tasks and Boosting Productivity

Microsoft Access 2016, a powerhouse in database management, empowers users with a versatile toolkit, and at the core of automation lies a game-changing feature – Macros. This comprehensive guide navigates the intricacies of Unleashing Automation with Macros in MS Access 2016, unraveling their significance, functionalities, and how they serve as a catalyst for simplifying tasks and catapulting productivity to new heights.

The Essence of Macros in MS Access 2016

At its essence, a Macro in MS Access is a set of predefined actions that automate repetitive tasks or sequences of commands. While tables and forms handle data storage and interaction, Macros transcend manual intervention by enabling users to create scripts that execute a series of operations with a single command. This not only streamlines workflows but also enhances the overall efficiency of database management.

Core Components of MS Access 2016 Macros

1. Macro Designer:

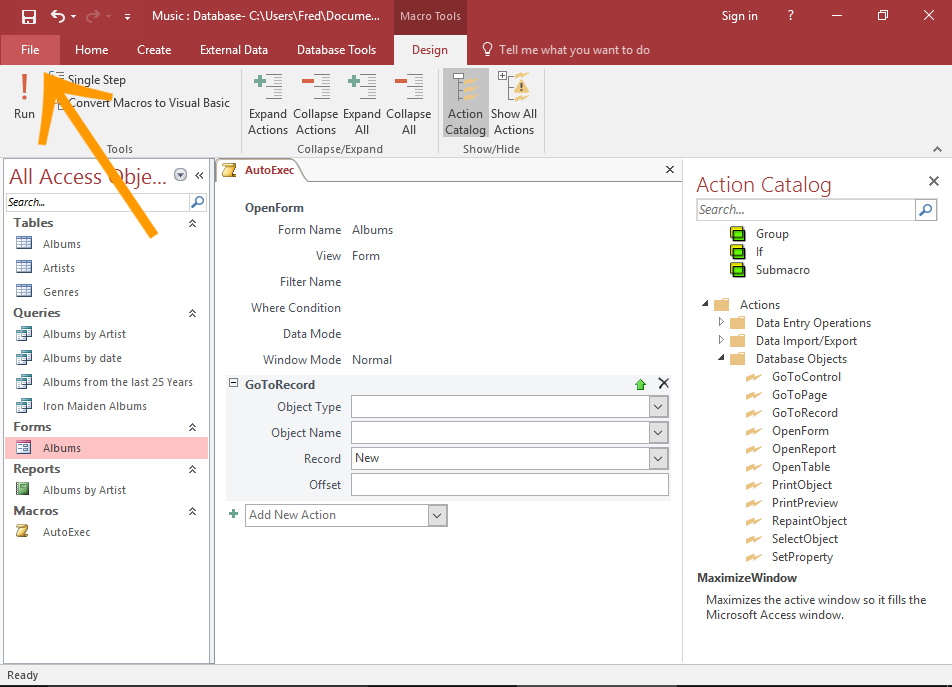
  • The Macro Designer is the visual interface within MS Access 2016 where users construct and edit Macros. It provides a canvas for assembling actions and defining the logic of the automated sequence.

2. Action Catalog:

  • The Action Catalog is a comprehensive library of predefined actions that users can incorporate into their Macros. Actions range from opening forms and running queries to sending emails and updating records.

3. Conditions:

  • Conditions allow users to introduce logic into Macros, specifying criteria that determine whether an action should be executed. Conditions add a layer of flexibility, making Macros adaptable to different scenarios.

4. Arguments:

  • Arguments are parameters that users can configure for each action in a Macro. They provide a level of customization, allowing users to tailor actions to specific requirements.

5. Embedded Macros:

  • Macros can be embedded within other objects in MS Access, such as forms or reports. This enables users to trigger Macros based on specific events, providing a dynamic and responsive automation experience.

Creating Macros in MS Access 2016: A Step-by-Step Guide

Step 1: Accessing the Macro Designer:

  • Launch MS Access 2016 and open the database where the Macro will be created. Navigate to the “Create” tab, and in the “Macros & Code” group, select “Macro.”

Step 2: Adding Actions:

  • In the Macro Designer, drag actions from the Action Catalog onto the design grid. Actions can include opening a form, running a query, sending an email, or performing data manipulation.

Step 3: Configuring Actions:

  • For each action added to the Macro, configure its properties using the Arguments section. This involves specifying details such as the form to open, the query to run, or the email recipients.

Step 4: Adding Conditions (Optional):

  • If conditional logic is needed, users can add conditions to actions. This involves defining criteria that determine when an action should or should not be executed.

Step 5: Saving and Running the Macro:

  • Save the Macro, and it is ready for execution. Users can run the Macro by clicking the “Run” button in the Macro Designer. The sequence of actions will be executed in the specified order.

Types of Macros in MS Access 2016

1. Simple Macros:

  • Simple Macros are straightforward sequences of actions without the complexity of conditions or embedded logic. They are ideal for automating routine tasks with a fixed set of steps.

2. Data Macros:

  • Data Macros are Macros that respond to changes in data, such as record updates, inserts, or deletes. They can be associated with tables and run automatically when certain data events occur.

3. Embedded Macros in Forms and Reports:

  • Macros can be embedded within forms or reports, responding to events like opening the form, changing a record, or clicking a button. This allows for a more interactive and event-driven automation approach.

4. AutoExec Macros:

  • AutoExec Macros are special Macros that automatically run when the database is opened. They are useful for initiating specific actions or setting the stage for the user’s interaction with the database.

5. Conditional Macros:

  • Conditional Macros incorporate logical conditions, allowing for more dynamic and adaptive automation. Actions are executed based on whether specified conditions are met, providing a flexible and responsive automation framework.

Advanced Features and Functionalities

1. Error Handling:

  • Macros in MS Access 2016 support error handling, allowing users to define actions to be taken in case an error occurs during the execution of the Macro. This ensures more robust and fault-tolerant automation.

2. Web Macros:

  • MS Access 2016 introduces the concept of web macros, enabling users to create Macros that interact with web-based content. This extends the reach of Macros beyond the confines of the local database.

3. Parameterized Macros:

  • Parameterized Macros allow users to pass parameters to a Macro at runtime, enhancing the flexibility and reusability of Macros. This is particularly valuable for Macros that need to adapt to varying inputs.

4. Integration with Visual Basic for Applications (VBA):

  • For users seeking advanced customization and functionality, Macros can be integrated with VBA. This opens the door to a world of coding possibilities, enabling the creation of highly tailored and intricate automation solutions.

5. Macro Groups:

  • Macro Groups allow users to organize and categorize Macros within the database. This is especially useful for databases with numerous Macros, providing a structured way to manage and locate specific automation sequences.

Real-World Applications of Macros in MS Access 2016

1. Automated Reporting:

  • Macros can be employed to automate the generation of reports based on specific criteria. This includes running queries, formatting reports, and distributing the final reports to designated recipients.

2. Data Cleanup and Maintenance:

  • Macros are invaluable for automating data cleanup tasks, such as removing duplicate records, updating outdated information, or restructuring data to meet evolving requirements.

3. Email Notifications:

  • Users can set up Macros to send automated email notifications based on specific events or conditions. This is particularly useful for alerting stakeholders about critical changes in the database.

4. Integration with External Systems:

  • Macros can be utilized to facilitate the integration of MS Access with external systems or databases. This includes importing/exporting data, synchronizing information, and maintaining consistency across platforms.

5. Dynamic Form and Report Interactions:

  • Embedded Macros in forms or reports allow for dynamic interactions based on user actions. This can include updating data based on form inputs, triggering specific actions upon button clicks, or dynamically adjusting report content.

Best Practices for Macro Mastery

1. Start with Simple Tasks:

  • For users new to Macros, start with simple tasks to grasp the basics. As proficiency grows, gradually tackle more complex automation scenarios.

2. Thoroughly Test Macros:

  • Before deploying Macros in a live database, thoroughly test their functionality with various scenarios. This helps identify and address potential issues and ensures reliable automation.

3. Document Macros:

  • Maintain documentation that outlines the purpose and functionality of each Macro. This serves as a reference for users and administrators, especially in databases with multiple Macros.

4. Regularly Review and Update Macros:

  • As the database evolves, regularly review and update Macros to align with changing requirements. This involves adjusting actions, conditions, or incorporating new features introduced in MS Access updates.

5. Explore Integration with VBA:

  • For users seeking advanced customization, explore the integration of Macros with VBA. This opens up a world of possibilities for creating highly tailored and intricate automation solutions.

Conclusion

Unleashing Automation with Macros in MS Access 2016 is not merely a technical feat; it is a strategic decision that transforms the landscape of database management. This comprehensive guide has traversed the foundational elements of Macros, from their core components to advanced features, showcasing their versatility and impact on productivity.

As users embark on the journey of MS Access mastery, Macros emerge as a key proficiency that empowers them to automate tasks, streamline workflows, and elevate the efficiency of database interaction. Beyond the realm of tables and forms, Macros serve as the catalyst for a new era of automation, simplifying tasks, reducing manual intervention, and unlocking the full potential of MS Access 2016. In a world where time is a precious commodity, Macros stand as a beacon of efficiency, enabling users to accomplish more with less effort and catapulting productivity to unprecedented heights.
Categories
Microsoft Office

Beyond Spreadsheets: Exploring the Magic of Forms in MS Access 2016

Microsoft Access 2016, a versatile and powerful relational database management system, goes beyond the traditional realm of data storage and retrieval. At the forefront of its user interface lies a transformative feature – Forms. This comprehensive exploration delves into the magic of Forms in MS Access 2016, uncovering their significance, functionalities, and how they transcend the limitations of spreadsheets, offering users an interactive and user-friendly approach to database interaction.

The Significance of Forms in Database Management

In the context of database design, Forms act as a bridge between raw data and end-users. While tables present data in a structured format, Forms provide a dynamic and user-friendly interface for data entry, editing, and viewing. They encapsulate the intricacies of database structure, shielding users from the complexities of tables and queries. The key significance of Forms lies in their ability to enhance user experience, streamline data input, and contribute to the overall efficiency of database interaction.

Core Functionalities of Forms

1. Data Entry and Editing:

  • Forms are designed to facilitate the seamless entry of new data and the editing of existing records. They provide a user-friendly layout where users can input information without directly interacting with the underlying tables.

2. User-Friendly Interface:

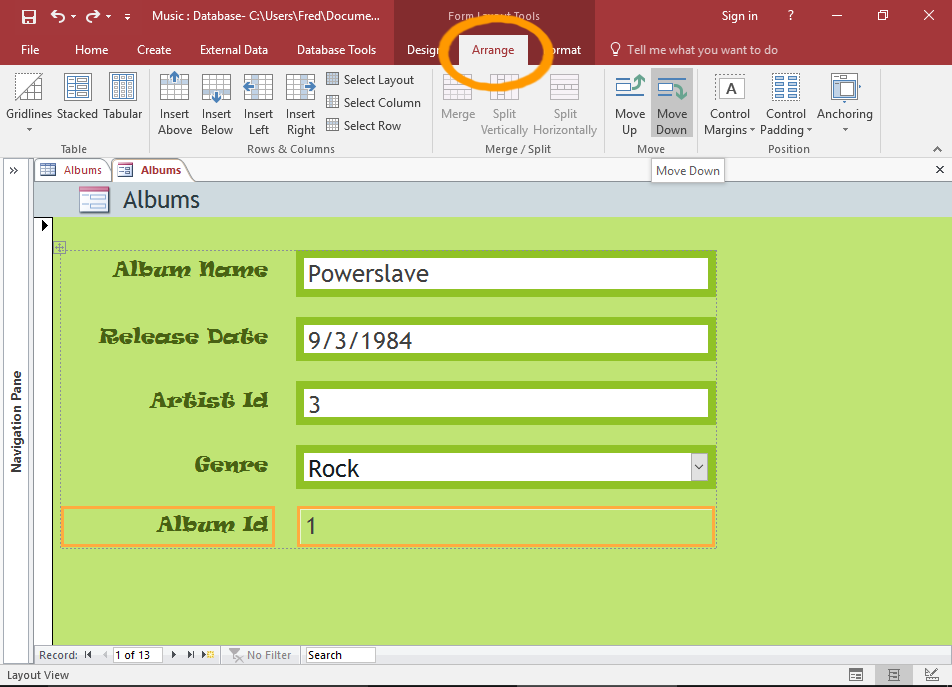
  • Unlike raw tables, Forms offer a visually appealing and intuitive interface. Through the use of controls like text boxes, combo boxes, and buttons, users can interact with the database in a more human-centric way.

3. Navigation and Record Selection:

  • Forms provide navigation tools that allow users to move between records effortlessly. This is especially valuable when dealing with large datasets, as users can navigate to specific records with ease.

4. Data Validation and Error Handling:

  • Forms can include validation rules and error handling mechanisms, ensuring that data entered conforms to predefined criteria. This contributes to data accuracy and prevents the input of invalid or inconsistent information.

5. Integration with Queries and Reports:

  • Forms seamlessly integrate with queries and reports, providing a cohesive user experience. Users can interact with data through Forms and generate custom reports or queries based on their specific needs.

Creating Forms in MS Access 2016: A Step-by-Step Guide

Step 1: Open the Database:

  • Launch MS Access 2016 and open the database where the Form will be created.

Step 2: Navigate to the “Create” Tab:

  • Select the “Create” tab in the Ribbon at the top of the screen.

Step 3: Choose “Form Design”:

  • In the “Forms” group, select “Form Design.” This opens a blank Form in Design View.

Step 4: Add Fields to the Form:

  • Drag and drop fields from the underlying table or query onto the Form. Arrange them as desired, defining the layout that suits the user’s needs.

Step 5: Insert Controls:

  • Use controls such as text boxes, combo boxes, and buttons to enhance the user interface. These controls allow users to input and interact with data seamlessly.

Step 6: Set Properties and Formatting:

  • Customize the appearance and behavior of the Form by setting properties and formatting options. This includes defining default values, specifying input masks, and adjusting the layout.

Step 7: Save and Test the Form:

  • Save the Form and switch to Form View to test its functionality. Enter data, navigate between records, and ensure that the Form aligns with user expectations.

Types of Forms in MS Access 2016

1. Single Form:

  • A Single Form displays one record at a time and is ideal for data entry or viewing detailed information about a specific record.

2. Continuous Form:

  • A Continuous Form displays multiple records in a tabular format. Users can scroll through records horizontally, making it suitable for tasks like data review and editing.

3. Datasheet Form:

  • Similar to a Continuous Form, a Datasheet Form presents data in a tabular format. It resembles a spreadsheet and is particularly useful for quick data entry and overview.

4. Pop-up Form:

  • A Pop-up Form appears as a separate window, overlaying the main database window. It is often used for data entry or displaying additional information without navigating away from the main interface.

5. Navigation Form:

  • A Navigation Form serves as a centralized hub for navigating through different forms and reports within a database. It provides a user-friendly menu for accessing various elements of the database.

Advanced Form Design and Functionality

1. Subforms:

  • Subforms are Forms embedded within other Forms. They enable the display of related data and are especially useful in scenarios where data is normalized across multiple tables.

2. Tab Controls:

  • Tab Controls allow users to organize information on a Form into tabs, making it more visually appealing and organized. Each tab can represent a category or type of information.

3. Combo Boxes and List Boxes:

  • Combo boxes and list boxes are powerful controls that enable users to select values from predefined lists. They enhance data accuracy and prevent the entry of invalid information.

4. Command Buttons:

  • Command buttons can trigger various actions within a Form. These actions include saving records, navigating between records, running queries, or opening other Forms or reports.

5. Event Procedures and Macros:

  • Advanced users can leverage event procedures and macros to add custom functionality to Forms. This includes running specific actions when a Form is opened, a button is clicked, or data is updated.

Real-World Applications of Forms

1. Customer Information Form:

  • In a customer database, a form can be created to display and edit customer information. Users can easily navigate between records, update contact details, and add new customers.

2. Order Entry Form:

  • An order entry form streamlines the process of entering new orders. Users can select products from a list, input quantities, and the form can automatically calculate totals.

3. Employee Information Form:

  • HR databases often use forms to manage employee information. A well-designed form allows HR personnel to input or update details such as personal information, job roles, and performance evaluations.

4. Inventory Management Form:

  • For inventory management, a form can provide an intuitive interface for tracking stock levels, adding new items, and managing supplier information.

5. Project Tracking Form:

  • Project management databases can utilize forms to track project details, milestones, and team member assignments. Users can easily update project statuses and timelines.

Best Practices for Form Design Mastery

1. User-Centric Design:

  • Design forms with the end-user in mind. Prioritize a clean, intuitive layout that facilitates easy navigation and data entry.

2. Consistency Across Forms:

  • Maintain a consistent design theme and layout across different forms within the same database. This enhances the user experience and creates a cohesive interface.

3. Use Descriptive Labels:

  • Label fields and controls with clear and descriptive names. This aids users in understanding the purpose of each field and how to interact with the form.

4. Limit Data Entry Errors:

  • Implement validation rules and input masks to limit data entry errors. This ensures that data entered conforms to predefined criteria, enhancing accuracy.

5. Regularly Review and Update Forms:

  • As data requirements evolve, regularly review and update forms to align with the changing needs of the organization. This includes adding new fields, adjusting layouts, or incorporating additional controls.

Conclusion

In the landscape of database management, Forms in MS Access 2016 emerge as more than just interfaces; they represent a transformative approach to data interaction. This comprehensive exploration has peeled back the layers of form functionality, from basic data entry to advanced design elements.

As users navigate the expansive world of MS Access, mastering Forms becomes a cornerstone of effective database utilization. It is not merely a technical skill but a strategic decision that influences the efficiency, user-friendliness, and overall success of a database. Beyond spreadsheets, Forms in MS Access 2016 open doors to a realm of interactive and dynamic database interaction, empowering users to engage with their data in a way that goes beyond the constraints of traditional tabular structures.

Categories
Microsoft Office

Mastering Data Validation in MS Access 2016: Ensuring Accuracy and Consistency

In the dynamic realm of database management, the accuracy and consistency of data are paramount. Microsoft Access 2016 provides a robust solution through its powerful Data Validation feature, offering users the means to enforce rules and standards, thereby elevating the overall integrity of their databases. This comprehensive guide delves into the intricacies of Mastering Data Validation in MS Access 2016, exploring its features, benefits, and practical applications for ensuring data accuracy and consistency.

The Significance of Data Validation

Before diving into the specifics of Data Validation in MS Access 2016, it’s crucial to understand why this feature is fundamental to database management. Data Validation serves as a proactive measure to prevent errors, inconsistencies, and inaccuracies in the data entered into a database. By defining validation rules, users can enforce data integrity, streamline data entry processes, and ultimately contribute to the reliability of the entire database.

Core Components of Data Validation

1. Field Validation Rules:

  • At the heart of Data Validation in MS Access is the ability to define validation rules for individual fields within a table.
  • Validation rules specify the criteria that data must meet to be considered valid.
  • Examples of validation rules include data type constraints (e.g., only accepting numeric values), range limitations, and pattern matching.

2. Validation Text:

  • Alongside validation rules, users can provide custom validation text that conveys specific instructions or error messages to users attempting to input data.
  • This feature enhances user-friendliness by guiding data entry and explaining any validation errors that occur.

3. Input Masks:

  • Input masks are another facet of Data Validation, particularly useful for enforcing specific formats for data entry.
  • For instance, an input mask for a phone number might automatically insert dashes or parentheses in the appropriate places.

4. Lookup Fields and List Validation:

  • MS Access allows the creation of lookup fields, enabling users to choose values from predefined lists.
  • List validation ensures that only values from a specified list are accepted, minimizing the risk of data entry errors.

Implementing Data Validation: A Step-by-Step Guide

Step 1: Identifying Validation Requirements

Before implementing Data Validation, it’s essential to identify the specific requirements for each field. This involves understanding the acceptable data types, ranges, and formats for accurate validation.

Step 2: Accessing Table Design

Navigate to the table in Design View where Data Validation rules will be applied. This can be an existing table or a new one created to store validated data.

Step 3: Defining Validation Rules

In the Design View, locate the field for which validation rules are to be set. Enter the desired validation rule in the “Validation Rule” property. For instance, to enforce a numeric range, the rule might be “Between 1 and 100.”

Step 4: Adding Validation Text

In the same field properties, add a custom validation text that will be displayed if the validation rule is not met. This text serves as guidance for users and helps them understand any errors in their data entry.

Step 5: Implementing Input Masks

For fields where a specific format is crucial, input masks can be employed. Define the input mask in the field properties, specifying the characters and their positions.

Step 6: Utilizing Lookup Fields

For fields where a predefined set of values is appropriate, create a lookup field by specifying a list of values. This restricts data entry to the defined options, reducing the likelihood of errors.

Advanced Data Validation Techniques

1. Cross-Field Validation:

  • MS Access allows users to perform validation across multiple fields, ensuring that the data entered into one field is consistent with another.
  • For instance, if there are two fields representing a start and end date, a validation rule can be set to ensure that the end date is not earlier than the start date.

2. Custom Validation Functions:

  • Users can create custom validation functions using Visual Basic for Applications (VBA), providing a high degree of flexibility in defining validation logic.
  • Custom functions can perform complex checks, making them suitable for scenarios that go beyond the capabilities of standard validation rules.

3. Regular Expression Validation:

  • For advanced pattern matching, regular expressions can be employed in validation rules. This is particularly useful for enforcing specific text patterns or formats.

4. Validation Rule Expressions:

  • MS Access supports a range of expressions within validation rules, including mathematical expressions, logical comparisons, and string manipulations.
  • This allows for sophisticated validation criteria that cater to diverse data validation needs.

Benefits of Mastering Data Validation

1. Enhanced Data Quality:

  • Data Validation serves as a frontline defense against inaccurate or inconsistent data. By enforcing rules, databases can maintain a higher standard of data quality.

2. Streamlined Data Entry:

  • With clear validation rules and user-friendly validation text, the data entry process becomes more streamlined. Users receive guidance on correct data formats, reducing the likelihood of errors.

3. Reduced Data Cleanup Efforts:

  • By preventing invalid data entry, Data Validation reduces the need for extensive data cleanup efforts. This is particularly valuable for maintaining a tidy and efficient database.

4. Improved User Experience:

  • User-friendly validation messages and input masks contribute to an improved user experience. Users are less likely to encounter frustrating data entry errors, fostering a positive interaction with the database.

5. Consistency Across Databases:

  • Implementing consistent validation rules across databases ensures uniformity in data quality. This is crucial in scenarios where multiple databases contribute to a comprehensive dataset.

Real-World Applications

1. Financial Data Entry:

  • In financial databases, Data Validation ensures accurate entry of numeric values, preventing errors in calculations or financial reports.

2. Contact Information:

  • For databases storing contact information, validation rules can enforce proper formatting for phone numbers, email addresses, and postal codes.

3. Inventory Management:

  • In inventory databases, Data Validation can enforce rules on quantity fields, ensuring that only positive integers are entered.

4. Date and Time Entries:

  • Databases containing date and time information benefit from Data Validation to prevent inconsistencies and errors in date formats.

5. Medical Records:

  • In healthcare databases, Data Validation is critical to ensure accurate entry of patient information, such as blood pressure readings or medication dosages.

Best Practices for Data Validation Mastery

1. Thoroughly Understand Data Requirements:

  • Before implementing Data Validation, have a clear understanding of the specific data requirements for each field. This includes data types, ranges, and acceptable formats.

2. Provide Descriptive Validation Text:

  • Craft validation text that is clear, concise, and user-friendly. This helps users understand any errors in their data entry and provides guidance on how to correct them.

3. Regularly Review and Update Validation Rules:

  • As data requirements evolve, regularly review and update validation rules to ensure they align with the changing needs of the organization.

4. Test Data Validation Rules Extensively:

  • Before deploying databases with Data Validation rules, thoroughly test them with various scenarios to identify and address any potential issues.

5. Document Validation Rules:

  • Maintain documentation that clearly outlines the validation rules for each field. This documentation serves as a reference for database users and administrators.

Conclusion

Mastering Data Validation in MS Access 2016 is an indispensable skill for users aiming to maintain the accuracy and consistency of their databases. This comprehensive guide has explored the core components of Data Validation, provided a step-by-step guide for implementation, and highlighted advanced techniques for nuanced validation scenarios.

As users navigate the intricacies of database management, Data Validation stands as a safeguard against data errors and inconsistencies. It goes beyond being a technical feature; it is a strategic tool that contributes to the reliability and effectiveness of databases across various industries and applications.

In the ever-evolving landscape of data management, where the integrity of information is non-negotiable, mastering Data Validation in MS Access 2016 becomes a key proficiency. It empowers users to build databases that not only store data but ensure that the data entered is accurate, consistent, and reliable – a cornerstone for informed decision-making and efficient business processes.