Introduction: MATLAB functions are powerful tools that enable users to encapsulate algorithms, perform computations, and automate repetitive tasks in a structured and reusable manner. Understanding how to write and call MATLAB functions is essential for efficient code organization, modularity, and maintainability. This comprehensive guide aims to provide a detailed overview of how to write and call MATLAB functions, offering step-by-step insights and expert tips to empower users to harness the full potential of MATLAB for their projects and tasks.
Understanding MATLAB Functions: In MATLAB, a function is a self-contained block of code that performs a specific task or operation and may accept input arguments and return output values. MATLAB functions adhere to certain syntax rules and conventions, allowing users to define custom algorithms, perform computations, and modularize code logic for better organization and reusability.
Key Components of MATLAB Functions: Before delving into writing and calling MATLAB functions, it’s essential to understand some key components and concepts:
- Function Declaration: MATLAB functions begin with a function declaration line, which specifies the function name, input arguments, and output arguments (if any).
- Function Body: The function body contains the actual MATLAB code that defines the behavior and functionality of the function.
- Input Arguments: Input arguments are variables or values passed to the function for processing or computation. They are specified within parentheses in the function declaration.
- Output Arguments: Output arguments are variables or values returned by the function as results or outcomes of the computation. They are specified after the function declaration using the “function” keyword.
- Function Handles: MATLAB supports function handles, which are variables that store references to functions. Function handles can be passed as arguments to other functions or stored in data structures.
Writing a MATLAB Function: The process of writing a MATLAB function involves several steps, from defining the function signature to implementing the function body. Here’s a comprehensive guide to writing a MATLAB function:
- Define Function Signature: Start by defining the function signature, including the function name, input arguments, and output arguments (if any). For example:
function result = myFunction(input1, input2)
- Implement Function Body: Write the MATLAB code that defines the behavior and functionality of the function inside the function body. This code will be executed whenever the function is called. For example:
result = input1 + input2;
- Handle Input Validation: Optionally, include input validation logic to check the validity of input arguments and handle edge cases or errors gracefully. For example:
if ~isnumeric(input1) || ~isnumeric(input2)
 error('Input arguments must be numeric.');
 end
- Return Output Values: If the function produces output values, use the “return” statement to return them to the calling code. For example:
return;
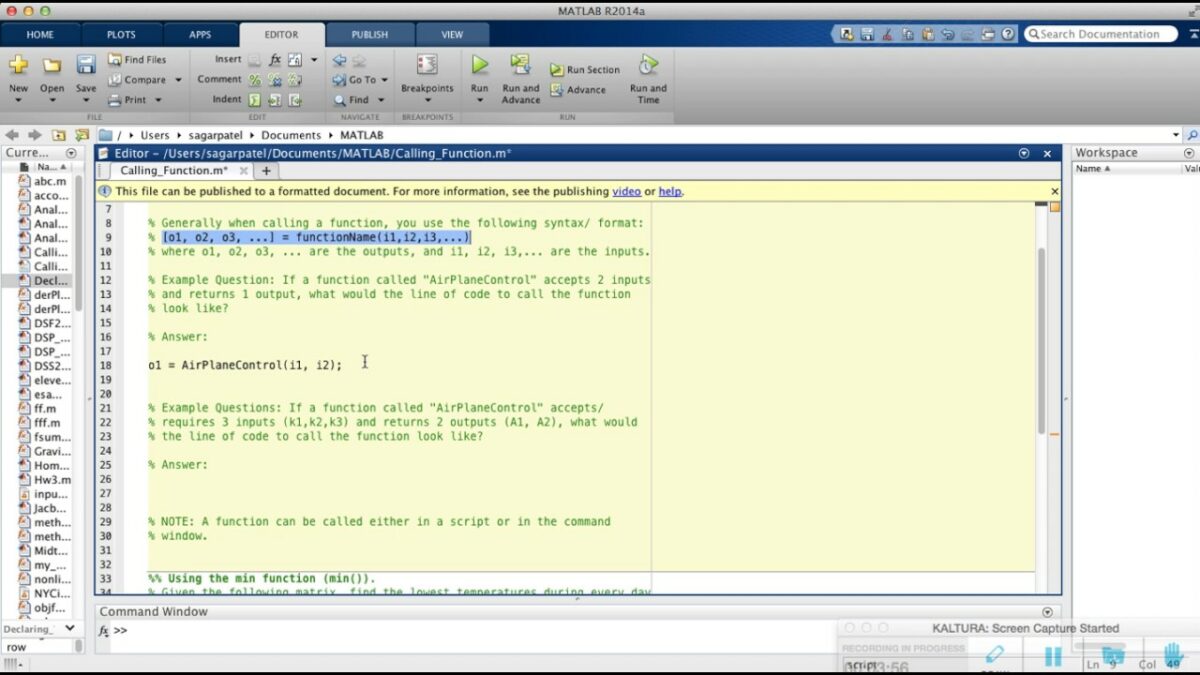
Calling a MATLAB Function: Once a MATLAB function has been defined, it can be called from other MATLAB code to perform computations or tasks. Here’s how to call a MATLAB function:
- Specify Input Arguments: Provide values or variables for the input arguments required by the function. For example:
a = 10;
 b = 20;
- Call the Function: Use the function name followed by parentheses to call the function and pass input arguments. For example:
result = myFunction(a, b);
- Handle Output Values: If the function returns output values, capture them in variables for further processing or analysis. For example:
disp(['The result is: ' num2str(result)]);
Best Practices for Writing and Calling MATLAB Functions: In addition to following the step-by-step guidelines outlined above, here are some best practices to optimize the writing and calling of MATLAB functions:
- Use Descriptive Function Names: Choose meaningful and descriptive names for functions that reflect their purpose or functionality to enhance code readability and maintainability.
- Modularize Code: Break down complex tasks into smaller, modular functions to promote code reusability, scalability, and maintainability. Use function handles and function files to encapsulate functionality and minimize dependencies.
- Document Function Interfaces: Document the input arguments, output arguments, and behavior of functions using comments or docstrings to provide context, guidance, and usage examples for users.
- Test Functions Thoroughly: Test MATLAB functions thoroughly using unit tests, test cases, and input validation to ensure correctness, robustness, and reliability across different scenarios and edge cases.
- Optimize Performance: Profile MATLAB functions using the built-in profiler to identify performance bottlenecks and optimize critical sections for improved speed and efficiency. Consider vectorization, preallocation, and algorithmic optimizations to enhance function performance.
Conclusion: Writing and calling MATLAB functions is a fundamental skill for leveraging the full power and flexibility of MATLAB for algorithm development, numerical computation, and data analysis. By following the comprehensive guide and best practices outlined above, users can create structured, efficient, and reusable MATLAB functions to tackle real-world challenges and advance scientific and engineering research. With its intuitive syntax, extensive libraries, and interactive development environment, MATLAB empowers users to explore complex problems, prototype solutions, and innovate across a wide range of domains and disciplines. Whether it’s implementing custom algorithms, designing simulation models, or analyzing experimental data, MATLAB functions provide a flexible and powerful framework for turning ideas into solutions and driving impactful discoveries and innovations.