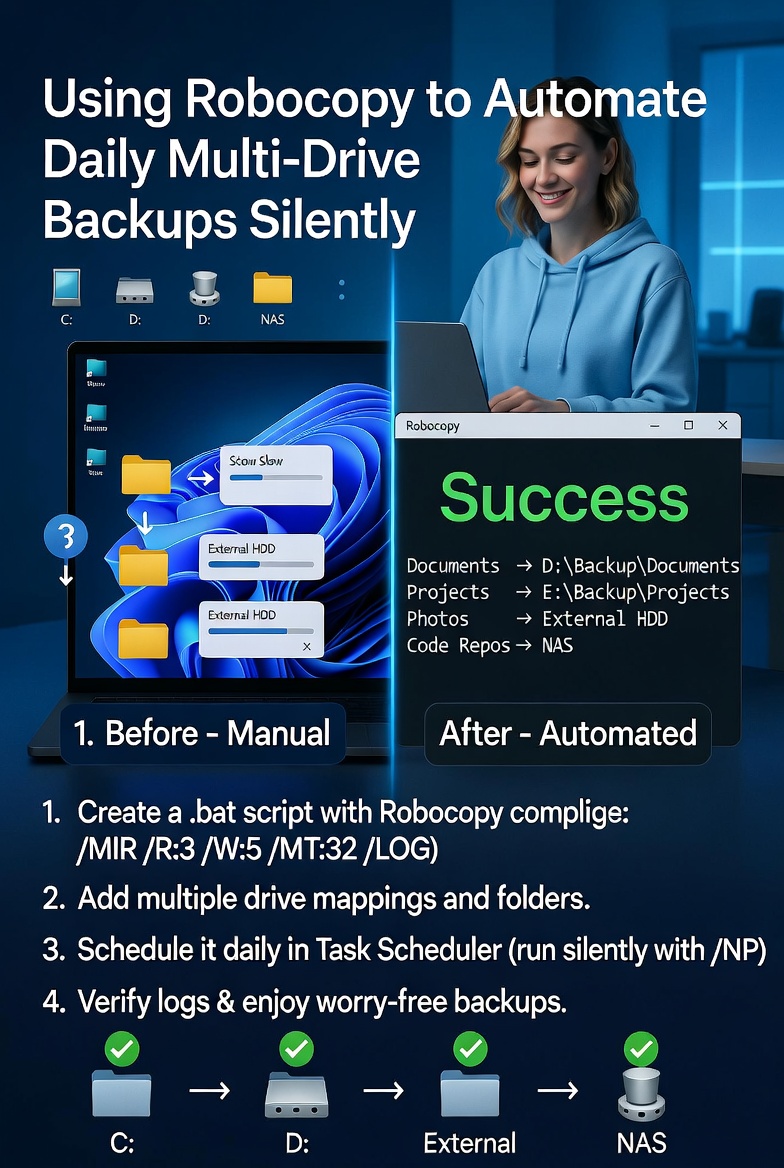
Categories
How To Guides Windows 10

How to Set Up a Multi-Monitor Workflow in Windows 11 Using PowerToys FancyZones

How to Set Up a Multi-Monitor Workflow in Windows 11 Using PowerToys FancyZones

By providing you with more screen real estate for work, creative pursuits, or gaming, a multi-monitor configuration may significantly boost your productivity. The management of many windows over several screens, on the other hand, may soon become chaotic if suitable structure is not implemented. In Windows 11, the FancyZones tool from Microsoft PowerToys is a sophisticated tool that enables users to design individualized window layouts, snap zones, and workflows that are consistent across several displays.

The snapping functionality that comes standard with Windows is not the only thing that FancyZones is. The ability to precisely manage many screens, develop layouts that can be reused, and specify accurate window placements are all made possible by this feature. You may maintain an effective workspace that eliminates clutter and boosts attention by customizing how apps snap and scale across displays. This will allow you to keep a more efficient workplace.

PowerToys: Setting up and Configuring Installations

To begin using FancyZones, you must first go to the official website of Microsoft and download and install the PowerToys software. Launch PowerToys when the installation is complete, and then activate the FancyZones module.

In order to ensure that your window layouts are accessible each time Windows boots, you need make sure that PowerToys is running simultaneously. You also have the ability to add keyboard shortcuts inside the settings; this allows you to easily shift windows across different displays or zones.

Acquiring Knowledge of the FancyZones Displays

Through the use of FancyZones, you are able to design windows with unique layouts. You are able to have a distinct setup on the screen of your laptop as opposed to an external display since each monitor has the capability of having its own layout.

The layouts might be as basic as grids or columns, or they can be totally customized to correspond with your process. You might, for instance, designate one display for the use of communication applications, another for the primary program you use for your job, and a third for the storage of reference materials.

Establishing Independent Zones

In order to build a zone arrangement that is unique to your preferences, launch the FancyZones editor and choose the monitor that you want to modify. You have the ability to split the screen into several zones of any size or shape, and you may drag between the zones to adjust them until they are suitable for your workflow.

It is possible to minimize the amount of effort spent manually resizing or moving windows by using custom zones, which guarantee that frequently used applications always occupy the same screen area.

Take use of the Zone Snapping Function

When you have finished defining your zones, you may highlight the zones that are accessible by holding down the Shift key while dragging another window. When you drop the window into a zone, it will snap into place exactly where you want it to be.

Your workplace will stay organized even if you regularly open and close programs if you use this strategy, which provides for consistent window placement across many monitors and guarantees that your workspace is always organized.

Using the Keyboard to Assign Windows to Zones

To facilitate the movement of windows between zones, FancyZones provides support for keyboard shortcuts. These shortcuts may be configured to transfer windows to the next zone, to a particular zone, or across displays. You can also move windows manually.

When dealing with several monitors, when reaching across displays may be a difficult process, keyboard-based control is particularly handy since it is quicker than dragging windows.

Taking Control of Multiple Monitor Layouts

There is the potential for each monitor in a multi-display configuration to have its own unique layout. Because FancyZones retains these configurations for each monitor, you are able to alter the arrangement of the monitors for a variety of purposes.

When it comes to coding, for instance, one monitor may utilize a three-column style, while another display might use a two-zone structure for communication applications and a browser simultaneously. This ensures that your workflow remains constant even after restarts since these layouts are persistent.

Window Behavior and Overrides: Handling the Situation

There are moments when Windows 11 overrides the snapping behavior of third-party applications, especially when doing so with full-screen or maximized windows. You are able to exercise control over these behaviors by activating the “Override Windows Snap” feature inside the settings of FancyZones.

It is because of this that your windows will always stick to the set zones rather than the default snapping rules, which will guarantee that consistency is maintained across all monitors.

Layouts may be saved and imported both.

Your own layouts may be saved in FancyZones so that you can move them to other computers or store them for backup. When you often transition between devices or when you need to reproduce a multi-monitor arrangement across numerous workstations, exporting layouts might be a handy functionality.

Additionally, importing layouts helps save time and assures consistency, which is especially beneficial in collaborative workplaces where numerous users share comparable configurations.

Increasing the Productivity of Workflowing

A considerable reduction in visual clutter and an increase in productivity may be achieved via the creation of organized zones and the use of FancyZones for accurate window snapping. Applications always open in the appropriate location, which reduces the amount of effort spent manually resizing or organizing windows and the amount of distractions that occur.

Using this planned approach, a multi-monitor setup may be transformed from a chaotic state to a very efficient one for professionals who are responsible for multitasking, such as developers and designers.

When it comes to multi-monitor setups, FancyZones is an absolute need.

There is a lack of versatility in the native snapping tools that come with Windows 11. By providing precise control, individualized layouts, and permanent multi-monitor setups, FancyZones expands the capabilities of previously mentioned software.

Multi-screen configurations are a great productivity accelerator because they enable you to keep a consistent and organized workplace, optimize screen real estate, and simplify processes across many monitors. Mastering FancyZones allows you to do all of these things.

Categories
Windows 10

Advanced Clipboard Features Most Users Don’t Know About

Advanced Clipboard Features Most Users Don’t Know About

The majority of users consider the Windows clipboard to be a temporary holding space for text or pictures, which is only helpful until the next copy operation replaces it. In point of fact, the contemporary Windows clipboard is a very effective productivity system that is built to save many things, maintain formatting, and even synchronize material across various devices. These functions are hardly used to their full potential merely due to the fact that they are concealed behind default settings and are seldom discussed in detail.

Clipboard History: Accessing Multiple Items That Have Been Copied At Once

One of the features that comes standard with Windows is a clipboard history function that enables you to copy several bits of text, photos, or links without losing the objects that you copied before. Whenever the clipboard is enabled, it will no longer overwrite previous material with each new copy that is copied. An alternative is that it keeps a list that may be retrieved immediately by using a shortcut on the keyboard.

When dealing with research material, code snippets, or content creation, when constantly moving between duplicated objects is necessary, this function is very useful since it allows for more efficient switching between items. Repetitive copying is substantially reduced thanks to clipboard history, which also speeds up the process of multitasking.

Maintaining a Reusable Clipboard by Pinning Important Items

The history of the clipboard contains the capability to pin copied objects, which ensures that they continue to be accessible even after the system has been restarted. This is of great assistance for material that is used on a regular basis, such as email templates, URLs that are regularly shared, or normal answers.

Items that are pinned serve as a library of clipboards that is semi-permanent, which eliminates the need to preserve such information in separate notes or papers.

Maintaining Content of Clipboards Across Multiple Devices

The contents of the clipboard may be synchronized across many devices that are signed into the same Windows account. Text and photos that have been copied on one device may be pasted on another device nearly quickly thanks to this feature. Once activated, the function operates in the background without any noticeable disruption and does not need any extra settings.

The usage of this feature eliminates the need for users to manually transmit information or utilize messaging applications for little bits of information, hence creating a smooth workflow for users who transition between a desktop computer and a laptop computer.

The ability to support images and rich formatting in the clipboard

It is not just plain text that may be copied to the clipboard in Windows. It is compatible with photos, text that has been prepared, tables, and even emojis. Windows maintains the formatting of the material that you copy from other documents or web pages, which enables you to paste the content precisely how you wanted to paste it.

Designers, content makers, and office users who deal with visually organized information and wish to prevent reformatting after pasting will find this to be an exceptionally helpful feature.

Cleaning the Clipboard Data in Order to Protect Privacy and Security

There is the potential for the history of the clipboard to contain sensitive information such as passwords, secret messages, or personal notes. For the purpose of protecting your privacy, Windows gives you the ability to manually wipe clipboard data. However, pinned objects will not be impacted until they are removed separately.

The implementation of this regulation guarantees that enhancements to productivity will not come at the expense of security, particularly in contexts that are shared or work-related.

Utilizing Keyboard Shortcuts to Achieve Maximum Efficiency with the Clipboard

The clipboard’s capabilities are considerably enhanced when it is used in conjunction with keyboard shortcuts. Users are able to instantly examine the history of their clipboard, choose objects from the past, and paste them straight into programs, as opposed to depending on the standard copy and paste instructions.

Once clipboard shortcuts have been incorporated into everyday workflow, they increase overall productivity while also reducing reliance on operations that are performed repeatedly.

How to Understand the Limits of the Clipboard and Its Performance

The history of the clipboard is very helpful; yet, it does have storage limitations. In the event that capacity is surpassed, older items are immediately deleted, with the exception of entries that have been pinned. Users are better able to moderate their expectations and avoid depending on the clipboard as a long-term storage solution when they are aware of this.

The history of the clipboard is optimized for speed and does not slow down the system when it is used properly, despite the limitations that have been imposed.

Why the Clipboard Features That Are Built-In Are Superior to Those That Are External

Concerns about security, needless system burden, and background activities are often introduced by clipboard managers that are provided by third parties. Without the need for extra software, the native Windows clipboard provides a comprehensive integration with the system, consistent updates, and robust confidentiality restrictions.

With regard to the majority of users, the built-in clipboard offers more than sufficient functionality while also preserving the stability and dependability of the system.

Some Closing Reflections on the Use of Advanced Clipboards

Microsoft’s clipboard is no longer only a simple utility; rather, it has evolved into a fully fledged productivity function. Users have the ability to significantly enhance their day-to-day productivity by activating clipboard history, making wise use of pinning, and taking advantage of cross-device synchronization.

Categories
Windows 10

How to Use Storage Sense to Automate System Cleaning

How to Use Storage Sense to Automate System Cleaning

Over the course of time, Windows systems amass temporary files, update leftovers, cache data, and unneeded things, all of which gradually devour important disk space. There is the possibility of manually cleaning these files; however, doing so takes consistent attention and a grasp of technical details. This whole process may be automated with the help of Storage Sense, which is a built-in function of Windows that is meant to keep your system clean without requiring frequent interaction from the user.

Comprehending the Functions That Storage Sense Actually Performs

Storage Sense is able to perform its function by monitoring the use of the disk and remotely deleting data that are no longer required. Temporary system files, application cache, outdated update files, and objects that have been languishing in the Recycle Bin for more than a certain amount of time are all included in this category. Storage Sense, in contrast to manual cleaning tools, functions completely in the background and adheres to the rules that you command.

The function is intended to be secure and conservative, so guaranteeing that essential system files and personal data are not erased without prior warning.

Adjusting the settings in Windows to enable Storage Sense

It is necessary to explicitly activate Storage Sense since it is currently deactivated by default. As soon as it is activated, Windows will begin monitoring the patterns of storage utilization and will be ready to undertake cleaning actions according on your choices.

Because the activation procedure is straightforward and does not call for any prior administrative experience, it is suitable for users of all experience levels, from novices to power users.

Establishing Schedules for Automatic Cleaning Schedules

One of the most significant benefits of Storage Sense is that it may be operated according to a predetermined timetable. You have the ability to command Windows to clear temporary files on a regular basis, rather than waiting until the storage space is nearly completely filled. By using this preventative measure, abrupt storage shortages may be avoided, and the system’s performance can be maintained consistently.

Storage Sense may be set to run on a daily, weekly, or monthly basis, or it can be set to run just when there is a limited amount of storage space available, based on your use patterns.

Maintaining the Security of Temporary Files

The major focus of Storage Sense is on files that are momentary in nature. These files are produced by Windows and apps during regular operation, and it is generally safe to delete them once they are no longer required.

Storage Sense is able to determine which temporary files may be eliminated without compromising the stability of the system. This has the effect of decreasing clutter while ensuring that current processes are not harmed.

Using Automation to Clean the Recycle Bin

The files that are stored in the Recycle Bin will continue to take up space on the disk until they are deleted permanently. After a certain amount of time has passed, Storage Sense has the capability to automatically empty the Recycle Bin. This prevents files that have been forgotten from eating storage space forever.

This function is especially helpful for users who routinely delete huge files but fail to remember to manually clean the trash can.

Management of the Downloads Folder Cleaning Process

It is common for the Downloads folder to become one of the most unorganized and biggest regions of the system. It is possible to exercise control over this folder via the use of Storage Sense, which enables the automated deletion of files that have not been accessed for a certain amount of time.

This option ought to be used with caution, particularly in the event that the Downloads folder is utilized for the purpose of long-term storage. Maintaining order and preventing the loss of data by mistake is made easier when it is setup appropriately.

Cleaning Up Windows Installations That Have Been Done Before

In the event that a rollback is required, Windows often stores earlier installation files after large updates have been applied. It is possible for these files to use up many gigabytes of storage space. After the rollback time has ended, Storage Sense has the capability to delete these files completely on its own.

This procedure is risk-free for systems that are operating normally following upgrades and do not need the option to return to an earlier version.

Whenever it is required, manually operating Storage Sense

Additionally, Storage Sense enables manual execution at any moment, in addition to its automated capabilities. In situations when storage space is urgently required, as well as after installing or deleting huge programs, this is very helpful.

The outcomes of manual runs are guaranteed to be consistent and predictable since they adhere to the same rules that you have defined.

Over the course of time, monitoring storage savings

In spite of the fact that Storage Sense operates invisibly in the background, users are able to occasionally check the amount of space that has been released. Windows gives you a breakdown of how much storage space is being used, which enables you to determine which categories will benefit the most from automatic cleaning.

Because of this visibility, users are able to fine-tune their settings to achieve greater efficiency over the long run.

What Makes Storage Sense Superior to Manual Cleaning Processes

Manual cleaning requires a significant amount of memory and effort, which often results in variable outcomes. Through the use of cleaning rules in a consistent and automated manner, Storage Sense successfully solves this issue. Due to the fact that it is a native Windows feature, it integrates extensively with the system and eliminates the hazards that are connected with using cleaning programs that are provided by third parties.

Providing a dependable equilibrium between automation, safety, and control is what Storage Sense offers to the majority of its consumers.

Few Closing Remarks Regarding the Automated System Cleaning

When it comes to keeping a Windows system clean and efficient, Storage Sense is a function that is often overlooked yet it is really helpful. Once it has been correctly designed, it eliminates the need for frequent human intervention, minimizes the amount of clutter, and avoids slowdowns that are associated to storage.