How to Rebuild the Windows Search Index to Fix Missing Executable Files
It is possible for users who depend significantly on rapid access via the Start menu or search bar to have disruptions in their productivity and uncertainty when executable files suddenly cease displaying in the search results of Windows. This problem is often associated with issues that occur inside the Windows Search Index, which is a background system that classifies files and directories in order to provide search results in a lightning-fast manner. Because of unexpected shutdowns, system upgrades, or changes to files, the index may become damaged, obsolete, or incomplete over the course of time. It is possible that significant executable files will not appear on the system, despite the fact that they are still there on the system. Rebuilding the search index is a dependable approach that may refresh the database and restore the functionality of the search to its original state. It is possible to overcome difficulties with missing executable files and guarantee a smoother workflow on Windows 11 if you have a thorough grasp of how the indexing system works and how to reset it in the correct manner.
Acquiring Knowledge of the Windows Software Search Index System
The Windows Search Index is a service that runs in the background and is responsible for scanning and cataloging files, programs, and system data in order to provide search results that are both quick and effective. When you input a query into Windows, it utilizes this pre-built index to bring up immediate matches rather than scanning the whole disk for the query. The index contains information on the names of files, their paths, metadata, and in certain instances, the contents of the files themselves. This index also includes executable files, such as program launchers, which helps to ensure that these files are quickly available via the Start menu. On the other hand, if the index becomes faulty or out of current, it is possible that these files will no longer return in the search results. When it comes to detecting and repairing indexing-related problems, having a solid understanding of how this system works is quite necessary.
It is common for executable files to be missing while searching for them.
There might be a number of factors contributing to the disappearance of executable files from the search results screen in Windows. Incomplete updates or system crashes are two major causes that might lead to a damaged search index. This is one of the most prevalent causes. There is also the problem of inappropriate indexing settings, which results in the exclusion of certain directories or file types from the index. Changing the rights of users or the locations of files may also have an effect on the visibility of searches. It is also possible for the background services that are responsible for indexing to cease operating properly, which might result in results that are either incomplete or out of date. In order to assess whether or not it is essential to rebuild the index, it is helpful to identify the main reason. Other modifications may also be needed.
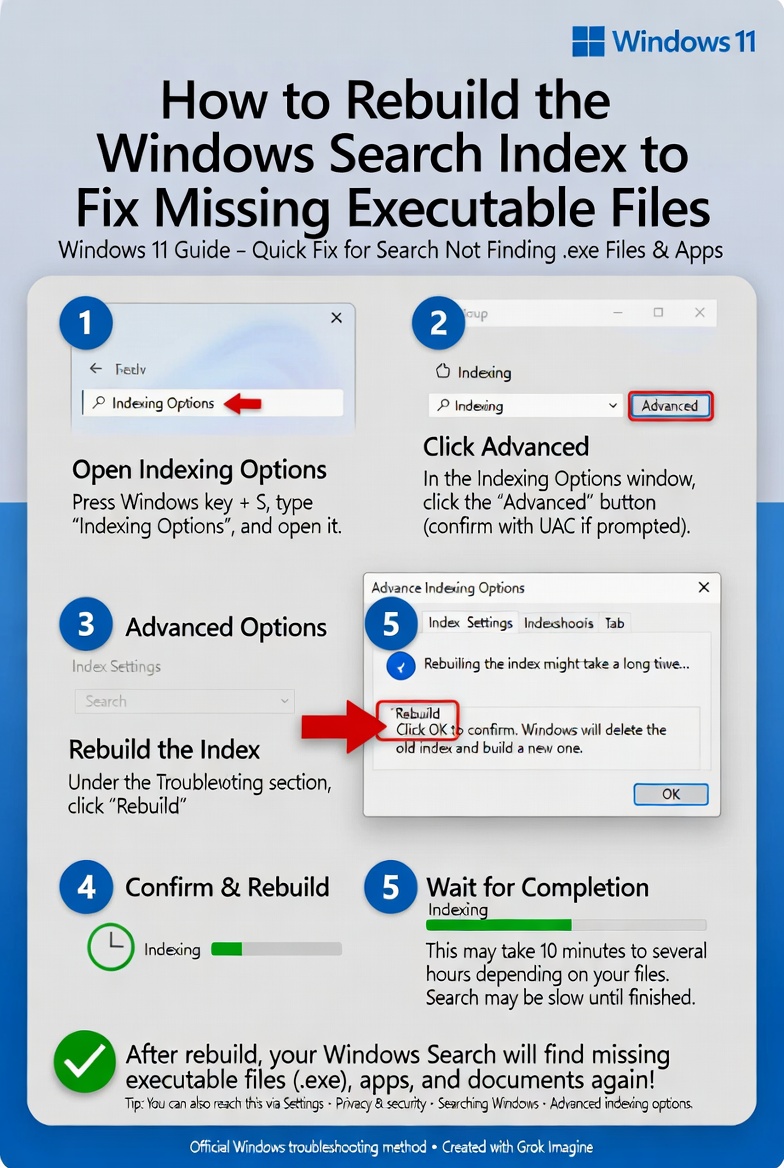
Utilizing Windows 11 to Gain Access to Indexing Options
You will first need to open the indexing settings inside Windows 11 in order to start the process of rebuilding the search index. You are able to do this by using the system settings or control panel, which is where you will discover choices pertaining to advanced setups and indexed locations. The indexing options interface gives a summary of the folders that are presently included in the index as well as the number of objects that have been cataloged. By reviewing these parameters, you will be able to verify whether or not significant folders that contain executable files are being indexed. In order to guarantee that the rebuilding process incorporates all of the pertinent data, this phase is very necessary.
I am in the process of reconstructing the search index.
Before beginning the process of rebuilding the search index, it is necessary to reset the old database and give Windows permission to generate a new database from scratch. You will discover an option to rebuild the index among the advanced indexing options that you use. Windows will destroy the current index after it has been begun, and it will then begin scanning all of the specified places once again. It is possible that this procedure will take some time depending on the amount of data you have and the speed of your machine. In the course of the rebuild, the functionality of the search may be momentarily restricted until the indexing process is finished. Due to the fact that disrupting the process might result in outcomes that are partial, patience is essential. The system need to provide search results that are accurate and up to date after it has completed its functioning.
It is important to provide executable file locations in the index.
After the index has been rebuilt, it is essential to check that all of the required sites that contain executable files have been included. One possible solution to this problem is to create specialized folders or directories for the storage of programs. The executables that are installed by some applications are stored in non-standard locations, which may not be indexed by default. You may guarantee that Windows is able to recognize and show these routes in search results by explicitly include them in the search results. Maintaining constant and dependable search performance requires precise design of indexed sites, which is necessary.
In order to get better results, restarting the Windows Search Services
In some circumstances, if the underlying search service is not operating as it should, rebuilding the index on its own may not be sufficient to completely cure the problem. To help refresh the system and ensure that indexing activities operate efficiently, restarting the Windows Search service may be of great assistance. You are able to do this via the use of system management tools, which allow you to manually stop and resume the service. Doing so eliminates any transient faults that may have occurred and enables the indexing system to function more efficiently. It is common practice to get the greatest results by combining this step with a complete index rebuild.
In order to avoid future indexing problems
The maintenance of a stable system environment and the maintenance of correctly configured indexing settings are both necessary in order to prevent indexing difficulties from occurring. Regular system upgrades, following the correct protocols for shutting down the system, and avoiding sudden disruptions are all ways to assist maintain the index’s integrity. Reviewing indexed locations on a regular basis guarantees that new folders and apps are present in the index. In addition, monitoring the performance of the system may assist in the early identification of possible problems before they have an impact on the operation of the search. Through the use of these principles, you will be able to reduce the likelihood of missing executable files in the future.
Persistent problems need advanced troubleshooting techniques.
In the event that rebuilding the index does not address the problem, it is possible that more difficult troubleshooting may be required. In this context, “running system diagnostic tools” refers to the process of identifying and fixing faulty files, as well as checking for software incompatibilities with third-party applications. It is possible that in some circumstances, it is necessary to either reset the search settings in Windows or conduct a system repair. The examination of system logs may also give insights into the underlying issues that are hurting the performance of indexing algorithms. Through the methodical exploration of these sophisticated choices, you will be able to recognize and resolve even the most complicated problems, therefore guaranteeing that the search feature of Windows continues to be dependable and effectiveness.