Introduction:
The Fairlight audio editor in DaVinci Resolve is a powerful tool that empowers video editors, sound designers, and audio engineers to achieve professional-grade audio editing, mixing, and mastering within the same integrated workflow as their video editing tasks. With a wide range of features and tools at your disposal, the Fairlight audio editor offers unparalleled flexibility and control over every aspect of your project’s sound. In this extensive guide, we’ll explore the ins and outs of using the Fairlight audio editor in DaVinci Resolve, providing you with the knowledge and techniques to unlock its full potential and elevate the audio quality of your video projects to new heights.
Understanding the Fairlight Audio Editor:
Before diving into the specifics of using the Fairlight audio editor, it’s essential to understand its layout, features, and capabilities.
- Interface Overview:
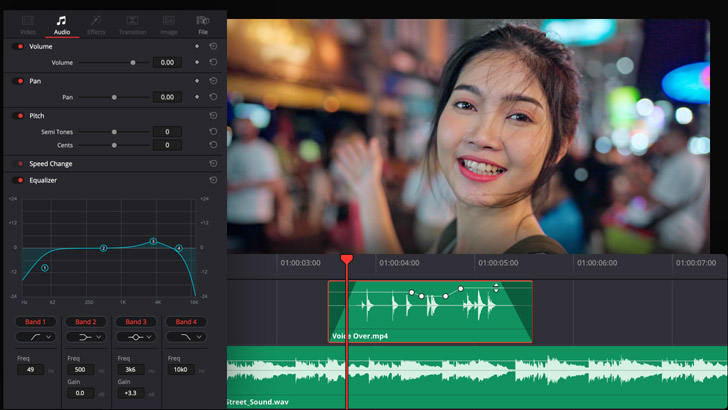
- The Fairlight audio editor interface is divided into several panels and sections, each serving a specific purpose in the audio editing and mixing process. The main components of the interface include the timeline panel, mixer panel, inspector panel, effects library, and meters panel, providing users with comprehensive control over their audio tracks and effects.
- Audio Tracks and Clips:
- Audio tracks and clips are the building blocks of your project’s audio in the Fairlight audio editor. Audio tracks represent individual channels of audio, while audio clips represent segments of audio data within those tracks. Users can create, arrange, and edit audio tracks and clips in the timeline, applying effects, automation, and processing as needed to achieve the desired sound.
- Mixer and Metering:
- The mixer panel provides users with detailed control over the volume, panning, routing, and effects processing of individual audio tracks. Users can adjust faders, knobs, and parameters in the mixer panel to fine-tune the balance and spatialization of their audio mix. The meters panel provides visual feedback on the amplitude, peak levels, and dynamics of audio signals in real-time, allowing users to monitor and analyze their audio levels and dynamics.
- Inspector and Effects Library:
- The inspector panel allows users to access and modify the properties and attributes of selected audio tracks and clips. Users can adjust parameters such as volume, pan, EQ, dynamics, and effects settings in the inspector panel to customize the sound of their audio elements. The effects library provides a vast collection of audio effects, plugins, and processors that users can apply to their audio tracks and clips to enhance their sound quality and creative potential.
Using the Fairlight Audio Editor in DaVinci Resolve:
Let’s explore the step-by-step process of using the Fairlight audio editor in DaVinci Resolve:
- Accessing the Fairlight Page:
- Launch DaVinci Resolve and open your project. Navigate to the Fairlight page by clicking on the Fairlight tab at the bottom of the interface. The Fairlight page provides a dedicated workspace for audio editing and mixing, where you can access all the tools and features of the Fairlight audio editor.
- Importing Audio:
- Before you can start editing and mixing your audio, you need to import audio files into your project. Navigate to the media pool panel and click on the “Import Media” button to import audio files from your computer into your project. Alternatively, you can drag and drop audio files directly into the media pool from your file explorer.
- Arranging Audio Tracks:
- Once you’ve imported your audio files, arrange them in the timeline to create the structure of your project’s audio. Drag and drop audio clips from the media pool into the timeline to create audio tracks, arranging them according to the desired sequence and order. Use the timeline ruler and zoom controls to navigate and zoom in and out of the timeline as needed.
- Editing Audio Clips:
- Edit audio clips in the timeline to trim, split, and adjust their timing as needed. Use the blade tool to split audio clips at specific points, and the selection tool to trim the clips by dragging their edges. Fine-tune the timing and duration of audio clips to synchronize them with video clips and create smooth transitions between audio segments.
- Applying Effects and Processing:
- Apply audio effects and processing to individual audio clips and tracks to enhance their sound quality and creative potential. Navigate to the effects library to access a wide range of audio effects, plugins, and processors, then drag and drop them onto the desired audio clips or tracks in the timeline. Adjust the parameters of the effects to achieve the desired sound and effect.
- Mixing and Balancing:
- Mix and balance your audio tracks to achieve the desired spatialization and balance of your audio mix. Use the mixer panel to adjust the volume, panning, and routing of individual audio tracks, and apply automation to dynamically control volume levels and effects parameters over time. Use the meters panel to monitor and analyze the amplitude, peak levels, and dynamics of audio signals in real-time.
- Exporting Your Project:
- Once you’re satisfied with the audio editing and mixing, export your project to create the final video with audio included. Navigate to the deliver page, configure the export settings, and click “Add to Render Queue” to queue the project for rendering. Then, click “Start Render” to export the video with audio to your desired format and specifications.
Best Practices for Using the Fairlight Audio Editor:
To achieve optimal results when using the Fairlight audio editor in DaVinci Resolve, consider the following best practices:
- Organize Your Workflow:
- Organize your workflow by creating clear and logical session structures, labeling tracks and clips, and using markers and color coding to identify different types of audio elements. A well-organized workflow makes it easier to navigate and edit your project’s audio and ensures consistency and efficiency throughout the editing process.
- Monitor Your Levels:
- Monitor your audio levels throughout the editing and mixing process to ensure that they remain within an optimal range and avoid clipping or distortion. Keep an eye on the meters panel to track the amplitude, peak levels, and dynamics of audio signals in real-time, and make adjustments as needed to maintain balanced and clear audio levels.
- Use Reference Material:
- Use reference material such as professionally produced music tracks, sound effects libraries, or reference videos to guide your decisions when editing and mixing your project’s audio. Compare the sound of your project with reference material to ensure that it meets industry standards and sounds natural and balanced.
- Experiment and Explore:
- Experiment with different audio effects, processing techniques, and mixing strategies to explore creative possibilities and discover new sounds. Don’t be afraid to push the boundaries of conventional audio editing and mixing and experiment with unconventional effects and signal chains to achieve unique and innovative results.
- Save Presets:
- Save custom effect settings, mixer configurations, and automation curves as presets for future use in other projects. Once you’ve dialed in the perfect sound with your chosen settings, save them as presets to streamline your workflow and save time on future projects. Give your presets descriptive names and organize them within the effects library for easy access and retrieval.
Conclusion:
The Fairlight audio editor in DaVinci Resolve is a versatile and powerful tool that empowers users to achieve professional-grade audio editing, mixing, and mastering within the same integrated workflow as their video editing tasks. By understanding its features, tools, and capabilities, and following best practices for audio editing and mixing, you can unlock the full potential of the Fairlight audio editor and elevate the audio quality of your video projects to new heights. Experiment with different techniques, explore creative possibilities, and let your creativity shine as you master the art of audio editing and mixing in DaVinci Resolve’s Fairlight audio editor.