Introduction:
In the dynamic world of digital media, the need to resize images is omnipresent. Whether for web use, print, or social media, maintaining image quality during resizing is a crucial consideration. Adobe Photoshop, a leading software for image editing, offers a powerful tool called Smart Objects that enables users to resize images without sacrificing quality. In this comprehensive guide, we will delve into the step-by-step process of resizing images using Photoshop Smart Objects, ensuring that your visuals remain crisp and clear regardless of size adjustments.
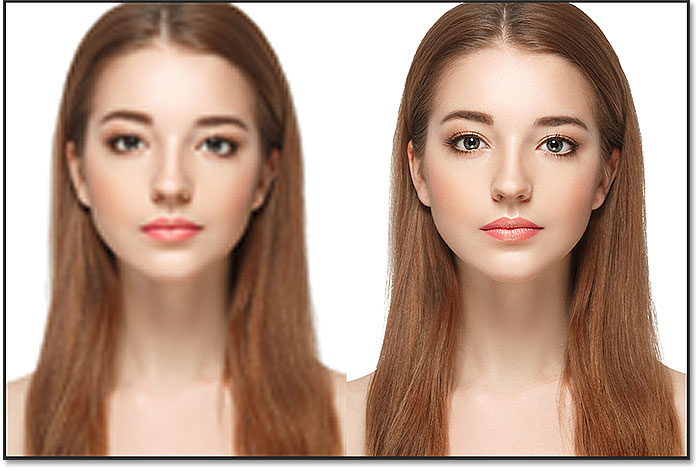
Section 1: Understanding the Importance of Image Quality
1.1 Image Resolution:
- Before diving into Photoshop, understand the concept of image resolution. Resolution is measured in pixels per inch (PPI) or dots per inch (DPI) and determines the level of detail in an image.
1.2 Loss of Quality:
- Traditional resizing methods often result in a loss of image quality, leading to pixelation and a decrease in sharpness. Maintaining image integrity is crucial for professional presentations.
Section 2: Introduction to Photoshop Smart Objects
2.1 What Are Smart Objects?
- Smart Objects in Photoshop act as containers that preserve the original content of an image. They allow non-destructive editing, making them an ideal choice for resizing without quality loss.
2.2 Benefits of Smart Objects:
- Smart Objects retain the image’s original data, preventing pixelation. They offer flexibility in scaling and enable adjustments even after resizing, making them a powerful tool for maintaining image quality.
Section 3: Importing Images into Photoshop
3.1 Open Your Image:
- Launch Photoshop and open the image you want to resize. Ensure that your image is in a high-resolution format for optimal results.
3.2 Duplicate the Layer:
- Right-click on the background layer in the Layers panel and choose “Duplicate Layer.” This step ensures that the original image remains untouched while you work with the duplicate.
Section 4: Converting to a Smart Object
4.1 Convert to Smart Object:
- With the duplicate layer selected, right-click and choose “Convert to Smart Object.” This action encapsulates the image as a Smart Object, preserving its original data.
4.2 Smart Object Icon:
- Note the Smart Object icon in the Layers panel, indicating that the layer has been converted. This icon signifies that the layer is now a Smart Object, ready for non-destructive editing.
Section 5: Scaling and Resizing with Smart Objects
5.1 Free Transform:
- To resize the Smart Object, go to “Edit” > “Free Transform” or use the shortcut (Ctrl+T for Windows, Command+T for Mac). You’ll see handles around the image, allowing you to adjust its size.
5.2 Maintaining Aspect Ratio:
- Hold down the Shift key while dragging the handles to maintain the aspect ratio of the image. This prevents distortion and ensures that the resizing is proportional.
Section 6: Adjusting Smart Object Settings
6.1 Accessing Smart Object Settings:
- Double-click on the Smart Object layer thumbnail in the Layers panel to access its settings. This opens the original image in a new window, providing options for adjustments.
6.2 Making Adjustments:
- Make adjustments to the original image if needed. These adjustments will be reflected in the Smart Object layer on the main canvas, allowing for real-time changes.
Section 7: Applying Filters and Effects
7.1 Smart Filters:
- Smart Objects support Smart Filters, allowing you to apply filters non-destructively. Experiment with filters and effects while maintaining the flexibility to adjust or remove them later.
7.2 Filter Gallery:
- Access the Filter Gallery to apply a combination of artistic and stylistic filters. Smart Objects enable you to experiment with various filters without compromising the original image.
Section 8: Best Practices for Resizing with Smart Objects
8.1 Initial Image Quality:
- Begin with a high-resolution image to ensure the best possible results when resizing. A higher resolution provides more detail and clarity.
8.2 Non-Destructive Workflow:
- Embrace a non-destructive workflow by utilizing Smart Objects. This allows you to iterate through adjustments without permanently altering the original image.
Section 9: Exporting Resized Images
9.1 Save As:
- Once satisfied with the resized image, go to “File” > “Save As” to save it in the desired format and location. Consider saving in a format suitable for your intended use, such as JPEG or PNG.
9.2 Save for Web (Optional):
- For web usage, consider using the “Save for Web” option in Photoshop. This allows you to optimize the image size without compromising quality, crucial for faster loading times.
Section 10: Batch Resizing with Smart Objects
10.1 Creating an Action:
- Streamline the process for batch resizing with Smart Objects by creating a Photoshop Action. Record the steps for resizing, enabling you to apply the action to multiple images simultaneously.
10.2 Batch Processing:
- Use the Batch option in Photoshop to apply your recorded action to multiple images. This efficient workflow ensures consistency in resizing across your image collection.
Section 11: Troubleshooting and Tips
11.1 Pixelation:
- If pixelation occurs during resizing, revisit the Smart Object settings and ensure that the original image’s resolution is adequate for the desired size.
11.2 Experimentation:
- Don’t hesitate to experiment with Smart Objects. Try different adjustments, filters, and resizing options to discover the full range of possibilities they offer.
Conclusion:
Resizing images without losing quality is an artful balance of precision and technique, and Photoshop Smart Objects stand as a powerful tool in achieving this delicate equilibrium. By following the comprehensive guide provided, you can confidently navigate the process of resizing images with the assurance that your visuals will retain their clarity and detail. Remember, the flexibility of Smart Objects empowers you to explore creative possibilities while preserving the integrity of your digital imagery. With this knowledge in hand, you can resize your images with confidence, knowing that each adjustment contributes to the enhancement rather than the compromise of your visual content.