Introduction:
In the realm of digital image editing, achieving optimal sharpness is paramount for conveying visual impact and clarity. Adobe Photoshop, a ubiquitous tool for creative professionals, offers an array of sharpening techniques, and among them, the Smart Sharpen filter stands out as a powerful and versatile tool. This extensive guide aims to delve into the intricacies of using Smart Sharpen in Photoshop, offering insights, tips, and techniques to help photographers and designers elevate their images to new levels of crispness and detail.
Understanding the Basics of Image Sharpening:
- The Importance of Image Sharpness: Image sharpness enhances visual appeal by accentuating details and improving overall clarity. Whether for web content, print materials, or artistic creations, sharp images command attention and leave a lasting impression on viewers.
- Common Causes of Image Blurring: Images can lose sharpness due to various factors, including camera shake, lens imperfections, and resizing. Understanding these factors is crucial for choosing the right sharpening techniques to address specific issues.
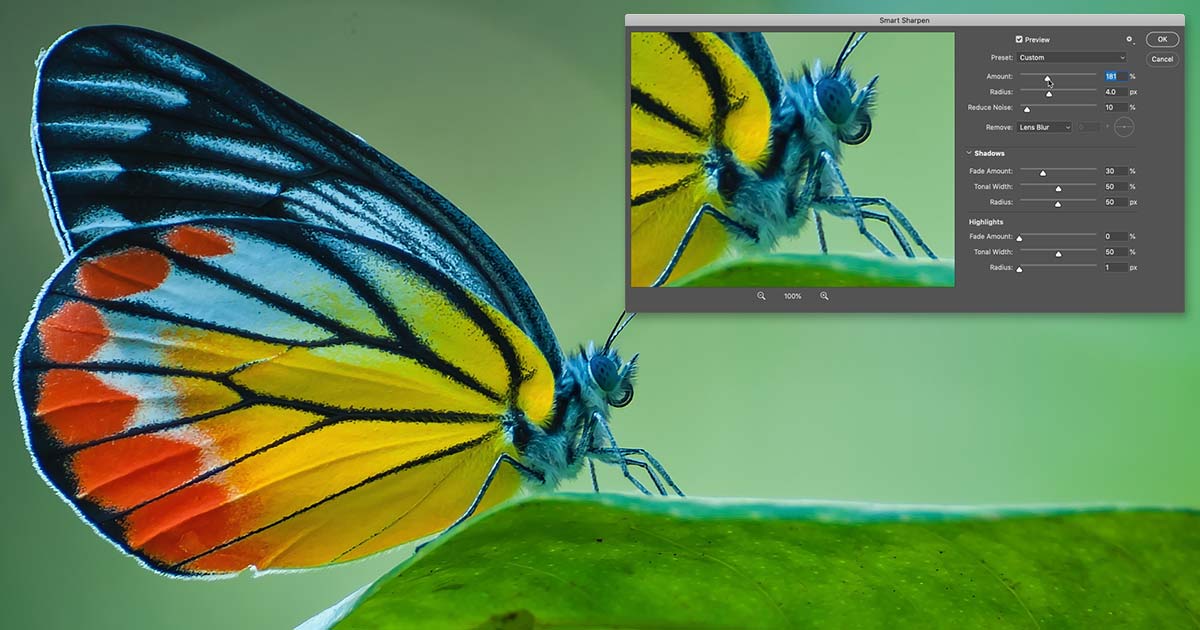
Introduction to Smart Sharpen in Photoshop:
- Evolution of Sharpening Tools: Smart Sharpen represents a significant evolution in Photoshop’s sharpening capabilities. Introduced in later versions, it incorporates advanced algorithms and features that surpass traditional sharpening filters.
- Key Features of Smart Sharpen: Smart Sharpen offers a range of features, including adjustable sharpening amount, radius, and noise reduction. Its unique ability to distinguish between different types of image details and edges sets it apart as a sophisticated and intelligent sharpening tool.
Optimal Workflow for Smart Sharpen:
- Preparing the Image: Before applying Smart Sharpen, ensure that the image is properly preprocessed. This includes addressing any issues related to exposure, color correction, and basic retouching.
- Accessing Smart Sharpen: Navigate to the “Filter” menu in Photoshop, select “Sharpen,” and then choose “Smart Sharpen.” This opens the Smart Sharpen dialog box, providing access to a range of controls.
- Fine-Tuning Sharpening Settings: Adjust the key parameters, including “Amount,” “Radius,” and “Remove” (for noise reduction), based on the specific needs of the image. Experiment with different settings to find the optimal balance between sharpness and natural appearance.
Advanced Techniques and Tips:
- Targeted Sharpening with Masking: Smart Sharpen allows for targeted sharpening by utilizing the “Shadows” and “Highlights” options. Employing masking techniques ensures that sharpening is applied selectively to different tonal areas, preventing over-sharpening in sensitive regions.
- Using the “More Accurate” Option: In the Smart Sharpen dialog box, the “More Accurate” checkbox enhances the algorithm’s precision. While it may slightly increase processing time, it often yields superior results, particularly for high-resolution images.
- Batch Processing with Smart Sharpen: For efficiency in a workflow with multiple images, Smart Sharpen supports batch processing. This enables users to apply consistent sharpening settings across a series of images, maintaining a cohesive look.
- Combining Smart Sharpen with Other Filters: Smart Sharpen can be complemented by other filters in Photoshop. For instance, applying a slight “Gaussian Blur” before Smart Sharpen can simulate a selective focus effect, enhancing the overall aesthetic appeal.
- Preserving Output Quality: When sharpening for specific output formats (web, print, etc.), consider creating separate Smart Sharpen adjustments for each format. This ensures that sharpening is optimized for the unique characteristics of the intended output.
Conclusion:
Mastering Smart Sharpen in Photoshop opens a realm of possibilities for photographers and designers seeking to enhance the sharpness and detail in their images. This sophisticated tool, with its advanced algorithms and versatile features, empowers users to achieve a perfect balance between sharpness and natural appearance. By understanding the nuances of Smart Sharpen and incorporating advanced techniques, creatives can elevate their images, leaving a lasting impact on viewers and establishing a signature style in their visual storytelling. As technology continues to evolve, the role of tools like Smart Sharpen becomes even more pivotal in shaping the future of digital imaging, where precision and artistry converge to define the visual language of tomorrow.