In the digital age, safeguarding your computer against malware, viruses, and other malicious threats is paramount. Windows Defender, a built-in security feature of Windows 7, serves as the frontline defense, protecting your system from various online dangers. In this exhaustive guide, we will delve deep into the functionalities of Windows Defender, providing step-by-step instructions, tips, and best practices for harnessing its power to fortify your system’s defenses.
Understanding Windows Defender in Windows 7:
Before delving into the intricacies of using Windows Defender, let’s first grasp the concept and significance of this indispensable security tool:
- Definition: Windows Defender is an integrated security solution included with Windows 7 that provides real-time protection against malware, spyware, and other malicious software threats.
- Comprehensive Protection: Windows Defender employs a robust set of detection and removal mechanisms to safeguard your system from a wide range of threats, including viruses, worms, Trojans, ransomware, and potentially unwanted programs (PUPs).
- Seamless Integration: Windows Defender seamlessly integrates with the Windows 7 operating system, running quietly in the background to monitor system activity and scan files and programs for malicious behavior.
Using Windows Defender in Windows 7:
Now, let’s explore the step-by-step process of using Windows Defender to protect your system in Windows 7:
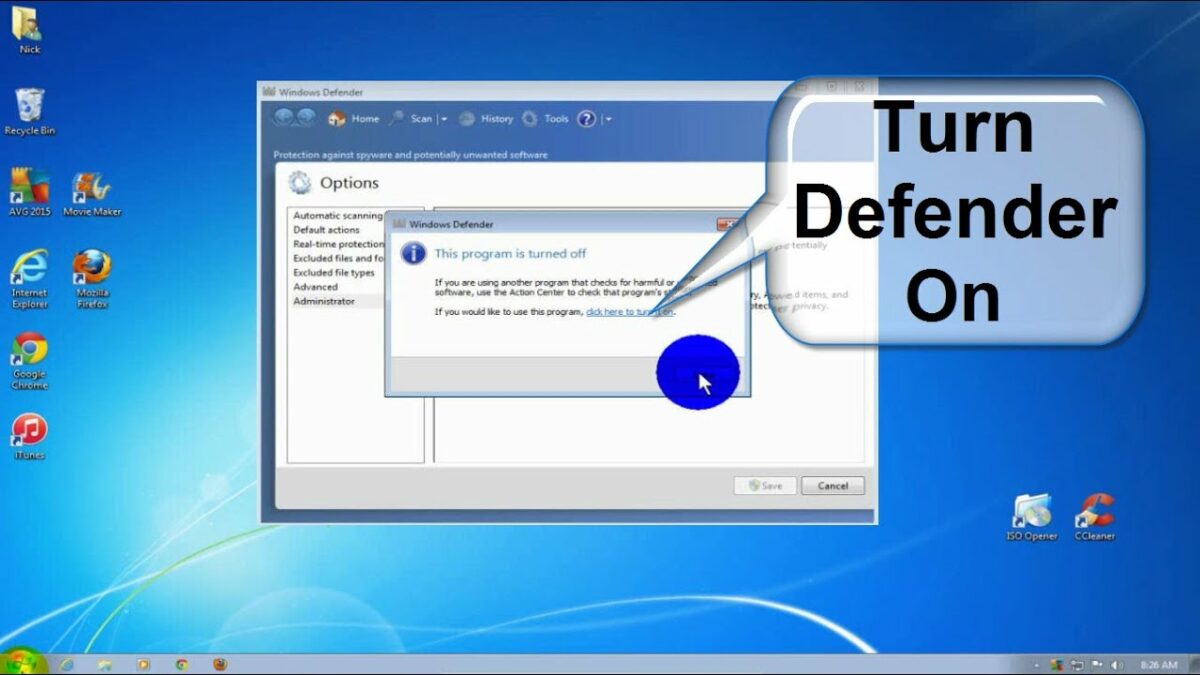
- Accessing Windows Defender:
- Click on the Start button in the taskbar.
- Navigate to “Control Panel” > “System and Security” > “Windows Defender.”
- Updating Definitions:
- Before running a scan, ensure that Windows Defender’s virus and spyware definitions are up-to-date to detect the latest threats.
- Click on the “Update” tab in the Windows Defender window and then click on the “Update definitions” button to download the latest updates.
- Running a Quick Scan:
- Click on the “Home” tab in the Windows Defender window.
- Select the “Quick” scan option and click on the “Scan now” button to initiate a quick scan of your system’s most vulnerable areas.
- Running a Full Scan:
- For a more thorough scan of your entire system, select the “Full” scan option under the “Home” tab.
- Click on the “Scan now” button to start a comprehensive scan of all files and programs on your computer.
- Reviewing Scan Results:
- After the scan is complete, review the scan results to identify any detected threats or suspicious files.
- Windows Defender will categorize detected items as either malware, potentially unwanted software, or clean files.
- Taking Action on Detected Threats:
- Depending on the severity of the detected threats, Windows Defender will provide options to quarantine, remove, or allow them.
- Review the recommended actions and follow the prompts to take appropriate measures to address the detected threats.
Advanced Features and Tips:
To make the most of Windows Defender and enhance your system’s security in Windows 7, consider the following advanced features and tips:
- Customizing Scan Options:
- Explore the “Settings” tab in the Windows Defender window to customize scan options, scheduling, and notification preferences.
- Adjust settings to tailor Windows Defender’s behavior to your specific security needs and preferences.
- Performing Manual Scans:
- In addition to scheduled scans, run manual scans of specific files, folders, or drives as needed.
- Right-click on the file, folder, or drive you want to scan and select “Scan with Windows Defender” from the context menu.
- Using Real-Time Protection:
- Enable real-time protection to continuously monitor your system for malware and other threats in real-time.
- Real-time protection automatically scans files and programs as they are accessed or downloaded, providing proactive defense against emerging threats.
- Updating Windows Regularly:
- Keep your Windows 7 operating system up-to-date with the latest security updates and patches provided by Microsoft.
- Enable automatic updates or manually check for updates regularly to ensure that your system is protected against known vulnerabilities.
Conclusion:
Windows Defender is a powerful security tool that provides essential protection against malware, viruses, and other malicious threats in Windows 7. By following the comprehensive guide outlined above, users can harness the capabilities of Windows Defender to fortify their system’s defenses, detect and remove threats, and maintain a secure computing environment. Whether it’s running scans, updating definitions, or customizing settings, Windows Defender offers a robust set of features and functionalities to safeguard your system against online dangers. So take charge of your system’s security today, utilize Windows Defender with confidence, and enjoy peace of mind knowing that your Windows 7 system is protected against malware and other threats.