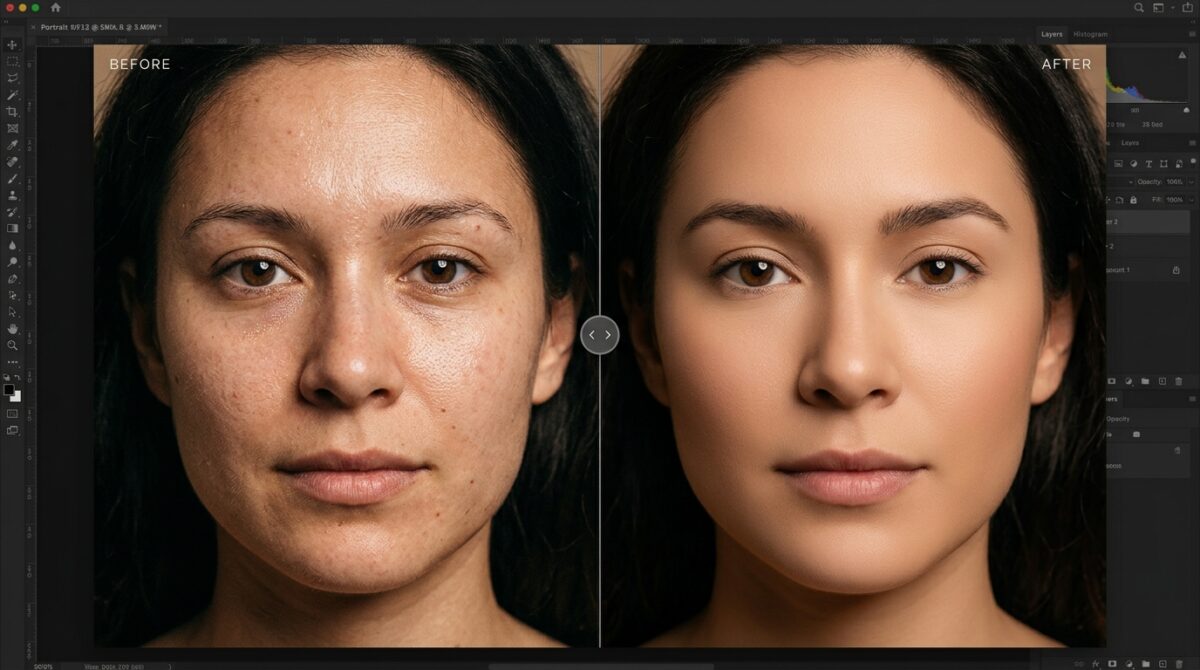
Setting Up Non-Destructive Frequency Separation Actions for Advanced Skin Retouching Without Texture Degradation
Professional skin retouching involves striking a fine balance between fixing apparent flaws and maintaining the natural texture of the skin. Color separation in Adobe Photoshop is a popular method used by retouchers to separate the color and tonal differences from the surface texture. Set up correctly, this technique will allow you to minimize uneven skin tones, smooth out distracting transitions and repair isolated blemishes without needlessly blurring pores or facial texture. But bad actions, wrong blur settings and too many manual tweaks can lead to plastic-looking skin and the loss of vital features. Good non-destructive frequency separation workflow gives photographers and designers more control over every step of retouching process. Photoshop actions may simplify repetitious setup procedures, help maintain consistency between photos, and boost editing productivity for portraiture, beauty photography and commercial campaigns. Retouchers might accomplish better results, yet keep the naturalness of skin, by comprehending the fundamental approach and constructing a flexible action with the right protections.
What is Frequency Separation in Photoshop?
Frequency separation is a method that splits an image into two complementary layers that include different sorts of visual information. The low frequency layer maintains broad color transitions, shadows, highlights and tonal variations, and the high frequency layer retains minute details such as pores, wrinkles, hair and other surface textures. This separation allows the retoucher to repair inconsistent color on the low frequency layer without directly painting over the original fine texture. Localized texture problems can be handled on the high frequency layer with most of the underlying color information left intact. This technique is very beneficial for professional pictures where tiny defects, patchy red coloration and uneven transitions in tone need to be corrected without excessive smoothing. However, frequency separation does not inevitably enhance the skin quality. “It’s just a more regulated method of working with the many qualities of the image.” Retouchers still have to determine what layer to do each modification on, and how much to do. Even if the layers of the frequency separation are technically set up correctly, too many corrections might cause obvious transitions, repeating texture patterns and false skin.
Preparing the Image Before Making an Action
The good frequency separation workflow starts with a properly prepared Photoshop document. Open a representative portrait and check its resolution, lighting, skin texture and previous retouching before generating the action. The image should contain enough details such that the high-frequency layer can keep significant texture. If the photo has already been aggressively smoothed, sharpened, or compressed, then frequency separation may not be able to recover the missing information. Keep a separate working copy of the original document, and, when possible, leave the source unmodified. Set the working document to the proper color mode and bit depth for the planned workflow, avoiding needless conversions that could compromise color or compatibility. Clear temporary selections, ensure the proper picture layer is active, and set a standard layer naming convention before recording the activity. Testing the method on photos of different resolutions is particularly useful, since blur settings that work for one portrait might not work for another. Good document preparation minimizes errors in the recording and makes the resulting action easier to reuse in numerous projects.
How to Record a Non-Destructive Frequency Separation Action
In Photoshop, there is the Actions panel where you may record a series of steps and then play them back when you find yourself in a similar editing situation. You can open the panel through the Window menu and start a new action and give it a good name that describes it and then start recording. Duplicate the created image layer twice and rename the copies to reflect the low-frequency and high-frequency parts. Leave the original image layer as it is, preferably locked so you can always refer to it. Gaussian Blur the low frequency layer with a radius suitable to the photo resolution and texture size. Then, select the high frequency layer and, using the proper Apply Image settings, find the texture information between the blurred and original layers. A typical configuration for an 8-bit RGB workflow is to subtract the low-frequency layer with a scale of two and an offset of 128, and then a Linear Light blend. Other bit depths need other settings. The action needs to match the document setup. Then check that the combined layers are a good reproduction of the original image and stop recording.
Choosing the Right Gaussian Blur Radius
The Gaussian Blur radius is what decides what image information is retained in the low frequency layer and what information is retained in the high frequency layer. If the radius is too tiny, low-frequency components can contain pores and fine features, making tonal adjustments less effective. A huge radius can eliminate crucial face structure from the texture component, and when the layers are altered individually this can lead to strange results.” The right setting depends on image resolution, distance to the subject, illumination and the scale of the skin elements you are retouching. Instead of applying a one size fits all pixel value, zoom into the portrait and raise the radius until the finest relevant skin texture is no longer clearly evident in the blurred layer. Simultaneously, keep larger transitions so that the desired low-frequency information can be extracted. Test the separation by turning on and off the high-frequency layer temporarily and check whether the original image appearance is recreated when both layers are turned on. The actions you record can reuse fixed values so consider making distinct actions for popular image resolutions or adding a purposeful manual checkpoint for changing the blur radius.
Keeping Texture Integrity While Retouching Skin
A good frequency separation process is primarily concerned with the preservation of texture. The high frequency layer should maintain the natural details of the original shot, including pores, tiny wrinkles and minor changes in surface features that contribute to realistic skin. Whenever possible, repair texture defects with moderate Clone Stamp (or other retouching tools) on a separate transparent layer, rather than continually touching the original frequency layer. Optionally, set the tool to sample the relevant visible layers and select nearby source areas that share comparable texture, lighting and orientation. Don’t clone the same little area over and over. Recognizable patterns can make restored skin look fake. Tonal adjustments can be done on the low frequency layer using a soft brush, appropriate sampling settings and low opacity/flow. Instead of painting broad flat areas that eliminate natural tonal diversity, make small modifications. Check the transition between the altered and the unaffected areas frequently and compare the editing output with the original image. The idea is not to get rid of every pore or line, but to minimize distracting defects while keeping the subject looking genuine.
Layering and Creating Action Controls that can be reused
Good layer structure makes frequency separation easy to comprehend, modify and trouble-shoot. Place the low and high frequency layers in a clearly designated group and keep the original image layer distinct from the retouching stack. Give your components descriptive titles so other editors can understand their purpose without having to access individual layer settings. Create separate transparent retouching layers above the frequency separation group for localized texture fixes and other non-destructive edits for more flexibility. Photoshop actions can be used to automate the creation of these layers, applying consistent names and setting the necessary blending modes. But we should not think of acts as fully adaptable systems. They can assume the current document, the selected layer, the bit depth, the color mode, and the existing layer structure. If these criteria are not the same as those used in the recording, the action may fail or yield an incorrect result. Test the action on copies of crucial client files before you run it on the real thing. If there are several editors on a project, specify the desired layer structure and document which changes should be separated from the original image data.
Common Frequency Separation Retouching Mistakes to Avoid
There are a few flaws that can ruin an otherwise perfectly crafted frequency separation operation. Too much Gaussian Blur can break the image apart at the wrong scale, and wrong Apply Image settings can end up with a poor high frequency layer that does not get the original shot back. You may also get tonal shifts or an unexpected contrast if you choose a blending mode that does not match the preset calculation settings. Another typical problem is when retouchers make their tonal adjustments too broad. This might result in flat (or disconnected from the lighting on the face) skin. Texture retouching can be just as troublesome when the same source area is cloned onto many areas or when fine lines are erased without regard to the natural qualities of the image. To avoid these problems, check the separation immediately after generating the layers by comparing the combined output to the original image. If obvious discrepancies show up when any retouching has not yet started, check the layer calculations, blend modes, opacity, and document bit depth. -Make copies of working action versions and edit in a test doc before swapping out a trusted setup. Systematic checks are more reliable than trying to patch up a bad separation after a lot of editing has been done.
Testing, Saving and Improving Photoshop Actions
Before applying a frequency separation step in a typical production workflow, it should be tested on representative portraits. Add photographs with varying resolutions , skin tones , lighting circumstances and texture levels so that potential constraints become visible . Make that the action creates the correct layers, applies the proper blend modes, and keeps the original image looking the same when the layers are merged. If the action relies on certain number settings, make explicitly identified alternatives for different bit depths or typical production needs. Save the completed action set using the Actions panel for backup or to transfer the action set to another workstation. If you are going to make significant modifications to the workflow , make a copy of the original action as a separate one . This way , you can always go back to the prior version if you have errors in the new process . After updating Photoshop or changing team practices, examine the action from time to time, especially if the automation depends on menu commands or document-specific assumptions. You can use a well-tested action to reduce recurrent setup time, but still have the option of manual judgment when the image properties are different. Regular testing and documenting helps to ensure that professional retouching projects remain consistent and reliable.
Setting up a professional non-destructive retouching workflow
The best frequency separation approach is an automated setup with deliberate hand editing. Take a clean source image, construct the frequency separation layers with known settings and keep the original photograph for comparison and recovery. Fix broad color and tonal discrepancies on the low frequency component and fix isolated texture issues with subtle, localized modifications. Whenever possible, include any extra adjustments on their own layers so that individual edits can be changed without having to rebuild the entire manuscript. Look at the outcome at normal size and at close-up size, noticing the pores, face contours, highlights, shadows, and transitions between unedited and modified areas. Do not use frequency separation instead of proper illumination correction, cautious dodge and burn, or intelligent color grading when those procedures are a superior solution to the problem. Save your creation as a layered PSD file, then create a separate delivery copy based on the required output needs. Using a reliable Photoshop action, resolution-aware blur options, careful layer calculations and disciplined retouching methods, designers may not only increase their productivity without losing skin texture but also achieve natural, professional portrait results.