AutoCAD, the industry-leading computer-aided design (CAD) software developed by Autodesk, offers a wide array of tools and commands for creating precise and detailed drawings. Among these tools, the INSERT command stands out as a fundamental feature for adding blocks or external references (Xrefs) into drawings. In this comprehensive guide, we delve deep into the intricacies of using the INSERT command in AutoCAD, exploring various methods, techniques, and best practices for optimal utilization.
Understanding the INSERT Command in AutoCAD:
The INSERT command in AutoCAD allows users to insert blocks or external references (Xrefs) into drawings, providing a convenient way to reuse existing geometry, symbols, or entire drawings. By using the INSERT command, users can incorporate standardized components, such as furniture symbols, equipment layouts, or architectural details, into their drawings, enhancing productivity and maintaining drawing consistency. The INSERT command facilitates collaboration and interoperability by enabling users to reference external drawings without physically embedding them into the current drawing.
Using the INSERT Command:
AutoCAD offers multiple methods for using the INSERT command to insert blocks or Xrefs into drawings:
1. Command Line Input:
The most straightforward method for using the INSERT command is through command line input. To insert blocks or Xrefs using the command line, follow these steps:
- Type “INSERT” in the command line and press Enter to activate the INSERT command.
- Specify the path or browse to the location of the block or Xref file.
- Choose the insertion point for the block or Xref.
- Optionally, specify other insertion parameters such as scale, rotation, and insertion units.
- Press Enter to insert the block or Xref into the drawing.
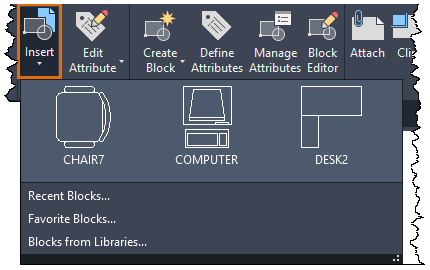
2. Ribbon Interface:
AutoCAD’s Ribbon interface provides a graphical user interface for accessing commands and tools. To insert blocks or Xrefs from the Ribbon interface, follow these steps:
- Navigate to the Insert tab on the Ribbon.
- Click on the Insert panel to expand it.
- Click on the Insert icon to activate the INSERT command.
- Specify the path or browse to the location of the block or Xref file.
- Choose the insertion point for the block or Xref.
- Optionally, specify other insertion parameters using the options provided in the Ribbon interface.
- Click OK or press Enter to insert the block or Xref into the drawing.
3. Toolbar or Tool Palette:
Users can also access the INSERT command from toolbars or tool palettes for quick access and convenience. Simply click on the Insert tool icon in the toolbar or tool palette to activate the INSERT command and follow the prompts to insert blocks or Xrefs.
Key INSERT Command Options:
When using the INSERT command in AutoCAD, users can specify various options and parameters to customize the insertion process. Key options include:
- Insertion Point: Specify the insertion point for the block or Xref, determining where it will be placed in the drawing.
- Scale: Optionally, specify a scale factor to resize the block or Xref during insertion.
- Rotation: Optionally, specify a rotation angle for the block or Xref during insertion.
- Path Type: Choose whether to specify the path to the block or Xref file relative to the current drawing or using a full path.
Advanced Techniques:
In addition to basic insertion methods, AutoCAD offers advanced techniques and tools for enhancing the INSERT command:
- Dynamic Blocks: Insert dynamic blocks with custom properties and parameters that allow for dynamic manipulation and variation of block geometry.
- Xref Management: Manage external references (Xrefs) by attaching, detaching, reloading, or unloading Xrefs as needed to maintain drawing organization and performance.
- Attachment Clipping: Apply clipping boundaries to Xrefs to control their visibility and appearance within the drawing viewport, enhancing drawing clarity and focus.
Best Practices:
To achieve optimal results when using the INSERT command in AutoCAD, it’s essential to follow these best practices:
- Organize Block Libraries: Maintain organized block libraries or catalogs containing commonly used blocks to facilitate easy access and reuse across multiple projects.
- Standardize Insertion Parameters: Establish and adhere to standards for insertion parameters such as insertion point, scale, and rotation to ensure consistency and uniformity in block placement.
- Reference External Drawings Carefully: Exercise caution when referencing external drawings (Xrefs) to avoid issues such as broken references, file path errors, or unintended changes to linked drawings.
- Regularly Review and Update Xrefs: Periodically review and update external references (Xrefs) to reflect changes in linked drawings and ensure drawing accuracy and integrity.
Conclusion:
In conclusion, mastering the INSERT command in AutoCAD empowers designers and drafters to efficiently incorporate blocks or external references (Xrefs) into drawings, enhancing productivity, maintaining consistency, and facilitating collaboration. By understanding the various methods, options, and best practices for using the INSERT command, users can streamline the drawing process, improve drawing organization, and achieve superior results in their projects. With AutoCAD’s versatile tools and features, designers can leverage the power of the INSERT command to optimize workflows and create high-quality drawings with ease.