Introduction:
The world of digital art offers boundless opportunities for creative expression, and the fusion of reality with rotoscope-style painting stands as a testament to the marriage of traditional and contemporary artistic techniques. Adobe Photoshop, a powerhouse in graphic design, opens the door to a realm where reality intertwines with the imaginative strokes of a rotoscope-style painting. This comprehensive guide will unravel the intricate steps, creative considerations, and advanced techniques required to master the art of combining reality with a rotoscope-style painting, transforming ordinary images into captivating visual narratives.
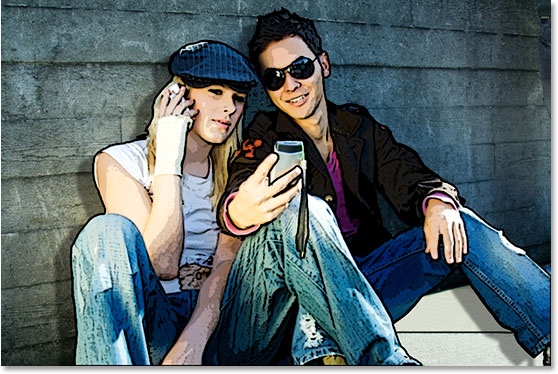
I. Understanding the Rotoscope-Style Aesthetic:
- Origins of Rotoscope: Delve into the origins of rotoscope, a technique that traces over live-action footage to create a distinctive animated or painterly effect. Understand how this style marries reality with artistic interpretation.
- Characteristics of Rotoscope-Style Painting: Analyze the key characteristics of rotoscope-style painting, including bold outlines, simplified forms, and a balance between realism and abstraction. These elements form the foundation for the creative fusion with reality.
II. Selecting an Appropriate Image:
- Choosing a Dynamic Image: Start with an image that possesses dynamic elements, interesting compositions, or distinctive subject matter. The chosen image serves as the canvas onto which the rotoscope-style painting will be overlaid.
- Considering Composition: Analyze the composition of the image to identify areas that can be enhanced or transformed through the rotoscope-style aesthetic. Elements like facial expressions, gestures, or intricate details often lend themselves well to this artistic fusion.
III. Preparing the Base Image:
- Color Correction and Enhancement: Begin by performing basic color correction on the base image. Adjust saturation, brightness, and contrast to create a balanced foundation that complements the intended rotoscope-style transformation.
- Retouching and Cleaning: Use Photoshop’s retouching tools to clean up the base image. Remove distractions, blemishes, or unwanted elements that may interfere with the harmonious blend of reality and rotoscope-style painting.
IV. Understanding Rotoscope Techniques:
- Outlining and Simplification: Familiarize yourself with the techniques of outlining and simplifying forms, two key aspects of the rotoscope style. Understand how bold, stylized outlines contribute to the visual impact of the final composition.
- Balancing Realism and Abstraction: Explore the delicate balance between realism and abstraction in rotoscope-style painting. Identify areas where you can retain realism for a recognizable base while introducing abstract elements for artistic flair.
V. Creating the Rotoscope-Style Overlay:
- Tracing Over Image Elements: Begin the process of rotoscope-style painting by tracing over specific elements in the base image. Utilize brushes with bold strokes to outline shapes and forms, capturing the essence of the subjects.
- Selective Detailing: Apply selective detailing in the rotoscope-style overlay. Decide which elements require intricate detailing to maintain realism and where abstraction can be introduced for a more painterly effect.
VI. Layering and Blending Techniques:
- Creating Rotoscope Layers: Organize your work by creating separate layers for the rotoscope-style elements. This allows for greater flexibility in adjusting opacity, blending modes, and fine-tuning individual components.
- Blending with the Base Image: Experiment with blending modes to seamlessly integrate the rotoscope-style overlay with the base image. Modes like Multiply or Overlay often work well to enhance the interplay of colors and tones.
VII. Mimicking Brushstrokes and Textures:
- Rotoscope Brush Sets: Source or create brush sets that emulate the characteristic strokes of rotoscope-style painting. Utilize these brushes to add texture, depth, and painterly effects to the overlay.
- Matching Textures with Reality: Pay attention to the textures present in the base image and mimic them in the rotoscope-style overlay. This step contributes to a cohesive and unified look, ensuring that the painted elements integrate seamlessly.
VIII. Color Palette Harmonization:
- Selective Color Adjustments: Implement selective color adjustments to harmonize the color palette between the base image and the rotoscope-style overlay. This process involves matching hues, tones, and saturation levels for a unified visual experience.
- Experimenting with Color Grading: Experiment with color grading techniques to enhance the overall atmosphere of the composition. Consider introducing subtle shifts in color temperature or introducing gradients that complement the narrative.
IX. Creating Depth and Perspective:
- Layering for Depth: Leverage layering techniques to create depth within the composition. Arrange rotoscope-style elements in a way that mimics foreground and background elements, enhancing the overall sense of perspective.
- Applying Depth of Field Effects: Introduce depth of field effects to selectively blur or sharpen certain areas. This technique directs focus to specific subjects while adding a cinematic quality to the combined reality and rotoscope-style painting.
X. Fine-Tuning with Layer Styles and Filters:
- Layer Styles for Realism: Apply layer styles to the rotoscope-style elements to enhance realism. Techniques like adding a subtle drop shadow or inner glow contribute to the integration of painted elements with the base image.
- Filters for Artistic Effects: Experiment with artistic filters in Photoshop to further enhance the rotoscope-style painting. Filters like Oil Paint or Poster Edges can add unique textures and effects that elevate the overall aesthetic.
XI. Attention to Details:
- Micro-Details with Brushes: Utilize brushes to add micro-details, such as highlights, shadows, or intricate patterns, to specific areas of the rotoscope-style overlay. This meticulous step enhances the overall realism and visual interest.
- Consistent Stylistic Elements: Maintain consistency in stylistic elements across the composition. Whether it’s the brushstrokes, color palette, or level of abstraction, a cohesive stylistic approach unifies the combined reality and rotoscope-style painting.
XII. Final Review and Adjustments:
- Zooming In for Precision: Zoom in for a close inspection of the entire composition. Pay attention to details, edges, and the overall coherence of the combined elements. Make iterative adjustments to achieve a seamless fusion of reality and rotoscope style.
- Iterative Refinement: The process of combining reality with a rotoscope-style painting may involve several rounds of refinement. Iteratively adjust layers, colors, and stylistic elements until the desired visual harmony is achieved.
XIII. Saving and Exporting:
- Preserving Layers for Flexibility: Save the Photoshop project file with layers intact to retain flexibility for future adjustments. This is particularly useful when fine-tuning specific elements or exploring alternative compositions.
- Exporting for Different Platforms: When satisfied with the composition, export the final image in the desired format. Consider the platform where the image will be showcased – whether for print, web, or artistic exhibitions – and adjust the resolution accordingly.
XIV. Exploring Artistic Variations:
- Genre-Specific Adaptations: Experiment with combining reality and rotoscope-style painting across different genres. Adapt your techniques to suit the thematic requirements, whether it’s a surreal dreamscape or a vibrant urban scene.
- Cinematic Homage: Pay homage to cinematic styles by incorporating elements reminiscent of classic films. This approach adds a nostalgic touch and showcases your ability to capture the essence of cinematic storytelling.
XV. Troubleshooting Common Challenges:
- Maintaining Realism: Ensure that the rotoscope-style elements maintain a level of realism that complements the base image. Address any discrepancies in lighting, shadows, or proportions to uphold visual coherence.
- Refining Edges and Transitions: Pay special attention to the edges and transitions between reality and the rotoscope-style overlay. Use brushes and masks to refine these areas, ensuring a seamless and natural integration.
XVI. Inspiration and Learning Resources:
- Study Rotoscope Artists: Explore the work of artists renowned for their rotoscope-style paintings. Analyze their techniques, stylistic choices, and creative approaches to gain inspiration for refining your own fusion of reality and painting.
- Online Courses and Tutorials: Engage in online courses and tutorials dedicated to advanced Photoshop techniques. Continuous learning and exposure to diverse styles contribute to the evolution of your skills in combining reality with a rotoscope-style painting.
XVII. Conclusion: Mastering the Art of Combining Reality with a Rotoscope-Style Painting in Photoshop
In conclusion, combining reality with a rotoscope-style painting in Adobe Photoshop is an intricate and rewarding process that allows digital artists to bridge the gap between traditional and contemporary aesthetics. Through a combination of tracing, painting, and meticulous detailing, ordinary images can be transformed into captivating visual narratives that blur the lines between reality and artistic interpretation. Armed with the comprehensive guide provided here, aspiring creators can embark on a journey of mastery, exploring the intricacies of this artistic fusion and leaving an indelible mark on the canvas of digital creativity.